Managing your alerts
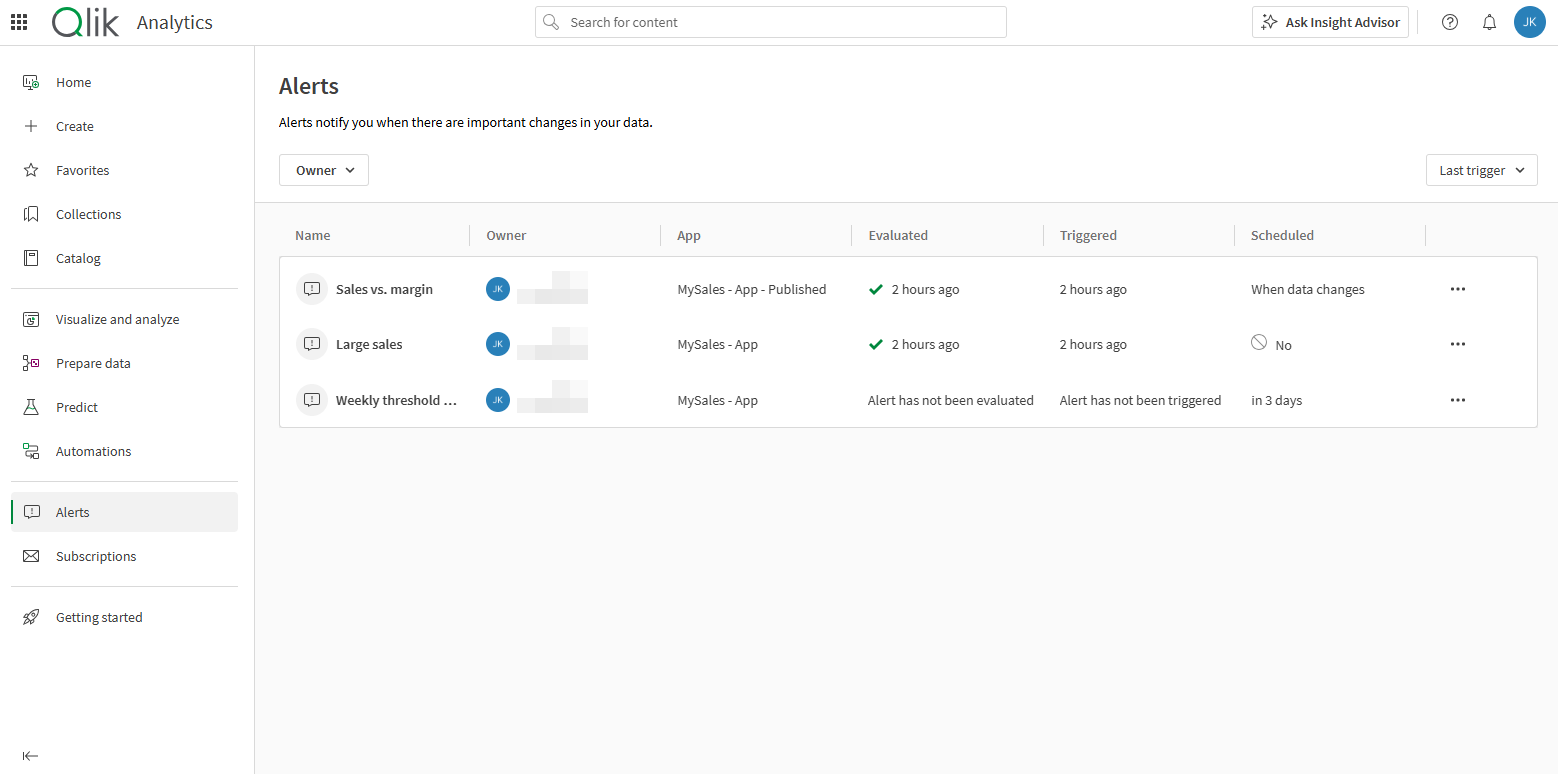
Click Alerts in the Analytics activity center to see a list of alerts owned by you, as well as alerts that have been shared with you.
You can click on an alert to see more details, or you can use the action menu to the right of each alert.
Alerts section of activity centers

You can filter and sort the alerts on the Alerts page. You can refine your list by alert owner (anyone, you, or others), or search for alerts owned by a specific user. The alerts in the list can be sorted by time of last evaluation, the last time triggered, or alphabetically by name.
Managing alerts that you own
If you are the owner of the alert, you can perform the following actions:
- Details
View details, history, recipients, and notification preferences.
-
Notification settings
Manage how you want to receive notifications sent by this alert.
If you go to Settings > Notifications you can change global alert settings. To change the settings for a specific alert, click Alerts in the Analytics activity center. Find the alert, click the
menu, and select Notifications settings.
Information noteWeb notifications are available for 90 days, after which they are deleted.
-
Edit
Edit the alert in the app with the selections used to create the alert.
-
Evaluate now
Evaluate the alert manually.
-
Enable / Disable
Turn scheduled evaluation on and off.
-
Recipients
View the recipients of the alert. If you are the owner of the alert, you can remove recipients.
-
Delete
Delete the alert. This deletes the alert for all recipients as well.
-
Data & conditions
View measures, dimensions, selections, and conditions used in the alert. You can also go to the sheet where the alert was created with the selections used in the alert with View in app.
-
History
View the history of when the alert was triggered.
Managing alerts that have been shared with you
The following actions are available for alerts that have been shared with you.
-
Details
View details, history, recipients, and notification preferences.
-
Notifications
Manage how you want to receive notifications sent by this alert.
If you go to Settings > Notifications you can change global alert settings. To change the settings for a specific alert, click Alerts in the Analytics activity center. Find the alert, click the
menu, and select Notifications settings.
Information noteWeb notifications are available for 90 days, after which they are deleted.
-
Data & conditions
View measures, dimensions, selections, and conditions used in the alert. You can also go to the sheet where the alert was created with the selections used in the alert with View in app.
-
History
View the history of when the alert was triggered.
-
Unsubscribe
Unsubscribe from the alert.
How timezones are displayed for alerts and subscriptions with recurring schedules
In Qlik Cloud activity centers, the time or timezone displayed will usually match the timezone you have set in your personal settings. One exception is the recurring interval schedule for alerts and subscriptions.
If you look at the Details page for an alert or subscription, you can see the next scheduled run-time under Scheduled. The time under Scheduled will reflect your timezone. If you hover over the , a tooltip will appear showing how often the subscription or alert is sent.
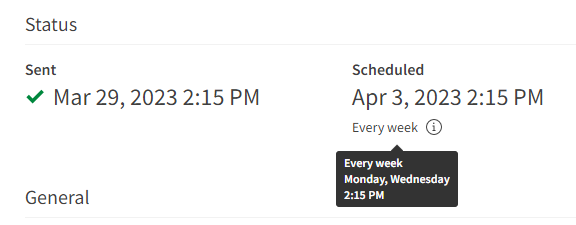
This image shows what it looks like when the creator and recipient live in the same timezone:
-
The next scheduled run-time is: April 3, 2023 at 2:15 PM.
-
The dark grey tooltip shows how often the subscription is sent: Every week, Monday and Wednesday, at 2:15 PM.
A subscription details page, as seen by a recipient who is in the same timezone as the creator.

However, the tooltip will show a if the alert or subscription was created in a different timezone than the recipient. In this case, the schedule will be shown in the timezone the alert or subscription was created.
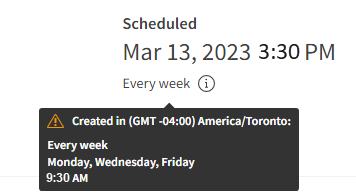
For example, a user in Toronto, Canada (GMT-4) creates a subscription. They add a recipient who lives in Stockholm, Sweden (GMT+2). There is a 6-hour time difference between them. The Swedish recipient checks the details page to find out how often they will receive this subscription. Under Scheduled, the time displayed is in the correct timezone: Stockholm, Sweden. However, if the recipient hovers over the , the tooltip shows the entire subscription schedule in the Canadian timezone:
-
The next scheduled run-time is March 13, 2023, 3:30 PM.
-
The dark grey tooltip shows the subscription schedule, but in the Canadian timezone:
Created in (GMT -4:00) America/Toronto: Every week, Monday, Wednesday, Friday 9:30 AM.
The schedule of a subscription created in Canada, as seen by a recipient in Sweden.

Managing alerts as an admin
Tenant and analytics admins can manage all alerts in the Administration activity center.
-
Delete alerts.
-
Enable and disable alerts.
-
Change the owner of an alert.
-
Edit alert schedules.
For admin information, see Enabling and managing data alerts
