
Deploying and installing Qlik add-ins for Microsoft Office
Last updated: 10/2/2026Deploy and install Qlik add-ins for Microsoft Office to allow users in your organization to create report templates. Upload report templates created with the add-ins into the Qlik Cloud application to generate report output from report tasks.

Qlik add-ins for Microsoft Office can be deployed and installed for compatible web and desktop versions of Excel, PowerPoint, and Word within Microsoft 365.
Add-ins are installed using a manifest file. This manifest file is required for the Microsoft 365 administrator (or possibly a user, in certain installation methods) to deploy and install add-ins for themselves or users in their organization. A manifest file allows installation of add-ins for a single Qlik Cloud tenant.
What are Qlik add-ins for Microsoft Office?
Qlik add-ins for Microsoft Office are:
-
Qlik add-in for Microsoft Excel
-
Qlik add-in for Microsoft PowerPoint
-
Qlik add-in for Microsoft Word
Functionality is similar across the add-ins. In the add-in window, you can add application content in the form of tables, images, variables, and expressions. After adding content using the add-ins, you have several options for formatting and styling it using the default Microsoft Office functionality.
Choose an installation workflow
After you obtain the manifest file or URL, choose the workflow that matches how you want to deploy the add-in:
-
Workflow 1: Centralized deployment for managed distribution by a Microsoft 365 administrator. See Workflow 1: Centralized deployment.
-
Workflow 2: Sideloading on the web for quick testing without centralized deployment. See Workflow 2: Sideload an add-in on the web.
-
Workflow 3: Installation on desktop Microsoft Office applications through a Windows network share. See Workflow 3: Install an add-in on desktop Microsoft Office applications using a Windows network share.
-
Workflow 4: Sideloading on desktop macOS applications. See Workflow 4: Sideload an add-in on desktop macOS applications.
Workflow 1 is the recommended option for production deployments. Workflows 2 through 4 are best for testing, trial use, or isolated user setups.
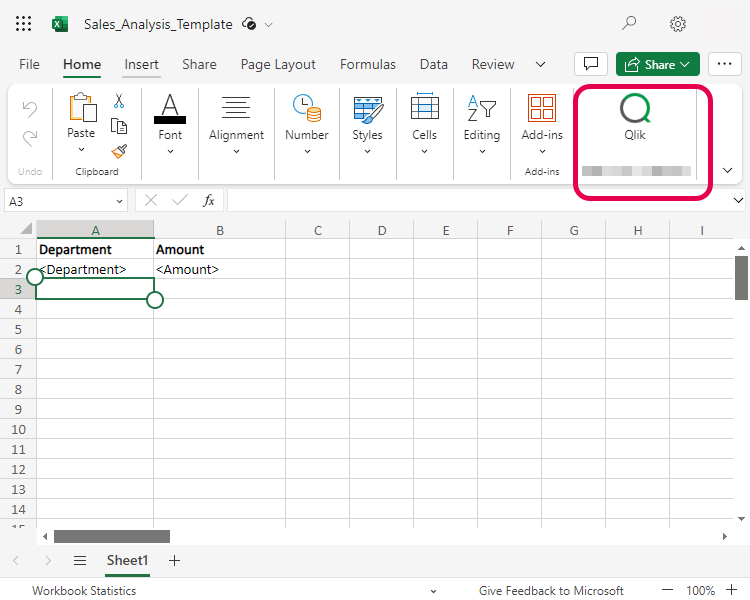
Qlik add-in button shown in a web version of Microsoft Excel
For more information, see Designing report templates with Qlik add-ins for Microsoft Office.
Before you start
These steps apply to all installation workflows.
-
Ensure you and your users meet the system and software requirements.
-
Create an OAuth client in Qlik Cloud.
-
Obtain the manifest file or link.
Requirement 1: Meet system and software requirements
Qlik add-ins for Microsoft Office are supported for developing report templates against applications in Qlik Cloud Government or Qlik Cloud Government - DoD tenants.
To install and use Qlik add-ins, users must meet the following requirements.
Qlik add-in for Microsoft Excel
For Windows installations:
-
Windows 10 v.1903 or higher
-
Microsoft 365 v.16.0.11629 or higher
For macOS installations:
-
macOS v.14 or higher
-
Microsoft 365 v.16.83 or higher
Also, to run the Qlik add-in for Microsoft Excel, you must have a Microsoft Excel installation with ExcelAPI 1.9 or newer. To check if your Excel installation is compliant, refer to the official Microsoft documentation at Excel JavaScript API requirement sets.
If your ExcelAPI is lower than the minimum required version, an error is shown indicating that the Qlik add-in requires a newer version of Microsoft Excel.
Example of an error message during installation of the add-in
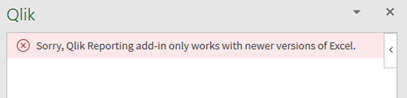
You may need to click on the white area on the right in Microsoft Excel and press F5 to update the page to see the error.
If you see this error, upgrade your Microsoft Excel installation.
Qlik add-in for Microsoft PowerPoint
For Windows installations:
-
Windows 10 v.1903 or higher
-
Microsoft 365 version 2504 (build 18730.20030) or higher
For macOS installations:
-
macOS v.14 or higher
-
Microsoft 365 v.16.96 or higher
Qlik add-in for Microsoft Word
For Windows installations:
-
Windows 10 v.1903 or higher
-
Microsoft 365 version 2208 (build 15601.20148) or higher
For macOS installations:
-
macOS v.14 or higher
-
Microsoft 365 v.16.64 or higher
Requirement 2: Create an OAuth client
An OAuth client configuration is required to install Qlik add-ins for Microsoft Office. Add-ins are used by report developers to prepare report templates for in-application reporting with Qlik Cloud.
For OAuth to work in the add-ins, the OAuth client needs to be configured with the exact configuration shown below.
Do the following:
-
In Qlik Cloud, click
 in the top left corner.
 -
Select Administration.
-
Go to OAuth.
-
Click Create new.
-
In the Client type dropdown menu, select Single-page app. More fields will appear.
-
Insert a Name. The Description is optional.
-
At minimum, select the checkbox to include the user_default scope. You can include other scopes in the configuration, but without user_default, installation will not work.
See Available OAuth scopes for a full description of each available scope.
-
In the Add redirect URLs field, insert the URL of the Qlik Cloud tenant, followed by this fixed string: /office-add-ins/oAuthLoginSuccess.html
The result should look like this: https://<tenant or alias hostname>.<region>.qlikcloud.com/office-add-ins/oAuthLoginSuccess.html. For example: http://example-company-123.us.qlikcloud.com/office-add-ins/oAuthLoginSuccess.html
-
Click Add.
-
In the Add allowed origins field, insert your tenant URL and click Add.
-
Click Create.
-
The Copy your Client ID window appears. You can choose to copy the Client ID to clipboard, or click Done to close the window.
After creating the OAuth client, get the updated manifest XML link from the Administration activity center. Go to the Settings page and select the Email and reports tab. In the Sharing and reports section, select Qlik add-ins for Microsoft Office. Use the provided link to deploy and install the add-in.
Requirement 3: Prepare and obtain the add-in manifest
You install Qlik add-ins for Microsoft Office in the Microsoft environment using a manifest XML file, or a link to it.
-
For centralized deployment, the manifest often needs to be provided in the form of a URL.
-
For self-managed installations, the manifest is often provided in the form of a file.
A manifest file is specific to a single Qlik Cloud tenant. You use the same manifest file to install the add-ins for Excel, PowerPoint, and Word.
An OAuth client configuration is required to install the add-in. After you have configured the OAuth client, obtain the manifest file link, as well as the manifest file itself, from the Administration activity center.
Do the following:
-
Create the OAuth client in the Qlik Cloud tenant using the required configuration. For full instructions, see Create an OAuth client.
-
In Qlik Cloud, click
in the top left corner. -
Select Administration.
-
Go to Settings.
-
In the Sharing and reports section, go to Qlik add-ins for Microsoft Office.
-
In the drop down menu, select the OAuth client configuration you have set up for activating OAuth in the add-in.
-
Click Download to download the manifest, or Copy to copy the link to it.
Workflow 1: Centralized deployment
It is recommended that Qlik add-ins for Microsoft Office are made available with centralized deployment and installation. Centralized deployment requires action from a Microsoft 365 administrator in your organization.
With centralized deployment, the add-in manifest is loaded into your organization’s Microsoft 365 admin center and distributed to users as a pre-configured installation. Distribution can be restricted to members of specific security groups.
Use this workflow when:
-
You want the add-ins to be permanently installed for members of your organization
-
You want to manage distribution to your organization members
Complete the following sections in order.
Deploy and install with the Microsoft 365 admin center
Centralized deployment is completed by a Microsoft 365 system administrator.
Do the following:
-
Obtain the add-in manifest file or manifest URL after creating an OAuth client. See Prepare and obtain the add-in manifest.
-
Distribute the add-in according to the official Microsoft documentation: Deploy and publish Office Add-ins. Note that distribution through centralized deployment is only possible by using the Microsoft 365 admin center.
With the above procedure, the add-ins are installed for users who are given access to them. Users then activate add-ins in their version of Excel, PowerPoint, or Word.
Activate an add-in after centralized deployment
After a Microsoft administrator has installed a Qlik add-in for your organization, you can activate and use it if you have been given access to it.
Depending on the version of your Microsoft Office application, these steps might be slightly different. Refer to the official Microsoft documentation for full details.
Do the following:
-
Open a desktop or web version of Excel, PowerPoint, or Word.
-
Go to Home > Add-ins > Get Add-ins.
-
In the ADMIN MANAGED tab of the dialog, select the Qlik add-in.
The Qlik add-in icon is added to your ribbon bar.
View, manage, and install add-ins for Excel, PowerPoint, and Word
Remove an add-in
If your installation uses a centralized deployment, you might not be able to uninstall the add-in. This depends on the policy used by your Microsoft 365 administrator.
Workflows 2-4: Self-managed installation options
Sideloading and network share installation are suitable ways to quickly obtain access to add-ins for testing or trial purposes. They are not suitable methods for deploying add-ins for production and enterprise-scale use cases.
In Office 365 Government Community Cloud High (GCCH), Qlik add-ins for Microsoft Office can only be installed via centralized deployment. Installing via sideloading or network share is not supported.
Depending on your version of Excel, PowerPoint, or Word, as well as other factors, add-ins loaded with these methods might eventually be removed from your ribbon bar. When this happens, re-upload the manifest into the Microsoft Office application.
Workflow 3: Install an add-in on desktop Microsoft Office applications using a Windows network share
To install add-ins on a desktop version of Excel, PowerPoint, or Word without centralized deployment, you can set up a network share and load the manifest into it. This can only be done on a Windows operating system.
Follow the guidelines below to sideload add-ins via network share. The instructions are adapted from the official Microsoft documentation. See Sideload Office Add-ins for testing from a network share or other Microsoft resources for more information.
Step 1: Create and share a folder
Do the following:
-
Create a folder to host the Qlik add-in. For example: C:\Qlik Office add-ins
-
In the Windows File Explorer, go to the parent folder, or drive letter, of the folder you want to use as your shared folder catalog. For example: C:\
-
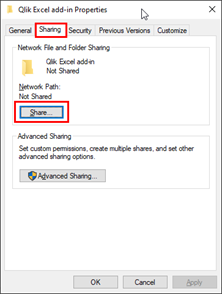
Right-click the folder and select Properties.
-
Open the Sharing tab and then click the Share... button.
Share... button
-
In the dialog window, add yourself and any other users and/or groups with whom you want to share your add-in. You will need at least Read/Write permission to the folder. After you have finished choosing people to share with, click Share.
-
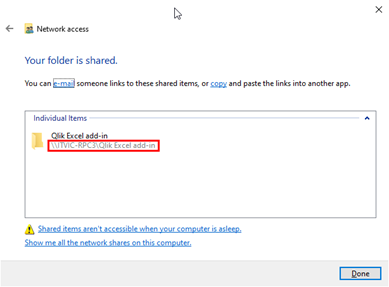
When you see confirmation that your folder has been shared, make note of the full network path that is displayed immediately following the folder name. Click Done to close the dialog window.
Confirmation of successfully shared folder with full network path
-
Click Close to close the Properties dialog window.
Step 2: Manually configure the shared folder as a trusted catalog
Do the following:
-
Open a new blank workbook in the desktop version of Excel, PowerPoint, or Word.
-
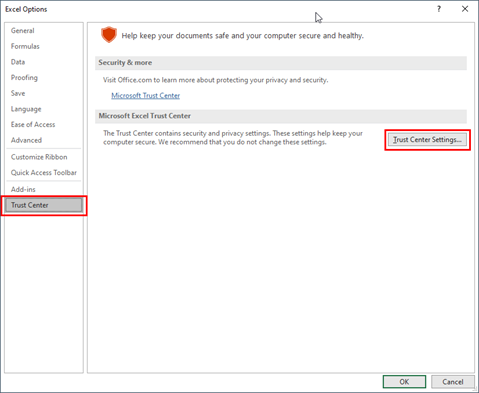
Click the File tab, and then click Options in the bottom left corner.
-
Click Trust Center, and then click the Trust Center Settings... button.
Trust Center Settings... button
-
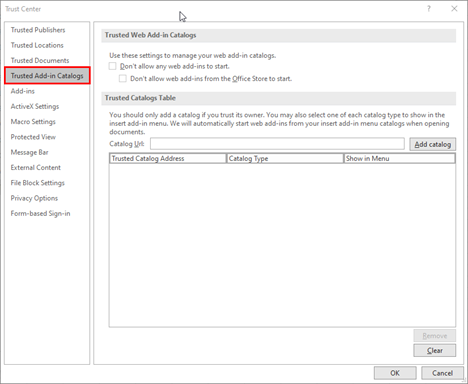
Click Trusted Add-in Catalogs.
Trusted Add-in Catalogs tab
-
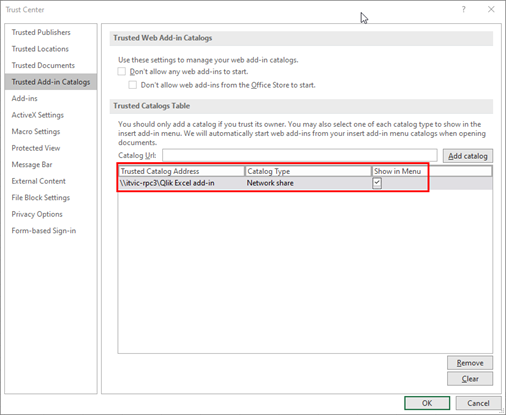
In the Catalog Url box, enter the full network path to the folder that you shared previously.
-
Click Add catalog.
-
Check the Show in Menu checkbox for the newly added item, and then click OK to close the Trust Center dialog window.
Trusted Add-in Catalogs tab in Trust Center dialog, with newly added catalog path
-
Click OK to close the dialog window.
-
Close and re-open the application so your changes take effect.
Step 3: Sideload the add-in
Do the following:
-
Add the add-in manifest XML file to the shared folder.
-
In ExcelPowerPoint, or Word, click Add-ins on the Home tab of the ribbon.
-
Click More Add-ins.
-
Click SHARED FOLDER at the top of the Office Add-ins dialog box.
-
Select Qlik to insert the add-in.
-
You might see a dialog window that says something like the following: Qlik wants to display a new window. Click Allow.
Removing an add-in installed through network share
Do the following:
-
If you have Excel, PowerPoint, or Word open, close it.
-
Delete the contents of this folder: %LOCALAPPDATA%\Microsoft\Office\16.0\Wef\
Workflow 4: Sideload an add-in on desktop macOS applications
Adding multiple Qlik add-ins to Excel, PowerPoint, or Word
Each added Qlik add-in allows use of the add-in for a single Qlik Cloud tenant.
Behavior and limitations are as follows:
-
In your Excel, PowerPoint, or Word application, only one add-in (connected to a single Qlik Cloud tenant) is supported for use at a single time.
-
If you need to work with add-ins for multiple Qlik Cloud tenants, you must switch between tenants by deploying or installing the add-in you want to use directly before you start to use it. If your add-in is still connecting to the previously selected tenant, restart your Office application or reload the browser page.
-
Having a Qlik add-in centrally deployed for one Qlik Cloud tenant may prevent your ability to sideload the add-in for different tenants.
-
Depending on your version of Microsoft Excel, PowerPoint, or Word, and the browser in use, when multiple add-ins are loaded, the ribbon bar might show icons for each of them, or only one icon holding the latest deployed instance. The former can happen, for example, when using older versions of Microsoft Excel, PowerPoint, or Word.
-
In Office 365 Government Community Cloud High (GCCH), Qlik add-ins for Microsoft Office can only be installed via centralized deployment. Installing via sideloading or network share is not supported. Office 365 GCC and GCCH support working with a single Qlik Cloud Government or Qlik Cloud Government - DoD tenant at a time.
Troubleshooting
This section provides tips for resolving common deployment and installation issues.
For additional troubleshooting tips, see Troubleshooting - In-application reporting.