Managing user groups
User groups are essential for effective identity management, helping administrators streamline user permissions and maintain a secure, organized system. In Qlik Cloud, groups can be created directly in the Administration activity center or provisioned from an identity provider.
Types of groups
There are two types of user groups:
-
Identity provider (IdP) groups: These groups are sourced from an external identity provider and cannot be edited, deleted, or managed directly within Qlik Cloud. All management must be performed through the external identity provider.
-
Custom groups: These groups are created and managed within the Qlik Cloud tenant. Tenant administrators can create, edit, delete, and manage members of custom groups directly from the Administration activity center or via APIs. Both Qlik Account users and users provisioned from identity providers can be added to custom groups.
Custom groups are immediately available for use, while IdP groups are dynamically created in Qlik Cloud when a user associated with the group logs in for the first time. If you are using SCIM to provision users and groups, groups can be populated in advance. For more information, see Provisioning users and groups using SCIM. You can view all groups in the Administration activity center.
IdP groups and custom groups are distinguished in the user interface by icons and labels. While they can share the same name, we recommend using a clear naming convention for custom groups (such as adding "CG-" at the beginning) to avoid confusion.
Example of two groups with the same name but different icons: the first is an IdP group, and the second is a custom group.
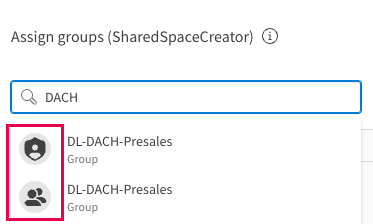
Groups are labeled by type ("Managed (IdP)" and "Custom") in the Groups table.

Example scenarios for groups
You can use groups to manage access based on group memberships. Assign security roles and space roles to IdP groups and custom groups to control permissions across the tenant.
Below are some example scenarios of using IdP groups and custom groups:
Example: Custom group for a software development project
If your organization is launching a new software development project, you can create a custom group specifically for the project team. This will allow you to assign project-specific roles and permissions, ensuring each team member has the access needed to collaborate effectively
Example: IdP group for marketing team
Suppose you work in the marketing department of an organization that integrates with an external identity provider. You can create an IdP group for the marketing team that grants unique permissions to access essential tools and resources. When a new member joins the team and is added to the IdP group, they automatically receive the correct permissions in Qlik Cloud, allowing them to start working without delays.
Example: Custom groups for access control based on user responsibilities
To efficiently manage access, create custom groups based on the tasks or responsibilities that users perform in different spaces. These user responsibilities help assign appropriate permissions within Qlik Cloud and ensure each user has access to what they need for their work.
-
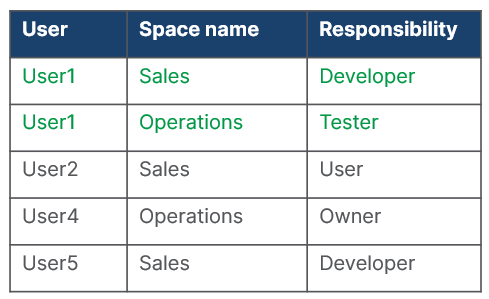
Establish clearly defined user responsibilities (for example, developer, tester, owner, and user) in each space.
The table shows user responsibilities in different spaces. User1 is developer in the Sales space and tester in the Operations space.
-
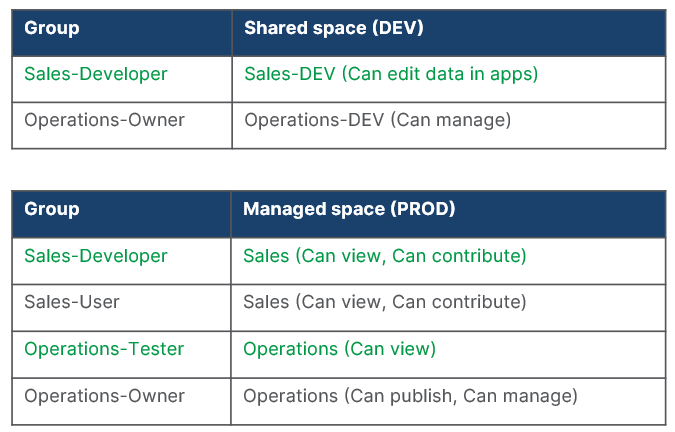
Create custom groups for each user responsibility. Assign space roles, such as Can view or Can contribute, to the groups to match the level of access required in the space.
Custom groups are created to manage access in shared and managed spaces. For example, the Sales-Developer group needs the Can view and Can contribute roles in the Sales space, and the Operations-Tester group needs the Can view role in the Operations space.
-
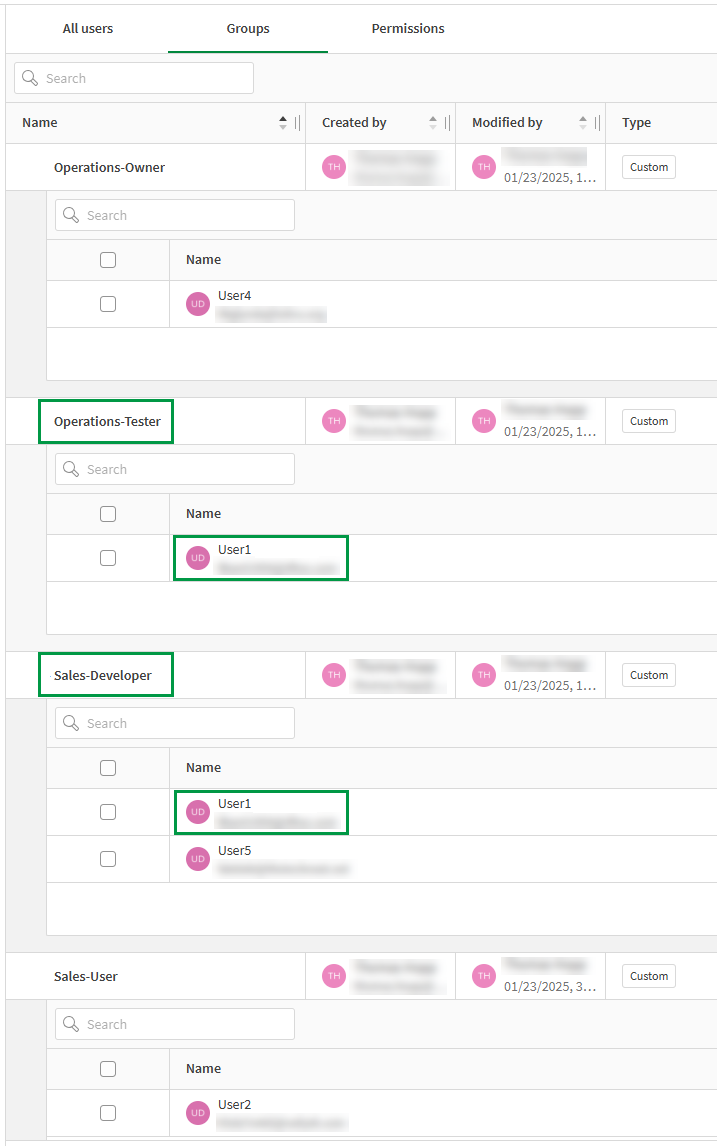
Map users to the appropriate custom groups based on their responsibilities in each space. For example, User1 may be a developer in the Sales space but a tester in the Operations space, with different permissions assigned for each responsibility.
Users are assigned to the different groups based on their responsibilities. User1 is a member of both the Sales-Developer and Operations-Tester groups.
This structured approach simplifies permission management, making it easier to scale and adapt to your organization’s needs.
Managing access permissions for groups
Permissions for group members are controlled by their assigned roles, regardless of whether the groups are IdP-provided or custom-created. When a role is assigned to a group, all members inherit the permissions associated with that role.
If users have roles assigned both individually and through group memberships, they might end up with duplicate role assignments. To completely remove a role from users, ensure you unassign it from both the Permissions > Users tab and the Permissions > Groups tab.
In cases where a user has different roles assigned individually and through group membership within a space, the higher permission level takes precedence.
For instructions on assigning tenant-wide roles to a group, see Assigning security roles and custom roles. For more information about space roles, see:
Listing group members
Tenant administrators can view the members of both IdP groups and custom groups.
Do the following:
-
In the Administration activity center, go to Manage users.
-
On the Groups tab, find the group by scrolling through the list or using the search feature.
-
Click
next to the group to expand the list of members.
Creating custom groups
Tenant administrators can create custom groups. Members can be added either during creation or at a later time.
To create multiple groups at once, you can use qlik-cli or APIs.

Do the following:
-
In the Administration activity center, go to Manage users.
-
On the Groups tab, click Create new.
-
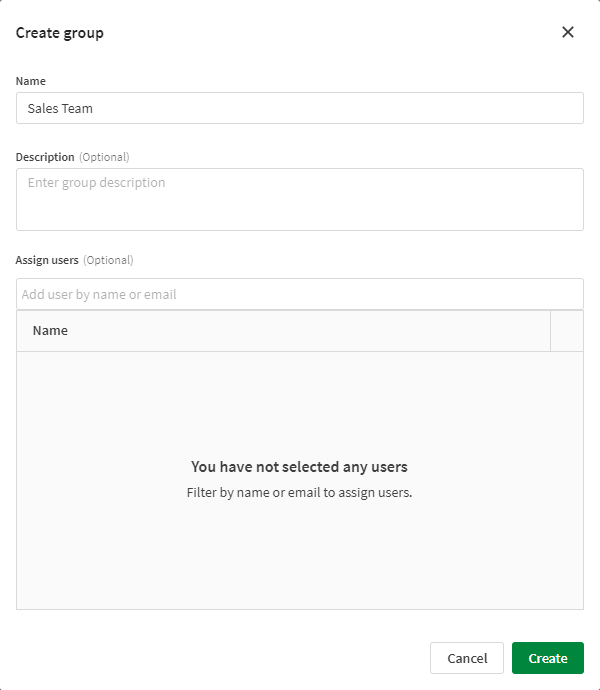
Enter a name for the group.
The Create group dialog.
 Tip note
Custom groups can share the same name as IdP groups, but using a clear naming convention (such as adding "CG-" at the start) helps prevent duplicates.
-
Optionally, add a description.
-
To add members to the group:
-
Search for users by name or email.
-
Select users to add them to the group.
-
-
Click Create.
After creating the group, go to the Permissions tab to assign roles that will grant permissions to group members.
Adding or removing members of a custom group
As a tenant administrator, you can add or remove members from custom groups. Users can be added from both Qlik Account and other identity providers.
You cannot add or remove members from IdP groups within Qlik Cloud. To manage these groups, use your external identity provider.
Adding or removing members
Do the following:
-
In the Administration activity center, go to Manage users.
-
On the Groups tab, find the group you want to manage.
-
Click
to expand the list of group members.
-
To add members:
-
Click Assign.
-
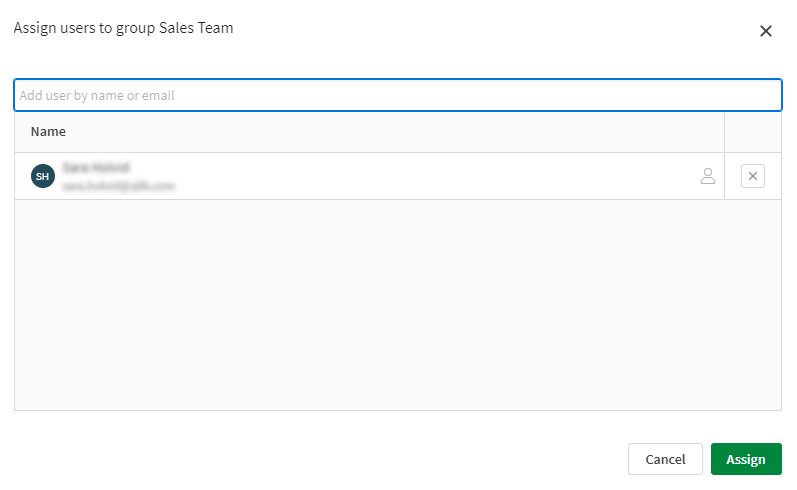
Search for and select the users you want to add.
The Assign users dialog.
-
Click Assign.
-
-
To remove members:
-
Use the search field to find specific users.
The expanded details of a group.

-
Select the users you want to remove.
-
Click Unassign.
-
Confirm the action to remove the selected members.
-
Editing group details
Tenant administrators can modify a group's name and description.
Do the following:
-
In the Administration activity center, go to Manage users.
-
On the Groups tab, find the group you want to edit.
-
Click
and select Edit.
-
In the Edit group dialog, modify the group's name or description as needed.
-
Click Save to apply your changes.
Deleting custom groups
Tenant administrators can delete custom groups only if they have no assigned members. Before deleting a group, make sure all members are unassigned.
To delete multiple groups at once, you can use qlik-cli or APIs.
Do the following:
-
In the Administration activity center, go to Manage users.
-
On the Groups tab, find the group that you want to delete.
-
Click
and select Delete.
-
Confirm the deletion.
You cannot delete IdP groups directly within Qlik Cloud. To remove an IdP group that is no longer in use:
-
Delete the group in your external identity provider. This ensures the group is no longer being synchronized.
-
Clean up the group in Qlik Cloud using qlik-cli or APIs, as deleting it from the IdP does not automatically remove it from Qlik Cloud.
For more information, see:
