Get started with Qlik Sense Desktop
Qlik Sense Desktop is an application you install on your local Windows computer. It is intended for you to try out and explore Qlik Sense, and it can also be used for creating visualizations, charts, interactive dashboards and analytics apps for local and offline usage in a contained environment, that is your local computer.
Apps you create in Qlik Sense Desktop can be exported and used in Qlik Cloud Analytics, Qlik Sense Enterprise, or by other Qlik Sense Desktop installations.
Comparing Qlik Sense Desktop and Qlik Cloud Analytics
There are some differences between Qlik Sense Desktop and Qlik Cloud Analytics:
- You can only run Qlik Sense Desktop on your local Windows computer - use of multiple screens or tablets, for example, is not supported.
- Apps cannot be published in Qlik Sense Desktop, and because of this, there is no support for streams.
- Security functionality is not supported in Qlik Sense Desktop.
- There is no autosave function in Qlik Sense Desktop – you have to save your work manually by clicking Save in the toolbar. The app is automatically saved when reloading the script.
- Duplicating apps is not supported in Qlik Sense Desktop.
- Qlik Sense Desktop will run in the language of your operating system and the language cannot be altered.
- Dynamic views are not supported in Qlik Sense Desktop.
Downloading the Qlik Sense Desktop installation files
Qlik Sense Desktop can be downloaded from Qlik Cloud or from the Qlik download site. Either of the two approaches gets the latest version of Qlik Sense Desktop onto your computer.
Downloading from Qlik Cloud
Do the following:
-
Open Qlik Cloud.
-
Click your profile in the top right corner and select Settings.
-
Under Other, select Tools.
-
Under Qlik Sense Desktop, click Download to download Qlik Sense Desktop.
- Install Qlik Sense Desktop.
- Navigate back to Qlik Cloud.
- Below the button you used to download Qlik Sense Desktop, click Authenticate to add a server authentication link to your Qlik Sense Desktop installation. You can then click on that link in Qlik Sense Desktop to authenticate.
Downloading from the Qlik download site
Do the following:
-
Go to Product Downloads.
-
Select Qlik Data Analytics, and then select Qlik Sense Desktop from the Product list.
-
Optionally, use additional filters to narrow your list of possible downloads.
-
Click a download link to start the download.
- Install Qlik Sense Desktop.
- Click Authenticate to add a server authentication link to your Qlik Sense Desktop installation. You can then click on that link in Qlik Sense Desktop to authenticate.
Authenticating against Qlik Cloud (formerly Qlik Sense SaaS)
You can authenticate your Qlik Sense Desktop client against Qlik Cloud. To do so, you must generate an authentication link.
What is included in Qlik Sense Desktop
Desktop items and start menu items
After having completed your installation of Qlik Sense Desktop, a shortcut will be available from the desktop as well as from the Start menu (Start > All Programs):
-
Shortcut to Qlik Sense Desktop
The hub is the starting point when you run Qlik Sense. That is where you find all the Qlik Sense apps that you have created.
Qlik Sense Desktop installation location
After having completed your installation of Qlik Sense Desktop, Qlik Sense Desktop is installed to Users\{user}\AppData\Local\Programs\Qlik.
You can also specify the installation location with the Custom Installation option.
Examples, apps and logs
There are some example files included in the installation of Qlik Sense Desktop. These are installed to Users\{user}\Documents\Qlik\Examples. For example, a number of extension code examples are installed to the Extensions sub-folder.
The installation of Qlik Sense Desktop also comes with example apps. These are installed to Users\{user}\Documents\Qlik\Sense\Apps.
In your installation of Qlik Sense Desktop, logs are found in Users\{user}\Documents\Qlik\Sense\Log.
Exploring the Qlik Sense Desktop hub
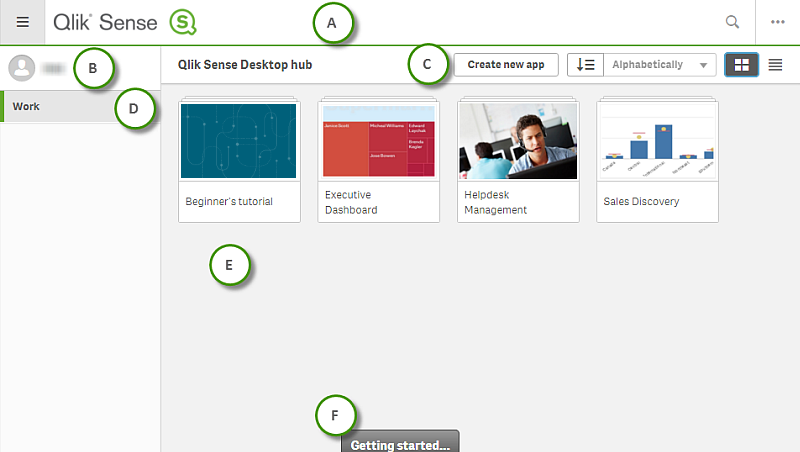
When Qlik Sense Desktop starts up, you arrive at the hub. The hub is where you find all your apps. Click an app in the hub to open it in a separate tab.
The Qlik Sense Desktop hub with the Work view open

A: Toolbar
The toolbar contains the global menu and other useful commands.
| UI item | Description |
|---|---|
|
|
Toggle on and off the navigation menu |
|
|
You can search to easily find a specific app. |
|
|
Global menu with options Dev Hub, Help and About. You can click the Client authentication link to enable using Qlik Sense Desktop. To learn more about Dev Hub, see Dev Hub. |
B: Login information
| UI item | Description |
|---|---|
|
|
Your login information is displayed when you are logged in. Depending on how the Qlik Sense system has been set up, you may have to log in by clicking the Log in button. When logged in, you can click |
| Log out |
Click |
C: Create new app
| UI item | Description |
|---|---|
| Create new app |
Create a new app. The button is only available if you have permission to create apps. To learn more about creating an app, see Creating apps and adding data. |
|
|
You can sort the apps alphabetically , by created date, or by published date, descending or ascending. |
|
|
Toggle between grid view and list view of the hub, depending on what kind of overview you prefer. |
D: Work
Personal with all your own apps under Work.
E: Main area
All your apps are displayed in the main area.
F: Getting started
Go to the Qlik Sense Desktop webpage to learn more about how to get started with Qlik Sense Desktop.
