
Amazon S3
The Qlik Amazon S3 Web Storage Provider Connector lets you fetch your stored data from Amazon S3 buckets, allowing you to stream data directly into your Qlik Sense application from your Amazon S3 public account, or via PrivateLink, just as you would from a local file. You can also export and upload compiled table data into your remote Amazon S3 buckets.
Connecting to an Amazon S3 account
To access your Amazon S3 data, you will need to select the connector in Qlik Sense, and authenticate the connector with your Amazon S3 credentials.
For example, a Qlik Sense deployment in the North American region may have significantly slower download/upload speeds when connecting to an Amazon S3 bucket in the Asia-Pacific region.
You can access the connector through Add data and the Data load editor.
- From Add data, select Amazon S3 from the list of data connectors.
- From the Data load editor, click Create new connection and select Amazon S3.
Connecting to Amazon S3 through the AWS internal network
Authentication
The first step to create a Amazon S3 connection is to authenticate the connector with your Amazon S3 credentials:
- access key
- secret key
- region
- bucket name
- SSE header value (for use with STORE command only)
If SSE header value is not empty, valid values are:
- aws:kms
- AES256
When you are finished setting up your data connection, click Create to save the connection. The connection credentials are verified automatically. From the Data load editor, you can also verify the connection before you create it by clicking Test Connection.
Add data
A default name is applied to the data connection.
Data load editor
You can specify a connection name or leave the default name for the connection.
Connector location
The location of the connection depends on how you select data.
-
From Add data, it will be saved under File Locations.
-
From the Data load editor, it will be saved under Data connections with the name that you provided.
Selecting data with a Amazon S3 connection
When you create a Amazon S3 connection with Add data, the data selection step follows immediately. When you create a data connection with the Data load editor, you need to open the data connection before you can select data.
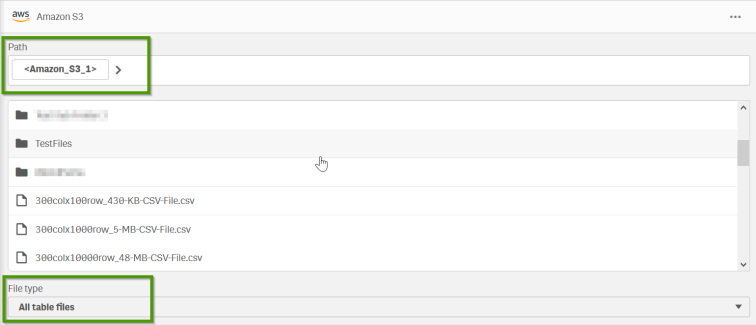
To select data, first, navigate to the file path location on your Amazon S3 account. Next, locate your files by clicking on the folder names. You can navigate backwards by clicking on the previous folder in the path field or by clicking ![]() . You can filter the file types that are shown by using the File type drop-down menu.
. You can filter the file types that are shown by using the File type drop-down menu.
Select and load data from any of the supported file types.
First, select a file. Then, select the data tables and the data fields that you want to load. You can rename data fields before loading them into Qlik Sense by clicking on the field name and entering a new name. The new name is mapped by Qlik Sense as an alias to that field name in the database.

Data file properties
If you are loading data from an Microsoft Excel file or from a delimited file, you may need to adjust the data file properties. The following table describes the data file properties for these file types:
| Parameter | Description | For file type |
|---|---|---|
| Field names (Embedded) | Set to specify if the table contains Embedded field names or No field names. Typically, in a Microsoft Excel spreadsheet, the first row contains the embedded field names. |
Delimited files .xls/.xlsx |
| Field names (None) | Select if the fields are not labeled. If you select this option, fields will be named A,B,C... |
Delimited files .xls/.xlsx |
| Header size | Set to the number of header rows to ignore. Typically, you want to exclude rows that contain general information that is not in a columnar format. |
Delimited files .xls/.xlsx |
| Delimiter | Set the field delimiter. Select a standard delimiter (comma, semicolon, space, tab) or a custom delimiter. | Delimited files |
| Quoting (MSQ) | Used to specify modern style quoting which allows multi-line content. End-of-line characters must be enclosed with double quotation marks. Double quotation marks (“) appearing as the first or last character in field content will be interpreted as the start or end of multi-line content. | Delimited files |
| Quoting (Standard) | Used to specify standard quoting. Double and single quotation marks accepted only when they are the first and last blank character of a field value. | Delimited files |
| Quoting (No Quote) | Used if quotation marks are not to be accepted in the file. | Delimited files |
| Character set | Select the character set for the data you are loading. Select a standard character set or a custom character set. | Delimited files |
| Ignore end-of-file-character | Select to ignore characters with code point 26, which otherwise denotes an end-of-file character, are disregarded and can be part of a field value. Only relevant for .txt files | Delimited files |
| Comment | Data files can contain comments between records. Comments are denoted by starting a line with one or more special characters, for example //. Specify one or more characters to denote a comment line. Qlik Sense does not load lines starting with the character(s) specified here. | Delimited files |
Load data into your Qlik Sense application
Once you have finished selecting data, you can load your data into your Qlik Sense application. How you proceed will depend on whether you load data with Add data or the Data load editor.
Add data
To load data using Add data, click Add data. This will open the data in the Associations view of the data manager. In the associations view, you can continue to add data sources, transform the data, and associate the tables in Data manager.
Data profiling is enabled by default when you click Add data. Data profiling does the following:
- Recommends data associations.
- Auto-qualifies common fields between tables. This adds a unique prefix based on table name.
- Maps date and time fields to autoCalendar.
Tables are not associated on common field names automatically. You can associate tables in the Associations view.
If you want to load the data directly into your application, click ![]() and then disable data profiling.
and then disable data profiling.
When you add data with data profiling disabled, all existing data from data sources will be reloaded when you add the data. Tables will be associated on common field names automatically. Date and time fields will not be created.
Data load editor
To load data with the Data load editor, click Insert script once you are finished selecting the data. A load script is inserted into the script editor of the Data load editor. You can continue to edit the script in the script editor or you can click Load data to run the data load script.
Syntax: Loading a hosted file
LOAD *
FROM [lib://S3Connection1/myFile1.csv]
(txt, utf8, no labels, delimiter is ',', msq);
S3Connection1 in this example is the name of the Amazon S3 connection.
Storing data from your Qlik Sense application in Amazon S3
Using the Data load editor, you can store table data into your Amazon S3 bucket.
Once you have loaded data into your Qlik Sense application, you can store your table data in Amazon S3, by creating a new load script or editing the existing script. Using the SELECT command, specify a list of fields to be included in the upload, and then write a Store command to set the file path in Amazon S3. Click Load data to run the data load script, and Qlik Sense will complete the upload process.
See the Store syntax for more detailed scripting instructions and supported file formats.
Limitations and known issues
When authoring load/store scripts for use with the Amazon S3 Web Storage Provider Connector, there are specific limitations to be aware of, due to the internal file structure of Amazon S3 buckets.
- Bucket names containing period characters [ . ] are not supported, due to an existing Amazon S3 issue with certificate support.
- Folders must be specified in syntax with a trailing slash character: [ / ].
Example: LOAD * FROM [lib://S3Connection1/Path/Folder/] - Folders named [ / ] are not supported. This includes object keys with multiple slashes, e.g. MyFolder/MySubfolder//.
- The slash character [ / ] is the only character supported as a delimiter.
- The dirlist command currently returns a trailing period character [ . ].
- Folders created via the STORE command may not display correctly in the treeview. As a workaround, create the folder structure before performing STORE.
- Partial paths are not supported, although they may return results due to prefix support in the Amazon S3 API.
- Folders and files with the same name are not supported.
- Wildcard/masking syntax is not supported. You may only load specified individual files.
Reference - Amazon S3 documentation
You can refer to the Amazon S3 API documentation to learn more about the requirements and restrictions imposed by the Amazon S3 REST API.