
SAP Extractor Connector configuration
The SAP Extractor Connector user configuration is applicable for SAP BASIS System 7.00 and later.
The Extractor Connector can also be used with an SAP BW system. The structure of the BW system differs from that of an SAP ERP system, but the principle is the same. User configuration is the same as for SAP BASIS System 7.00 and later.
Setting up the Extractor on SAP
A series of standard extractors are delivered within SAP for data transfer to the SAP Business Information Warehouse. If BI/BW is not used, proceed to activate a series of processes within SAP.
Do the following:
- In some cases, the set up has to be performed from the customizing side, which is reached through the SPRO transaction and the Activate Business Functions menu.
-
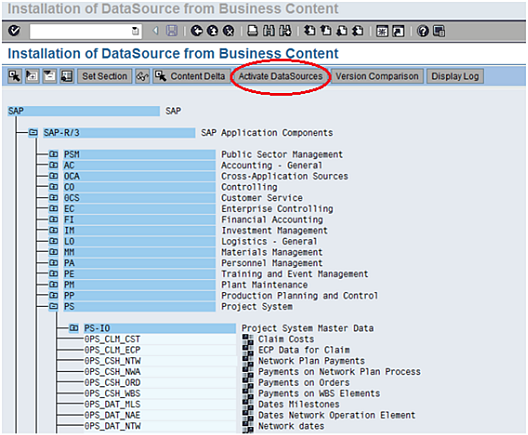
In the SAP system, go to transaction SBIW to transfer and activate the BI/BW DataSources.

- Check that the tree hierarchy and data sources are activated.
-
If this is not the case, transfer the Application Component Hierarchy and then the Business Content DataSources.

-
Transfer Application Component Hierarchy:
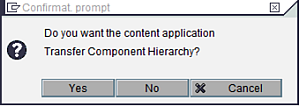
Click Yes.
-
Transfer Business Content DataSources:
Start by activating the tree hierarchy and then activate each data source to be used.
Setting up the Qlik SAP Extractor
Configuration changes to the clients are required to execute the processes involved in the Qlik Extractor (QTQVC/EXTRACTOR_ADM). The SAP client must have “changes to repository and cross-client customizing allowed.”
Do the following:
- In the SAP system, go to transaction SCC4.
- Select Client.
-
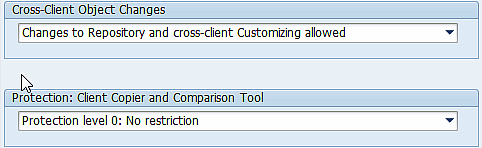
Change the system to reflect the following options:
- Cross-Client Object Changes: Changes to Repository and cross-client Customizing allowed
- Protection: Client Copier and Comparison Tool: Protection level 0: No restriction
- Go to transaction SE03. Double-click Set System Change Option under Administration.
- Check that the following options are set to Modifiable:
- Global Setting
- Local Developments (No Automatic Transport)
- Customer Name Range
Setting up Qlik Extractor administration
To initiate the capabilities of the Qlik Extractor Connector, a one-time task is required to create a logical system to receive the generated IDocs/RFC used in the Extractor process.
Do the following:
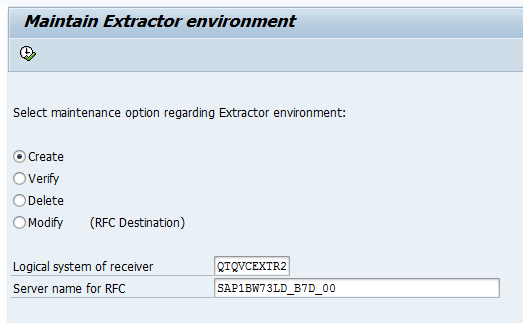
- In the SAP system, go to transaction /n/QTQVC/EXTRACTOR_ADM and select the Create option.
-
Select a Logical system of receiver name.
Information noteWhen selecting a logical system name it has to be one word like QTQVCEXTR1 and not QTQVC_EXTR1. To prevent a mismatch fill the whole field with 10 characters. -
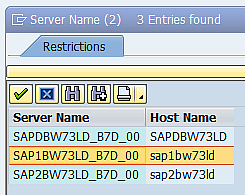
Select a Server name for RFC.
Select the server that the Extractor Connector will use for the RFC Communication. The user can look up possible servers in the SAP system cluster (from transaction SM51) under Server Name, and select one of them to enter in the field Server Name for RFC.
- Close the SAP client after the setup
Create
- Creates the logical system of the receiver. See the SALE transaction.
- Creates the RFC connection (same name as the logical system).
- Creates the partner profile of type LS (same name as the logical system).
- Creates the Basic IDoc type for data transfer. The name is hard-coded like “ZSQAQTQVCEXTR1”.
Verify
- Verifies that all necessary components of the Extractor environment are configured.
Delete
- Deletes all components in the Extractor environment.
Modify
- Modifies the RFC Destination.
In this transaction the RFC Destination used for RFC communication is created or modified. The following information is applicable to both the Create and Modify options.
You must select a server that the Extractor Connector will use for the RFC communication. The user can look up possible servers in the SAP system cluster (from transaction SM51) under Server Name, and select one of them to enter in the field Server Name for RFC:
If the Central instance is part of the list, it can also be selected. The selected server should have dialog processes.
In this example the Gateway Host (SAP1BW73LD.RDLund.qliktech.com) and Gateway Service (sapgw00) of the selected server are used when the RFC Destination is created or modified. Check the result in transaction SM59 under TCP/IP connections:
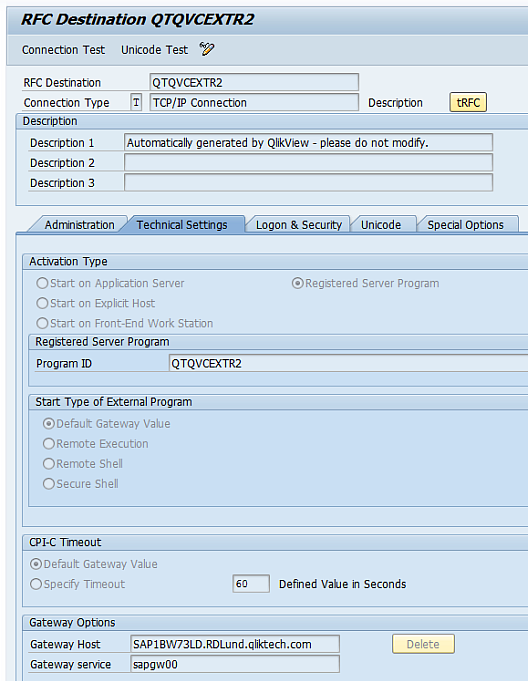
The Windows part of the connector will always use the Gateway Host and Gateway Service of the selected server when registering the Program ID of the RFC Destination (starting up the ‘listener’).
It is possible to change to another server anytime. The RFC Destination can easily be updated with the Gateway Host and Gateway Service of the new server and the connector will automatically use the new settings when starting up the ‘listener’.
The RFC Destination can be updated in the transaction /n/QTQVC/EXTRACTOR_ADM by using the option Modify or by using the SAP transaction SM59.
If connecting through an SAP Router, the RFC Connection in SAP needs to be manually changed in transaction SM59. The ‘Gateway Host’ needs to be changed to:
/H/addr.to.SAPRouter/H/addr.to.SAPsystem
The ‘Gateway service’ value can be kept if correctly set in /N/QTQVC/EXTRACTOR_ADM.
The SAP parameter SAPLOCALHOSTFULL has to contain the correct value for each server. Log on directly to each SAP server and check the value in transaction RZ11. SAPLOCALHOSTFULL should contain the Fully Qualified Domain Name of the server.
Activating/generating data sources/Extractors
Once the setup is complete and the extractors have been activated in the SAP system, activate the extractors for use with the Qlik Extractor Connector:
Do the following:
- In the SAP system, go to transaction RSA6.
-
Select a DataSource/Extractor in the transaction by high-lighting it and copying the technical name (using Ctrl+Y on the keyboard). This can also be done manually.

- Go to transaction /n/QTQVC/Activate.
- Paste the selected extractor in the Extractor name field or select an extractor from the drop-down box.
- Click Get Extractor.
- Select the field to activate (X) or select all fields.
- Choose update method tRFC or IDoc.
-
Click Activate Extractor.
SAP Extractor Connector user configuration for SAP BASIS System
The Extractor Connector user configuration is applicable for SAP BASIS System 6.40, 7.00, and later. After the transports have been installed in the system, create one or more new users for the Extractor connector. Qlik provides three roles that contain the necessary authorizations. It is possible to assign different roles to different users depending on needs, or all roles can be assigned to one user. The roles are:
The QTQVCEXTRACTOR role is to be used by the Extractor connector Back-end user for performing extraction jobs from Qlik.
The QTQVCEXTRADM role is used to activate and generate the extractors in an SAP system. It can also be used to test Extractors in the SAP system and to monitor Extractor jobs.
The QTQVCEXTRSETUP role can be used to create, delete, and verify the setup of the logical system in an SAP system for later use by the Extractor connector. It can also be used for administration tasks such as migrating Extractors and the Extractor environment.
Do the following:
- In the SAP system, go to transaction SU01.
- Click Create (F8).
- Give the user a name and a password.
- On the Logon data tab, assign the user to User Type: Service.
- On the Roles tab, add the role QTQVCEXTRACTOR.
- Click Save.
If the installation is an upgrade from a previous version and any of the roles have been updated, update all users assigned to the role.
Do the following:
- Go to transaction PFCG.
- Enter the role name QTQVCEXTRACTOR.
- Click Change Role.
- On the User tab, enter the name of the user(s) created above.
- Click User comparison.
- Click Complete comparison.
- Click Save.
Setting up SAP BW side Extractor
Make sure the source to be used is generated as an export data source
Do the following:
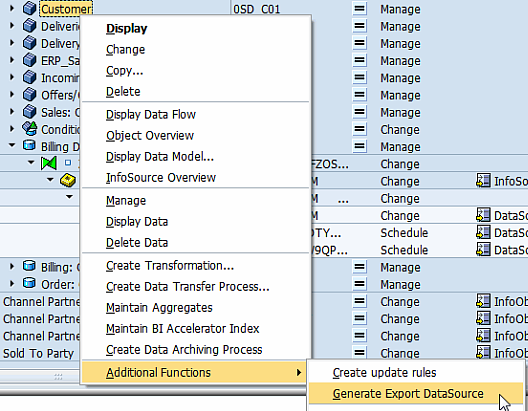
- In the SAP system, go to transaction RSA1.
- Select Cube or DSO/ODS.
-
Right-click and select Additional Functions>Generate Export DataSource.
Next, you need to replicate the internal BW setup.
Do the following:
-
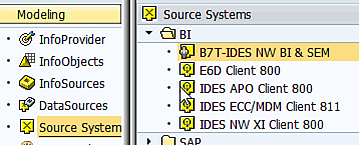
Choose the BI system from Modeling>Source System.
-
Open Modeling>DataSources.
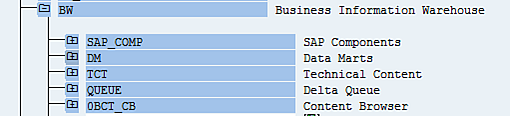
The internal BI sources are available. In BW, these are referred to as “data marts”.
-
Replicate the whole tree or just the data source needed:
Right-click Data Marts and select Replicate Metadata.

After replicating the data marts, the data sources show up as selectable and can be activated for the Qlik Extractor Connector process.
-
Go to transaction code RSA6 and use it as in the ERP system.
The tree differs slightly from the one in ERP. This is because no pre-defined extractors are used. In BW, the actual data sources are used.
The available sources to be used can be found here. Normally, the technical name starts with “8” followed by “0” for standard ODSs and cubes. The end of the name uses “O” for ODS and “C” for cubes.
-
The technical name can now be activated using the same method as for the ERP system.
If an extractor is activated in a BW system before it has been replicated, an error occurs when a reload is attempted. The error can be corrected.
Do the following:
- Deactivate the extractor in transaction /n/QTQVC/DEACTIVATE.
- Replicate in the transaction RSA1.
- Activate the extractor in transaction /n/QTQVC/ACTIVATE.
- Reload the script.
Important issues
If there is no SAP GUI installed on the machine where the connector is to be installed, the SAP system gateway port has to be written manually in the file:
C:\Windows\System32\drivers\etc\services.
Add the following information at the end of the file:
sapgw01 – sapgw99 3301/tcp - 3399/tcp #SAP System Gateway Port
sapdp01 – sapdp99 3201/tcp – 3299/tcp #SAP Dialog Service (dispatcher port)
Example:
Sapgw01 3301/tcp #SAP System Gateway Port
Sapdp01 3201/tcp #SAP Dialog Service Port
Sapgw02 3302/tcp #SAP System Gateway Port
Sapdp02 3202/tcp #SAP Dialog Service Port
If passing through a message server, an entry may have to be added in the C:\WINDOWS\system32\drivers\etc\services file. Add sapmsxxx 36nn/tcp, where xxx is the system ID and nn is the system number. If it is the last line in the file, add a new line break after the entry.
If there is a firewall between the connector and the SAP system, port 33nn has to be open (where nn = system number of the SAP system).
Restrictions for the IDoc method
If several data sources or extractors have to be loaded at the same time, set up multiple logical systems. Make sure to use the same logical system when loading the deltas.
The total length of an IDoc is 1000 characters. The normal length of an extractor is between 250 and 700, but when using a BW or CRM system with many text fields, the length of the extractor could end up above this. If so, exclude some fields in order to be able to use the extractor. The total length of an activated extractor can be checked using transaction WE30.
Language dependencies
All standard data sources and extractor are maintained in every language. A customized data source is only activated in the log on language if no action is taken. This has to be taken into consideration when activating a data source in the SAP system.
Custom Namespace
If the data sources in the SAP system are generated with the addition of a custom namespace in the technical name, the namespace needs to be active in SAP transaction RSNSPACE. Otherwise the activation of the extractor will fail.
Finding activated data sources
The relevant activated data sources are found in the SAP system:
- In transaction SE16 in the SAP ERP, the extractor are found in table ROOSOURCE.
- In BW, the table name is RSOLTPSOURCE.
Use transaction WE30 and check the Basic IDoc Type to see which segment has been activated.
Logistics data sources
In logistics, activities have to be carried out in several areas in order to use the extractor within the SAP Business Information Warehouse.
These areas can be found by going to transaction SBIW.
Managing extract structures
This section is used for customization of extract structures in movement data for logistics. The old LIS technique for the transfer information structures has some disadvantages compared to the new technique and is no longer necessary. There are, however, some overlaps between the two techniques, particularly if LIS and BW are to be used in parallel.
Initialization
The initialization must be prepared by OLTP. A setup completes the setup tables, which are then read during the initialization.
To enable the setup to be reset after a termination, assign a name to each background run for the setup. Then, if a setup terminates or a setup from the archive documents is interrupted, the status of the setup at the point of termination can be stored under the assigned name. When restarting the setup using the assigned name, the processing can continue from the point of termination without having to go through the entire process again. Once the run has completed successfully, the in-between status stored in the memory is deleted.
The setup must run in the background.
Filling the setup table
Completing the setup tables is a critical action that must be carried out with caution. For large amounts of data, this can take more than a night and may have to be done over a weekend.
The setup log (transaction NPRT) contains information on setups that have already been carried out.
Application-specific setup of statistical data
This section describes the relevant, application-specific features for applications that can perform statistical setups.
Example: SD-Sales Orders – perform setup
- Standard settings: In this activity, selected sales orders are called and the statistical update of the BW extraction structures for sales orders is triggered. The statistical update used here corresponds to the one chosen in the customizing cockpit.
- Requirements: Before this activity can be carried out, at least one extraction structure in the application must have been activated. For more information, consult the SAP resources about the ‘Logistics Data Extraction: Customizing Cockpit’ transaction (transaction code LBWE).
Migrate Extractor environment
When the Extractor environment has been created, it is possible to migrate it to other SAP systems in the landscape by using the SAP transport management system. This functionality can be used by customers who do not want to change the SAP configuration in production systems. Instead the Extractor environment can be created in a development system and migrated to the production system.
Do the following:
- Create the Extractor environment in the unlocked source system with the existing transaction /N/QTQVC/EXTRACTOR_ADM.
-
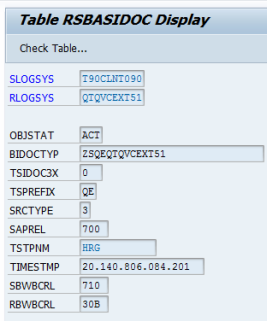
Then check the database table RSBASIDOC in the source system with transaction SE16. Enter the name of the Extractor Environment Logical System and click Execute.
-
Then enter the name of the TSPREFIX (Transfer structure prefix), from the source system, in the same table in the target system and click Execute.
 Information noteIf a record is found with the same TSPREFIX in the target system, the transport function cannot be used (a workaround is to create a new Extractor environment in the source system to get another TSPREFIX that is not already used in the target system).
 - If the prerequisite above is fulfilled, then execute the transaction /N/QTQVC/MIGRATE_ENV in the source system to put the Extractor environment into a transport.
- Migrate and import the transport into the correct client in the Target system.
-
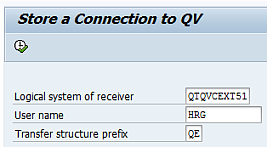
After the import, execute the transaction /N/QTQVC/CONNECT_ENV in the target system. Enter Logical system of receiver, User name and Transfer structure prefix (found above in the source system) and click Execute.
-
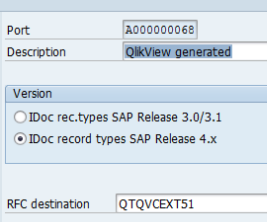
Go to transaction WE21 (under Transactional RFC) in the target system and generate a new port name and save it. The RFC destination should contain the Extractor Environment Logical System name.
-
Go to transaction WE20 and find the partner profile for the Partner Type LS and the Extractor Environment Logical System name.
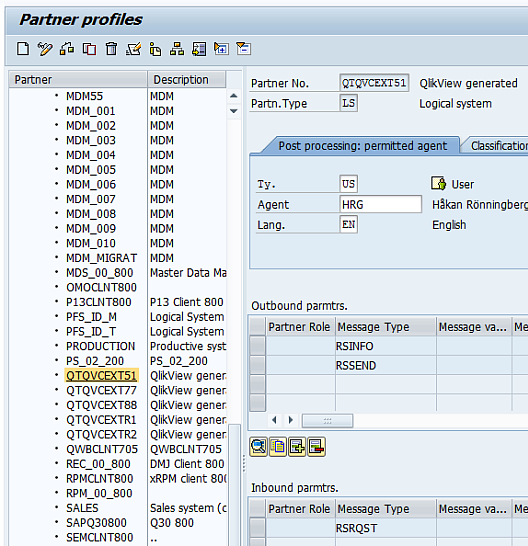
-
Double-click the Message TypeRSINFO.
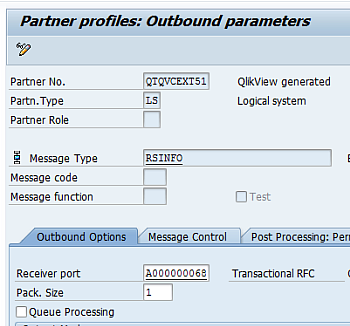
- Assign the port name which was generated for Receiver port, click Enter and Save.
- Do the same for the Message Type RSSEND.
-
Finally perform the Modify option in the transaction /n/QTQVC/EXTRACTOR_ADM to update the Gateway Host and Gateway Service of the RFC connection used by the Logical system.
The Extractor environment is ready to use.
Migrate activated Extractors
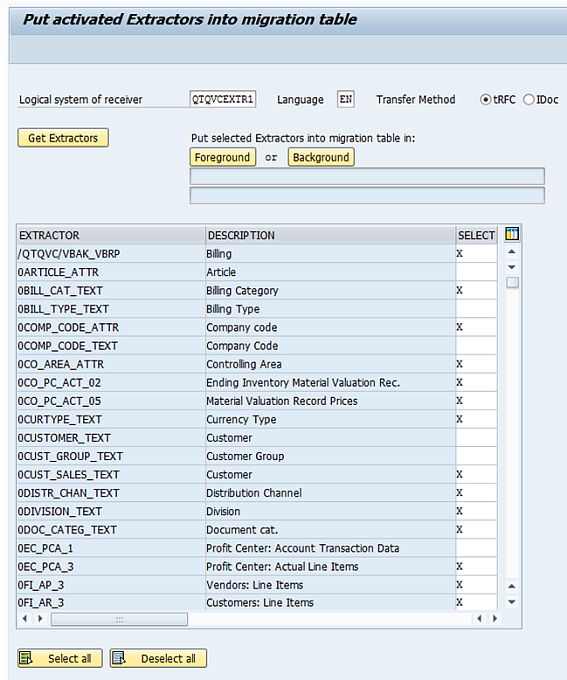
In the first system in the SAP system landscape, put the activated Extractors that should be migrated into the database table /QTQVC/EXTRACT.
Do the following:
-
Use the transaction /QTQVC/MIGRATE_PREP:
-
In the same system in the SAP system landscape, create a Transport request containing activated Extractors for the specific Logical system. Perform step 1 in the transaction /QTQVC/MIGRATE_EXTR:
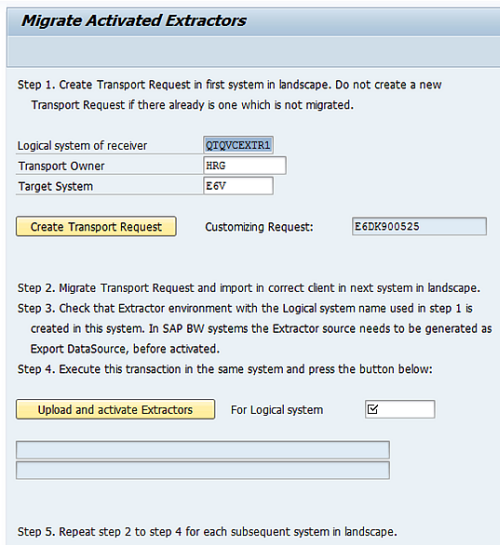
-
Perform step 2 and step 3 described in this transaction dialog.
-
Execute the same transaction /QTQVC/MIGRATE_EXTR in the SAP system where step 2 and step 3 were performed. Then perform step 4:
-
Then perform step 5 in each system in the SAP system landscape.