Single sign-on (SSO)
With single sign-on (SSO), you can minimize the number of times a user has to log on to access apps and websites.
When you set up SAP Connector as a data source in Qlik Sense, you can configure SAP Connector for SSO. You store the Qlik Sense user credentials and define a trusted relationship so that the system passes the Qlik Sense credentials to the connector.
Requirements
The following prerequisites must be set up in the SAP environment before configuring SSO:
-
The SAP BW platform must be configured for Secure Network Communication (SNC). For more information on SNC, see Secure network communication.
-
The version of SAP Cryptolib file type on the SAP BW platform must be compatible with the version of the SAP Cryptolib on the Qlik Sense server.
The files needed can be found on the SAP help portal:
- SAPCAR32-bit version for unpacking files.
- SAPCRYPTOLIB 64-bit version, in a build that is suitable for the servers where SAP BW and Qlik Sense are deployed.
- A user account.
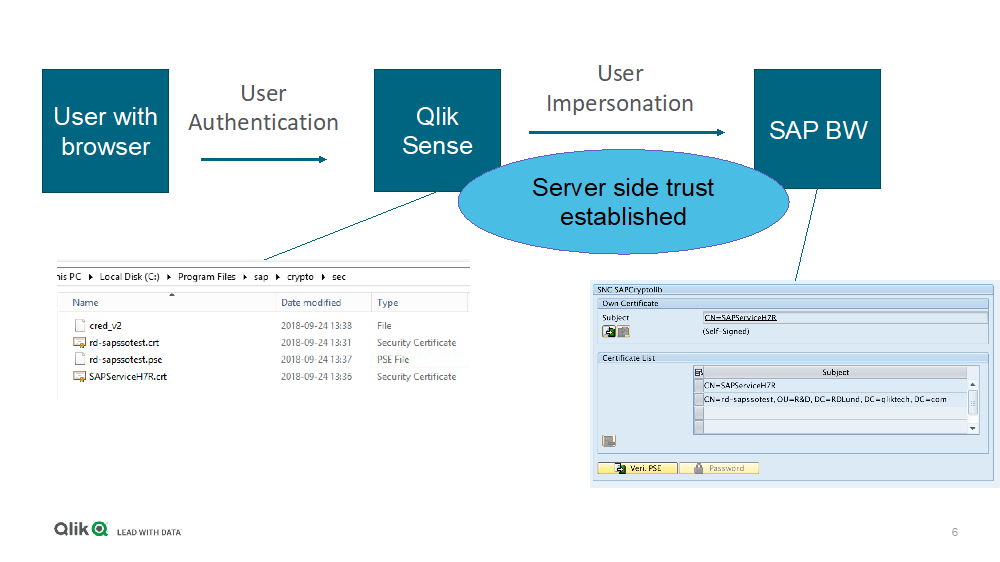
Server-side trust overview
The server-side trust path for SSO with Qlik Sense and SAP is as follows:
- A user in browser authenticates with their credentials.
- Their credentials are sent to Qlik Sense, which refers against the installed cryptographic credentials.
- Qlik Sense then impersonates the user when connecting to SAP BW, using the credentials to establish server-side trust.
Setup on the Qlik server
Three environment variables need to be set on the Qlik Sense server: SNC_LIB, SECUDIR and QLIK_SNC_LIB.
-
32-bit SAP Cryptolib must be installed on the Qlik Sense server. Set the environment variables SNC_LIB and SECUDIR.
Do the following:
-
Copy the files SAPCAR_<Version>.EXE and SAPCRYPTOLIBP_<Version>.SAR to an empty temporary directory.
-
Run the command: SAPCAR_<Version>.EXE –xvf SAPCRYPTOLIBP_<Version>.SAR
-
Copy the extracted files to the location you intend to use as the SNC_LIB directory. Usually this is C:\Program Files\SAP\Crypto.
-
Create a system environment variable named SNC_LIB that points at the file sapcrypto.dll that you copied to this directory. This could be C:\Program Files\SAP\Crypto\sapcrypto.dll.
-
Create a system environment variable named SECUDIR that points at a sub directory for the SNC_LIB named sec. This could be C:\Program Files\SAP\Crypto\sec. Move the file sapgenpse.exe from the SNC_LIB folder to the SECUDIR folder.
-
64-bit SAP Cryptolib must be installed on the Qlik Sense server.
Extract the 64-bit SAPCRYPTOLIBP_<Version>.SAR file with SAPCAR to an empty folder using the command SAPCAR_<Version>.EXE –xvf SAPCRYPTOLIBP_<Version>.SAR.
Move the files to an appropriate folder. This could be C:\Program Files\SAP\Crypto64. Create the environment variable QLIK_SNC_LIB and point it to the 64 bit sapcrypto.dll. This could be C:\Program Files\SAP\Crypto64\sapcrypto.dll.
Establishing server-side trust
To establish server-side trust you must do the following.
- Generate a new Personal Security Environment using sapgenpse.
- Import the Qlik Sense PSE certificate.
- Export the BW Instance Certificate.
- Set up access control for the Qlik Sense server identity.
- Import the BW Instance Certificate on the Qlik Sense server.
- Configure PSE access on the Qlik Sense server.
Generating a new Personal Security Environment (PSE)
To generate a new PSE you will need to execute sapgenpse on the Qlik Sense server, using the 32-bit SAP Cryptolib. Make sure that you create the PSE with the same user that is set to run the Qlik Sense services.
Do the following:
-
Log on to the server using the same user that is set to run the Qlik Sense services.
-
Choose a PIN. Keep a record of the PIN because it will be needed in the following steps.
-
Navigate to the SECUDIR directory. Τhis could be C:\Program Files\SAP\Crypto\sec.
-
Execute sapgenpse.exe with a command line tool using the following commands:
- sapgenpse.exe gen_pse -v -p <NameOfQlikUser>.pse
- Enter your chosen PIN twice. Ignore the warning.
- Enter the Distinguished Name of PSE owner as defined in Active Directory or similar: CN=<NameOfQlikUser>,OU=<OrganizationalUnit>,DC=<DomainComponent>
Example:CN=rd-sapssotest,OU=R&D,DC=RDLund,DC=qliktech,DC=com
-
Verify that the SECUDIR directory contains a .pse file.
-
Export the PSE’s certificate with the following command:
-
sapgenpse.exe export_own_cert –v –p <NameOfQlikUser>.pse –o < NameOfQlikUser>.crt
-
-
Verify that the SECUDIR directory contains a .crt file.
Importing the PSE certificate
You need to import the Qlik Sense PSE certificate in the SAP BW instance using STRUST.
Do the following:
-
Log into the BW instance and start Transaction STRUST.
-
Double-click the entry under SNC_SAPCryptolib in the left pane.
- Verify that the Own Certificate subject value changes to the Distinguished Name of the BW Instance Identity. For example, CN=SAPServiceH7R.
-
Double-click the Own Certificate value to view details in the Certificate section of the Trust Manager: Change screen.
- Import the Qlik Sense server .crt file:
- Click the eyeglass button in the upper left corner to enable editing.
- Click Import certificateat the bottom left corner of the certificate section.
- In the Import Certificate dialog, browse to your SECUDIR directory, select the .crt file, and select the green check mark.
- Click Add to Certificate List at the bottom of the certificate section.
- Verify that the certificate appears in the Certificate List.
-
Click Save.
Exporting the BW Instance Certificate
You need to export the BW Instance Certificate using STRUST.
Do the following:
- Double-click the entry under SNC SAPCryptolib in the left pane.
- Double-click the Own Certificate subject value. For example, CN= SAPServiceH7R.
- In the certificate section, verify that the subject value matches the Own Certificate value.
- Export <BWInst.crt>:
- Click the eyeglass icon in the upper left corner to enable editing.
- Click the Export certificate button in bottom left corner of the certificate section.
- In the export dialog, navigate to the SECUDIR directory and enter <BWInst.crt> in the File name box.
- Specify the file format Base64 and click the green check button.
- Verify that the certificate now appears in the SECUDIR directory.
- Exit transaction STRUST.
Setting up access control for the Qlik Sense server identity
You must set up access control for the Qlik Sense server identity in SNC0.
Do the following:
- Start transaction SNC0.
- Select New Entries.
- In the System ID box, provide a value for the Qlik Sense server identity.
- Click the pencil button on the SNC Name box and enter the SNC Name of the Qlik Sense identity. This value should be p: followed by the Distinguished Name of the Qlik Sense server identity. This could be p:CN=<NameOfQlikUser>,OU=<OrganizationalUnit>,DC=<DomainComponent>.
- Click the green check mark. You should now see a green check mark next to Canonical Name Determined.
- Check the following boxes:
- Entry for RFC activated
- Entry for CPIC activated
- Entry for certificate activated
- Entry for ext. ID activated
- Click Save.
- Exit transaction SNC0.
Importing the BW Instance Certificate on the Qlik Sense server
In the SECUDIR directory, execute the following command: ..\sapgenpse.exe maintain_pk -v -a <BWInst.crt> -p <SenseSrv.pse>
Configuring PSE access on the Qlik Sense server.
You must also configure PSE access on the Qlik Sense server.
Do the following:
- Execute the following command: ..\sapgenpse.exe seclogin -p <SenseSrv.pse>
- Verify that the directory contains a cred_v2 file.
- List the contents of the PSE by executing the following command:
..\sapgenpse.exe maintain_pk -l
The PKList should have at least one entry with Subject and Issuer values that match the Distinguished Name of the BW Instance Identity.
User mapping in SAP
Do the following:
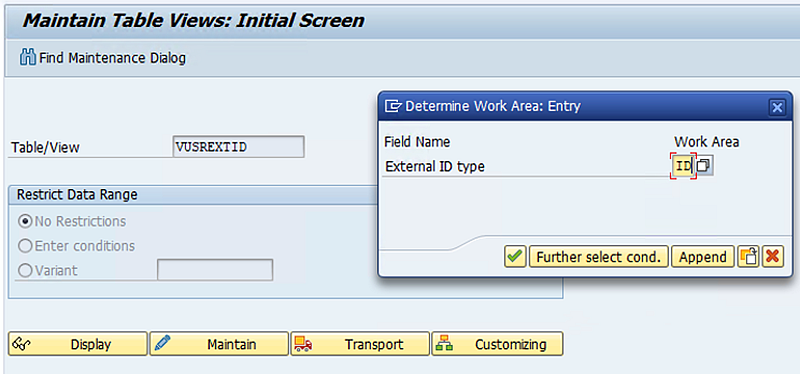
- Start transaction SM30.
- Select the view VUSREXTID.
- Click Maintain.
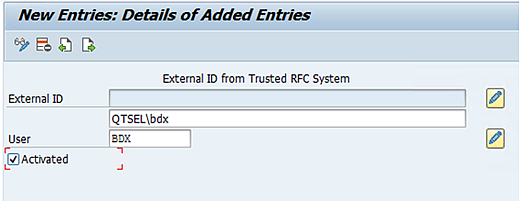
- Add the mappings with External ID type set to ID.
- Check the Activated box and save the record.
The External ID should be the username in Qlik Sense. Usernames in Sense are of the form Domain\User. The User is the SAP username.