This scenario presents a Job that checks the type, nullability, and length of data
from an incoming flow against a defined reference schema, and displays the validation
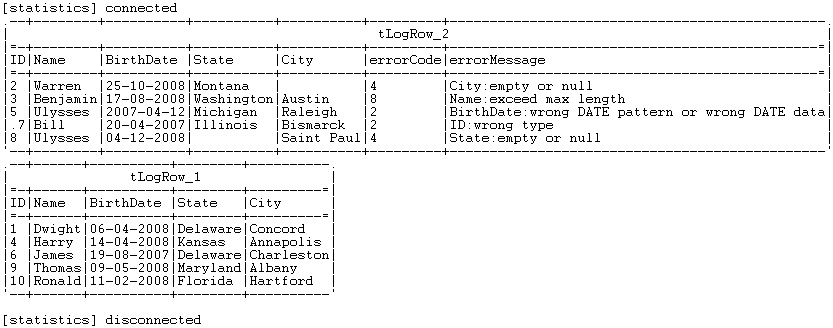
results on the Run console.
The incoming flow comes from a simple CSV file that contains heterogeneous
data including wrong data type, data exceeding the maximum length, wrong ID and null values
in non-nullable columns, as shown below:
This scenario applies only to Talend Data Management Platform, Talend Big Data Platform, Talend Real-Time Big Data Platform, Talend Data Services Platform, and
Talend Data Fabric.
Setting up the Job
Procedure
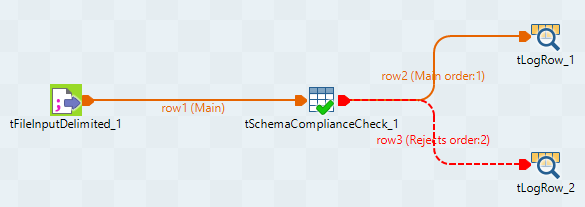
Drop the following components: a tFileInputDelimited, a tSchemaComplianceCheck, and two tLogRow components from the Palette to the design workspace.
Connect the tFileInputDelimited component to the tSchemaComplianceCheck component using a Row > Main connection.
Connect the tSchemaComplianceCheck component to one tLogRow component using a Row > Main connection. This output flow will gather the valid data.
Connect the tSchemaComplianceCheck component to the other tLogRow component using a Row > Rejects connection. This output flow will gather the non-compliant data. It
passes two additional columns to the next component:
errorCode and
errorMessage. These two read-only columns provide
information about the rejected data to ease error handling and troubleshooting if
needed.
Configuring the components
Procedure
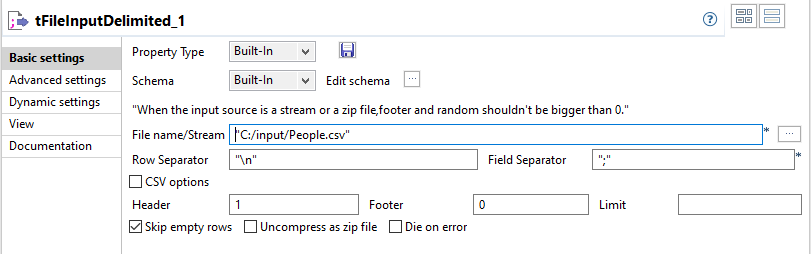
Double-click the tFileInputDelimited component to display its Basic settings view.
Define the basic parameters including the input file name and the number of header
rows to skip.
Click the [...] button next
to Edit schema to describe the data structure
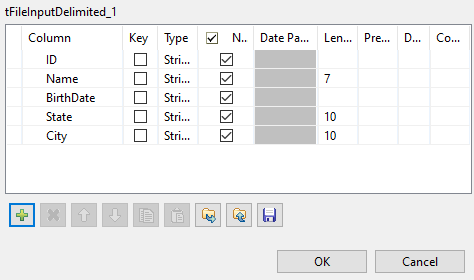
of the input file. In this example, the schema is made of five columns:
ID, Name,
BirthDate, State, and
City.
Fill the Length field for
the Name, State, and
City columns with 7,
10 and 10 respectively.
Click OK.
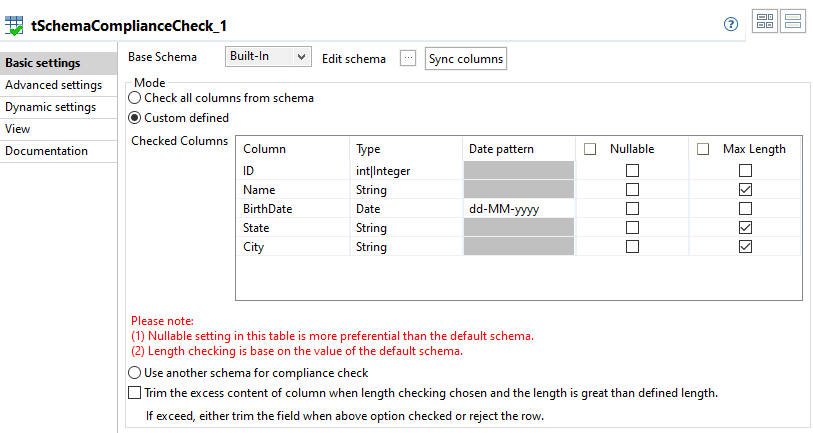
Double-click the tSchemaComplianceCheck component to display its Basic settings view.
Define the validation parameters.
In the Mode area, select the
Custom defined option to perform custom
defined checks.
In this example, you use the Checked columns table to set the validation parameters. However,
you can also select the:
Check all columns from schema check
box if you want to perform all the checks (type, nullability, and length) on
all the columns against the base schema.
Use another schema for compliance
check option and define a new schema as the expected
structure of the data.
In the Checked Columns
table, define the checks to be performed. In this example:
The type of the ID column should be Int|Integer.
The length of the Name, State
and City columns should be checked.
The type of the BirthDate column should be Date, and the expected date pattern is
dd-MM-yyyy.
All the columns should be checked for null values, so clear the Nullable check box for all the columns.
Information noteTip: To send rows containing fields exceeding the
defined maximum length to the reject flow, clear the Trim the excess content of column when length checking chosen and the
length is greater than defined length check box.
In the Advanced settings view of the
tSchemaComplianceCheck component,
select the Treat all empty string as NULL
option to sent any rows containing empty fields to the reject flow.
To view the validation result in tables on the Run console, double-click each tLogRow component and select the Table option in the Basic
settings view.
Executing the Job
Procedure
Save your Job and press F6 to launch it.
Two tables are displayed on the console, showing the valid data and
rejected data respectively.