
Pardot (v1)
Last updated: 9/15/2026This integration is powered by Singer's Pardot tap and certified by Stitch. Check out and contribute to the repo on GitHub.
For support, contact Support.
Pardot integration summary
Stitch’s Pardot integration replicates data using the Pardot API. Refer to the Schema section for a list of objects available for replication.
Pardot feature snapshot
A high-level look at Stitch's Pardot (v1) integration, including release status, useful links, and the features supported in Stitch.
| STITCH | |||
| Release status |
Released on February 12, 2020 |
Supported by
|
|
|
Stitch plan
|
Standard |
API availability
|
Available
|
| Singer GitHub repository | |||
| REPLICATION SETTINGS | |||
|
Anchor Scheduling
|
Supported
|
Advanced Scheduling
|
Supported
|
|
Table-level reset
|
Unsupported
|
Configurable Replication Methods
|
Unsupported
|
| DATA SELECTION | |||
|
Table selection
|
Supported
|
Column selection
|
Supported
|
|
Select all
|
Supported
|
||
| TRANSPARENCY | |||
|
Extraction Logs
|
Supported
|
Loading Reports
|
Supported
|
Connecting Pardot
Pardot setup requirements
To set up Pardot in Stitch, you need:
-
A user with a preferred timezone of UTC. This is required to ensure you don’t encounter Extraction errors during Daylight Savings Time, as some Replication Key fields used by Stitch are reported in Pardot using the user’s preferred timezone. By using UTC, this ensures that time data is accurately reported during extraction. Otherwise, you might encounter Extraction errors during Daylight Savings Time.
Step 1: Retrieve your Pardot business unit ID
- Sign into your Salesforce account.
- Navigate to the Setup page.
- Go to Account Engagement > Business Unit Setup.
- The setup page will display. Copy your Pardot Business Unit ID and keep it readily available for the next step.
Step 2: Add Pardot as a Stitch data source
- Sign into your Stitch account.
-
On the Stitch Dashboard page, click the Add Integration button.
-
Click the Pardot icon.
-
Enter a name for the integration. This is the name that will display on the Stitch Dashboard for the integration; it’ll also be used to create the schema in your destination.
For example, the name “Stitch Pardot” would create a schema called
stitch_pardotin the destination. Note: Schema names cannot be changed after you save the integration. - In the Pardot Business Unit Id field, paste your Business Unit ID that you copied in Step 1.
Step 3: Define the historical replication start date
The Sync Historical Data setting defines the starting date for your Pardot integration. This means that data equal to or newer than this date will be replicated to your data warehouse.
Change this setting if you want to replicate data beyond Pardot’s default setting of 1 year. For a detailed look at historical replication jobs, check out the Syncing Historical SaaS Data guide.
Step 4: Create a replication schedule
In the Replication Frequency section, you’ll create the integration’s replication schedule. An integration’s replication schedule determines how often Stitch runs a replication job, and the time that job begins.
Pardot integrations support the following replication scheduling methods:
-
Advanced Scheduling using Cron (Advanced or Premium plans only)
To keep your row usage low, consider setting the integration to replicate less frequently. See the Understanding and Reducing Your Row Usage guide for tips on reducing your usage.
Step 5: Authorize Stitch to access Pardot
- When finished in the Integration Settings page, click the Authorize button. You’ll be prompted to sign into your Pardot account.
- Sign into your Pardot account.
- After the authorization process is successfully completed, you’ll be directed back to Stitch.
- Click All Done.
Step 6: Set objects to replicate
The last step is to select the tables and columns you want to replicate. Learn about the available tables for this integration.
Note: If a replication job is currently in progress, new selections won’t be used until the next job starts.
For Pardot integrations, you can select:
-
Individual tables and columns
-
All tables and columns
Click the tabs to view instructions for each selection method.
- In the integration’s Tables to Replicate tab, locate a table you want to replicate.
-
To track a table, click the checkbox next to the table’s name. A blue checkmark means the table is set to replicate.
-
To track a column, click the checkbox next to the column’s name. A blue checkmark means the column is set to replicate.
- Repeat this process for all the tables and columns you want to replicate.
- When finished, click the Finalize Your Selections button at the bottom of the screen to save your selections.
- Click into the integration from the Stitch Dashboard page.
-
Click the Tables to Replicate tab.
- In the list of tables, click the box next to the Table Names column.
-
In the menu that displays, click Track all Tables and Fields:
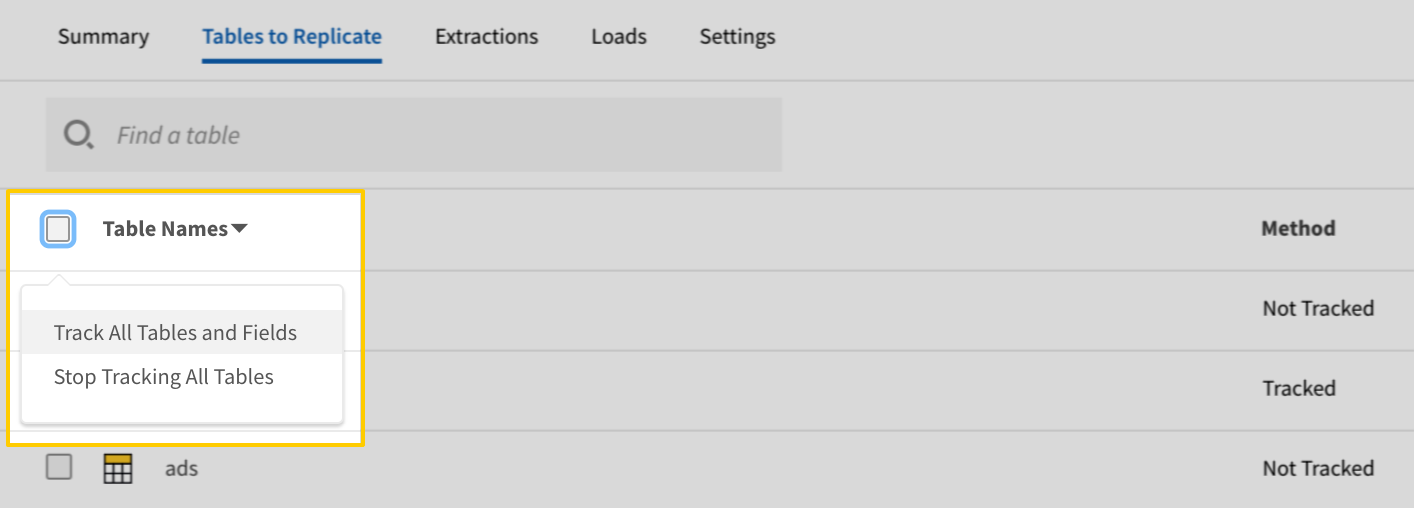
The Track all Tables and Fields menu in the Tables to Replicate tab - Click the Finalize Your Selections button at the bottom of the page to save your data selections.
Initial and historical replication jobs
After you finish setting up Pardot, its Sync Status may show as Pending on either the Stitch Dashboard or in the Integration Details page.
For a new integration, a Pending status indicates that Stitch is in the process of scheduling the initial replication job for the integration. This may take some time to complete.
Initial replication jobs with Anchor Scheduling
If using Anchor Scheduling, an initial replication job may not kick off immediately. This depends on the selected Replication Frequency and Anchor Time. Refer to the Anchor Scheduling documentation for more information.
Free historical data loads
The first seven days of replication, beginning when data is first replicated, are free. Rows replicated from the new integration during this time won’t count towards your quota. Stitch offers this as a way of testing new integrations, measuring usage, and ensuring historical data volumes don’t quickly consume your quota.
Pardot table reference
Schemas and versioning
Schemas and naming conventions can change from version to version, so we recommend verifying your integration’s version before continuing.
The schema and info displayed below is for version 1 of this integration.
This is the latest version of the Pardot integration.
Table and column names in your destination
Depending on your destination, table and column names may not appear as they are outlined below.
For example: Object names are lowercased in Redshift (CusTomERs > customers), while case is maintained in PostgreSQL destinations (CusTomERs > CusTomERs). Refer to the Loading Guide for your destination for more info.
campaigns
The campaigns table contains info about the campaigns in your Pardot account.
|
Key-based Incremental |
|
|
Primary Key |
id |
|
Replication Key |
id |
| Useful links |


email_clicks
The email_clicks table contains info about email click events.
|
Key-based Incremental |
|
|
Primary Key |
id |
|
Replication Key |
created_at |
| Useful links |
list_memberships
The list_memberships table contains info about list memberships.
Note: To replicate this table, the lists table must also be set to replicate.
|
Key-based Incremental |
|
|
Primary Key |
id |
|
Replication Keys |
id list_id updated_at |
| Useful links |
lists
The lists table contains info about the lists in your Pardot account.
|
Key-based Incremental |
|
|
Primary Key |
id |
|
Replication Key |
updated_at |
| Useful links |
opportunities
The opportunities table contains info about the opportunities in your Pardot account.
|
Key-based Incremental |
|
|
Primary Key |
id |
|
Replication Keys |
id updated_at |
| Useful links |
prospect_accounts
The prospect_accounts table contains info about prospect accounts.
|
Key-based Incremental |
|
|
Primary Key |
id |
|
Replication Key |
updated_at |
| Useful links |
prospects
The prospects table contains info about the prospects in your Pardot account.
|
Key-based Incremental |
|
|
Primary Key |
id |
|
Replication Key |
updated_at |
| Useful links |
users
The users table contains info about the users in your Pardot account.
|
Key-based Incremental |
|
|
Primary Key |
id |
|
Replication Keys |
id updated_at |
| Useful links |
visitor_activities
The visitor_activities table contains info about visitor activities.
|
Key-based Incremental |
|
|
Primary Key |
id |
|
Replication Key |
id |
| Useful links |
visitors
The visitors table contains info about visitors.
|
Key-based Incremental |
|
|
Primary Key |
id |
|
Replication Key |
updated_at |
| Useful links |
visits
The visits table contains info about visits.
Note: To replicate this table, you must also set the visitors table to replicate.
|
Key-based Incremental |
|
|
Primary Key |
id |
|
Replication Keys |
id updated_at |
| Useful links |