
Shopify (v3)
Last updated: 9/15/2026This integration is powered by Singer's Shopify tap and certified by Stitch. Check out and contribute to the repo on GitHub.
For support, contact Support.
Shopify integration summary
Stitch’s Shopify integration replicates data using the Shopify GraphQL Admin API (v2025-01). Refer to the Schema section for a list of objects available for replication.
Shopify is now powered by GraphQL
We’ve enhanced the Stitch’s Shopify integration by replacing REST Admin API by the Shopify GraphQL API. This provides:
- More structured and complete data
- Better performance and scalability
- Access to new fields that are unavailable in REST
What has changed?
The data structure has been reorganized for consistency and clarity. Some fields may look different or appear in new locations. Also, a few fields are deprecated from the Shopify side.
If you need help, you can compare the structures. Refer to Shopify documentation:
Check out our updated Shopify docs for stream-level details and examples.
Shopify feature snapshot
A high-level look at Stitch's Shopify (v3) integration, including release status, useful links, and the features supported in Stitch.
| STITCH | |||
| Release status |
Released on April 1, 2025 |
Supported by
Indicates if the integration is supported by Stitch or the Singer community. |
|
|
Stitch plan
The type of Stitch plan required to use the integration. |
Standard |
API availability
Indicates if the integration is available as a source in Stitch Connect. |
This version of the integration is available via the API. |
| Singer GitHub repository | |||
| REPLICATION SETTINGS | |||
|
Anchor Scheduling
A type of replication scheduling where an integration's Replication Frequency is anchored to a time you select. |
This feature is supported for this version of the integration. |
Advanced Scheduling
A type of replication scheduling that allows you to specify granular start times for data extraction using cron expressions. |
This feature is supported for this version of the integration. |
|
Table-level reset
Indicates if data can be reset at the table level. If unsupported, data can only be reset at the integration level. |
Table-level resets are not supported for this integration. Resets are only supported at the integration level. |
Configurable Replication Methods
Indicates if Replication Methods can be defined by you for tables in the integration. |
Configurable Replication Methods are not supported for this integration. Stitch will use pre-defined replication methods for tables you set to replicate. |
| DATA SELECTION | |||
|
Table selection
The ability to select individual tables for replication in the Stitch interface. If table selection is unavailable, all tables and all the columns they contain will be set to replicate by default. |
This feature is supported for this version of the integration. |
Column selection
The ability to select individual columns for replication in the Stitch interface. If column selection is unavailable, all columns will be set to replicate by default. |
This feature is supported for this version of the integration. |
|
Select all
Indicates if the integration supports selecting all available tables and columns. |
Supported |
||
| TRANSPARENCY | |||
|
Extraction Logs
Logs detailing the Extraction phase of the replication process for a given integration. Includes error info, should an error occur. |
This feature is supported for this version of the integration. |
Loading Reports
Reports detailing the Loading phase of the replication process for a given integration. Includes the number of rows loaded for each table and error info, should an error occur. |
This feature is supported for this version of the integration. |
Connecting Shopify
Shopify setup requirements
To set up Shopify in Stitch, you need:
-
Admin access in Shopify. This is required to create and manage custom apps.
Note: If you’re on a Shopify Plus plan, the permissions required may differ. Store owners can grant users permissions to manage apps and custom integrations. In general, app management permissions should be sufficient.
Refer to the Shopify Staff permissions documentation for more information.
-
Access to Shopify Developer Dashboard with app management permissions. You’ll use this to create a custom app and generate credentials.
-
Note: Access tokens refresh automatically every 24 hours and are managed server-side by Stitch. You don’t need to manually refresh your credentials.
Step 1: Add Shopify as a Stitch data source
- Sign into your Stitch account.
-
On the Stitch Dashboard page, click the Add Integration button.
-
Click the Shopify icon.
-
Enter a name for the integration. This is the name that will display on the Stitch Dashboard for the integration; it’ll also be used to create the schema in your destination.
For example, the name “Stitch Shopify” would create a schema called
stitch_shopifyin the destination. Note: Schema names cannot be changed after you save the integration.
Step 2: Create a Shopify custom app
A custom app allows you to securely generate credentials that Stitch will use to authenticate and replicate data from your Shopify store.
To create a custom app:
- Log into your Shopify Admin Dashboard.
- In the sidebar, go to Settings > Apps and integrations.
- Click Develop apps (or App and sales channel settings if using Shopify Plus).
- Click Create an app.
- Enter a name for your app (for example:
Stitch). - Click Create app.
The app is created. Do not install it. You need to request some Shopify access first. See the next step.
Step 3: Request access from Shopify
To access certain Shopify API scopes, you must request access from Shopify before installing your custom app. The following scopes require explicit approval:
read_all_orders scope
By default, you only have access to the last 60 days of orders. To access all historical orders, you must request the read_all_orders scope in the Shopify Partners dashboard.
To request the read_all_orders scope:
- Go to the Shopify Partners dashboard.
- Navigate to Apps and select your app.
- Open the API access requests section.
- In the Read all orders section, click Request access.
- In the access request justification, specify that the app needs full read-only access to historical orders for long-term analytics, reconciliation, and reporting.
- Submit the request and wait for Shopify approval.
After Shopify approves the request, you can add the read_all_orders scope to your app scope list. If the app was already installed before this permission was granted, you must uninstall and reinstall the app for the new scope to take effect.
read_users scope
To use the read_users scope, one of the following conditions must be true:
- The app must be a finance embedded app.
- The app must be installed on a Shopify Plus or Advanced store.
Contact Shopify Support to enable this scope if required.
Step 4: Install the Shopify custom app
Follow this step only if you’ve created the app and requested access from Shopify. See the previous steps.
- Go to the Shopify Partners dashboard.
- In the Configuration tab, click Admin API access scopes.
-
Select or copy-paste the following required scopes:
read_orders,read_all_orders,read_customers,read_products,read_checkouts,read_inventory,read_locations,read_assigned_fulfillment_orders,read_merchant_managed_fulfillment_orders,read_third_party_fulfillment_orders.Scope Purpose read_ordersReplicate order data read_all_ordersReplicate historical order data read_customersReplicate customer information read_productsReplicate product catalog read_checkoutsReplicate checkout data read_inventoryReplicate inventory levels read_locationsReplicate store locations read_assigned_fulfillment_ordersReplicate assigned fulfillment orders read_merchant_managed_fulfillment_ordersReplicate merchant-managed fulfillment orders read_third_party_fulfillment_ordersReplicate third-party fulfillment orders - Click Save.
- In the API credentials tab, under Admin API access token, click Reveal token once. You’ll see your Client ID and Client Secret.
- Store these credentials securely. You need them in the next step. Your Client Secret will only be visible once after initial creation. Store it securely before navigating away.
- Click Install app.
Step 5: Define the historical replication start date
The Sync Historical Data setting defines the starting date for your Shopify integration. This means that data equal to or newer than this date will be replicated to your data warehouse.
Change this setting if you want to replicate data beyond Shopify’s default setting of 1 year. For a detailed look at historical replication jobs, check out the Syncing Historical SaaS Data guide.
Step 6: Create a replication schedule
In the Replication Frequency section, you’ll create the integration’s replication schedule. An integration’s replication schedule determines how often Stitch runs a replication job, and the time that job begins.
Shopify integrations support the following replication scheduling methods:
-
Advanced Scheduling using Cron (Advanced or Premium plans only)
To keep your row usage low, consider setting the integration to replicate less frequently. See the Understanding and Reducing Your Row Usage guide for tips on reducing your usage.
Step 7: Set objects to replicate
The last step is to select the tables and columns you want to replicate. Learn about the available tables for this integration.
Note: If a replication job is currently in progress, new selections won’t be used until the next job starts.
For Shopify integrations, you can select:
-
Individual tables and columns
-
All tables and columns
Click the tabs to view instructions for each selection method.
- In the integration’s Tables to Replicate tab, locate a table you want to replicate.
-
To track a table, click the checkbox next to the table’s name. A blue checkmark means the table is set to replicate.
-
To track a column, click the checkbox next to the column’s name. A blue checkmark means the column is set to replicate.
- Repeat this process for all the tables and columns you want to replicate.
- When finished, click the Finalize Your Selections button at the bottom of the screen to save your selections.
- Click into the integration from the Stitch Dashboard page.
-
Click the Tables to Replicate tab.
- In the list of tables, click the box next to the Table Names column.
-
In the menu that displays, click Track all Tables and Fields:
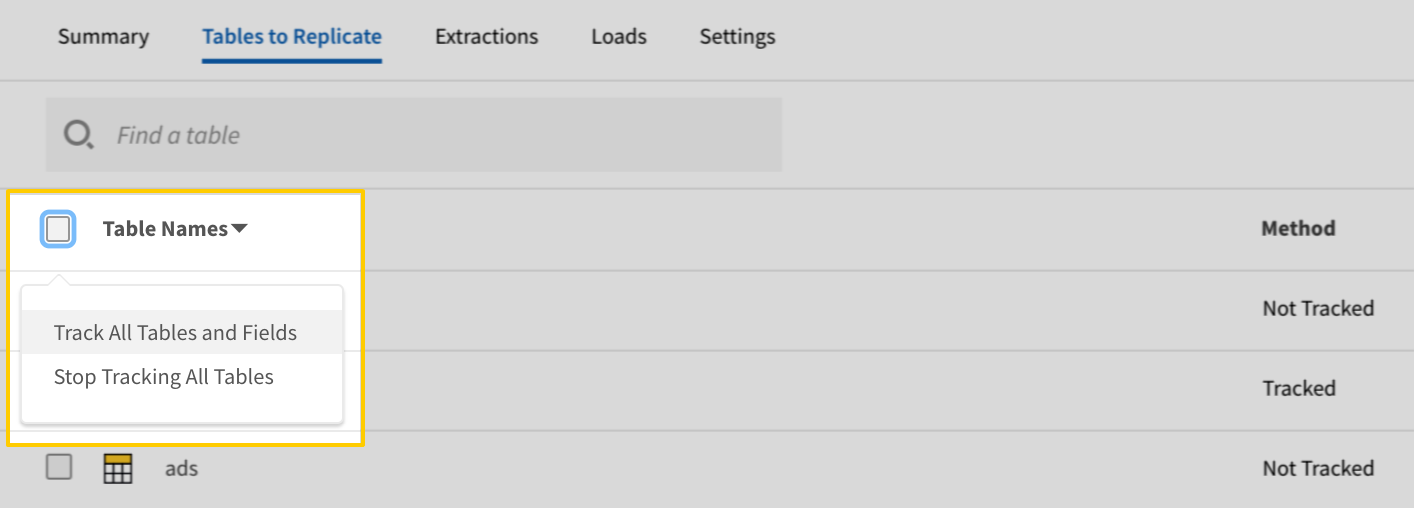
The Track all Tables and Fields menu in the Tables to Replicate tab - Click the Finalize Your Selections button at the bottom of the page to save your data selections.
Initial and historical replication jobs
After you finish setting up Shopify, its Sync Status may show as Pending on either the Stitch Dashboard or in the Integration Details page.
For a new integration, a Pending status indicates that Stitch is in the process of scheduling the initial replication job for the integration. This may take some time to complete.
Initial replication jobs with Anchor Scheduling
If using Anchor Scheduling, an initial replication job may not kick off immediately. This depends on the selected Replication Frequency and Anchor Time. Refer to the Anchor Scheduling documentation for more information.
Free historical data loads
The first seven days of replication, beginning when data is first replicated, are free. Rows replicated from the new integration during this time won’t count towards your quota. Stitch offers this as a way of testing new integrations, measuring usage, and ensuring historical data volumes don’t quickly consume your quota.
Shopify replication
Replicating order refunds
To extract order refund data, Stitch queries every order in your account. If you have the order_refunds table selected for replication, the process can potentially be very slow depending on how many orders and refunds exist in your Shopify account. As tables are extracted one at a time, this could cause extraction to not proceed for days at a time. To ensure timely replication of your other selected tables, consider creating a separate integration for only the order_refunds table.
Note: Creating a separate integration for your order_refunds table may negatively affect your Shopify API quota.
Shopify table reference
Schemas and versioning
Schemas and naming conventions can change from version to version, so we recommend verifying your integration’s version before continuing.
The schema and info displayed below is for version 3 of this integration.
This is the latest version of the Shopify integration.
Table and column names in your destination
Depending on your destination, table and column names may not appear as they are outlined below.
For example: Object names are lowercased in Redshift (CusTomERs > customers), while case is maintained in PostgreSQL destinations (CusTomERs > CusTomERs). Refer to the Loading Guide for your destination for more info.
abandoned_checkouts
The abandoned_checkouts table contains info about abandoned checkouts. Shopify considers a checkout to be abandoned when a customer has entered billing and shipping details, but hasn’t completed the purchase.
|
Key-based Incremental |
|
|
Primary Key |
id |
|
Replication Key |
updatedAt |
| Useful links |


| Join abandoned_checkouts with | on |
|---|---|
| customers |
abandoned_checkouts.customers.id = customers.id abandoned_checkouts.customers.lastOrder.id = customers.lastOrder.id |
| order_refunds |
abandoned_checkouts.customers.lastOrder.id = order_refunds.order.id abandoned_checkouts.lineItems.product.id = order_refunds.refundLineItems.lineItem.product.id |
| orders |
abandoned_checkouts.customers.lastOrder.id = orders.id abandoned_checkouts.lineItems.product.id = orders.lineItems.product.id |
| transactions |
abandoned_checkouts.customers.lastOrder.id = transactions.order.id |
| products |
abandoned_checkouts.lineItems.product.id = products.id |
|
note STRING |
|||||||||||||||||||||||||||||||||||||||||||||||||||||
|
completedAt STRING |
|||||||||||||||||||||||||||||||||||||||||||||||||||||
|
billingAddress OBJECT This is a nested data structure. If your destination doesn't natively support nested data, attributes in this object will be flattened into the table. <a href='/en-US/stitch/replication/loading/understanding-loading-row-usage-for-nested-data-structures' target='new'>Learn more</a>.
|
|||||||||||||||||||||||||||||||||||||||||||||||||||||
|
discountCodes ARRAY This is a nested data structure. If your destination doesn't natively support nested data, attributes will be denested into a subtable. <a href='/en-US/stitch/replication/loading/understanding-loading-row-usage-for-nested-data-structures' target='new'>Learn more</a>. |
|||||||||||||||||||||||||||||||||||||||||||||||||||||
|
createdAt STRING |
|||||||||||||||||||||||||||||||||||||||||||||||||||||
|
updatedAt STRING |
|||||||||||||||||||||||||||||||||||||||||||||||||||||
|
taxLines ARRAY This is a nested data structure. If your destination doesn't natively support nested data, attributes will be denested into a subtable. <a href='/en-US/stitch/replication/loading/understanding-loading-row-usage-for-nested-data-structures' target='new'>Learn more</a>.
|
|||||||||||||||||||||||||||||||||||||||||||||||||||||
|
totalLineItemsPriceSet OBJECT This is a nested data structure. If your destination doesn't natively support nested data, attributes in this object will be flattened into the table. <a href='/en-US/stitch/replication/loading/understanding-loading-row-usage-for-nested-data-structures' target='new'>Learn more</a>.
|
|||||||||||||||||||||||||||||||||||||||||||||||||||||
|
id STRING |
|||||||||||||||||||||||||||||||||||||||||||||||||||||
|
name STRING |
|||||||||||||||||||||||||||||||||||||||||||||||||||||
|
totalTaxSet OBJECT This is a nested data structure. If your destination doesn't natively support nested data, attributes in this object will be flattened into the table. <a href='/en-US/stitch/replication/loading/understanding-loading-row-usage-for-nested-data-structures' target='new'>Learn more</a>.
|
|||||||||||||||||||||||||||||||||||||||||||||||||||||
|
shippingAddress OBJECT This is a nested data structure. If your destination doesn't natively support nested data, attributes in this object will be flattened into the table. <a href='/en-US/stitch/replication/loading/understanding-loading-row-usage-for-nested-data-structures' target='new'>Learn more</a>.
|
|||||||||||||||||||||||||||||||||||||||||||||||||||||
|
abandonedCheckoutUrl STRING |
|||||||||||||||||||||||||||||||||||||||||||||||||||||
|
totalDiscountSet OBJECT This is a nested data structure. If your destination doesn't natively support nested data, attributes in this object will be flattened into the table. <a href='/en-US/stitch/replication/loading/understanding-loading-row-usage-for-nested-data-structures' target='new'>Learn more</a>.
|
|||||||||||||||||||||||||||||||||||||||||||||||||||||
|
taxesIncluded BOOLEAN |
|||||||||||||||||||||||||||||||||||||||||||||||||||||
|
totalDutiesSet OBJECT This is a nested data structure. If your destination doesn't natively support nested data, attributes in this object will be flattened into the table. <a href='/en-US/stitch/replication/loading/understanding-loading-row-usage-for-nested-data-structures' target='new'>Learn more</a>.
|
|||||||||||||||||||||||||||||||||||||||||||||||||||||
|
totalPriceSet OBJECT This is a nested data structure. If your destination doesn't natively support nested data, attributes in this object will be flattened into the table. <a href='/en-US/stitch/replication/loading/understanding-loading-row-usage-for-nested-data-structures' target='new'>Learn more</a>.
|
|||||||||||||||||||||||||||||||||||||||||||||||||||||
|
lineItems ARRAY This is a nested data structure. If your destination doesn't natively support nested data, attributes will be denested into a subtable. <a href='/en-US/stitch/replication/loading/understanding-loading-row-usage-for-nested-data-structures' target='new'>Learn more</a>.
|
|||||||||||||||||||||||||||||||||||||||||||||||||||||
|
subtotalPriceSet OBJECT This is a nested data structure. If your destination doesn't natively support nested data, attributes in this object will be flattened into the table. <a href='/en-US/stitch/replication/loading/understanding-loading-row-usage-for-nested-data-structures' target='new'>Learn more</a>.
|
|||||||||||||||||||||||||||||||||||||||||||||||||||||
|
customer OBJECT This is a nested data structure. If your destination doesn't natively support nested data, attributes in this object will be flattened into the table. <a href='/en-US/stitch/replication/loading/understanding-loading-row-usage-for-nested-data-structures' target='new'>Learn more</a>.
|
collections
The collections table contains info about the collections.
|
Key-based Incremental |
|
|
Primary Key |
id |
|
Replication Key |
updatedAt |
| Useful links |
|
id STRING |
|||||
|
title STRING |
|||||
|
handle STRING |
|||||
|
collectionType STRING |
|||||
|
updatedAt STRING |
|||||
|
productsCount OBJECT This is a nested data structure. If your destination doesn't natively support nested data, attributes in this object will be flattened into the table. <a href='/en-US/stitch/replication/loading/understanding-loading-row-usage-for-nested-data-structures' target='new'>Learn more</a>.
|
|||||
|
sortOrder STRING |
|||||
|
ruleSet OBJECT This is a nested data structure. If your destination doesn't natively support nested data, attributes in this object will be flattened into the table. <a href='/en-US/stitch/replication/loading/understanding-loading-row-usage-for-nested-data-structures' target='new'>Learn more</a>.
|
|||||
|
seo OBJECT This is a nested data structure. If your destination doesn't natively support nested data, attributes in this object will be flattened into the table. <a href='/en-US/stitch/replication/loading/understanding-loading-row-usage-for-nested-data-structures' target='new'>Learn more</a>.
|
|||||
|
feedback OBJECT This is a nested data structure. If your destination doesn't natively support nested data, attributes in this object will be flattened into the table. <a href='/en-US/stitch/replication/loading/understanding-loading-row-usage-for-nested-data-structures' target='new'>Learn more</a>.
|
|||||
|
products ARRAY This is a nested data structure. If your destination doesn't natively support nested data, attributes will be denested into a subtable. <a href='/en-US/stitch/replication/loading/understanding-loading-row-usage-for-nested-data-structures' target='new'>Learn more</a>. |
customers
The customers table contains info about the shop’s customers. This includes their contact details, order history, and email marketing preferences.
|
Key-based Incremental |
|
|
Primary Key |
id |
|
Replication Key |
updatedAt |
| Useful links |
| Join customers with | on |
|---|---|
| abandoned_checkouts |
customers.id = abandoned_checkouts.customers.id customers.lastOrder.id = abandoned_checkouts.customers.lastOrder.id |
| order_refunds |
customers.lastOrder.id = order_refunds.order.id |
| orders |
customers.lastOrder.id = orders.id |
| transactions |
customers.lastOrder.id = transactions.order.id |
|
STRING |
||||||||||||||||||||
|
multipassIdentifier STRING |
||||||||||||||||||||
|
defaultAddress OBJECT This is a nested data structure. If your destination doesn't natively support nested data, attributes in this object will be flattened into the table. <a href='/en-US/stitch/replication/loading/understanding-loading-row-usage-for-nested-data-structures' target='new'>Learn more</a>.
|
||||||||||||||||||||
|
numberOfOrders STRING |
||||||||||||||||||||
|
state STRING |
||||||||||||||||||||
|
verifiedEmail BOOLEAN |
||||||||||||||||||||
|
firstName STRING |
||||||||||||||||||||
|
updatedAt STRING |
||||||||||||||||||||
|
note STRING |
||||||||||||||||||||
|
phone STRING |
||||||||||||||||||||
|
addresses ARRAY This is a nested data structure. If your destination doesn't natively support nested data, attributes will be denested into a subtable. <a href='/en-US/stitch/replication/loading/understanding-loading-row-usage-for-nested-data-structures' target='new'>Learn more</a>.
|
||||||||||||||||||||
|
lastName STRING |
||||||||||||||||||||
|
tags ARRAY This is a nested data structure. If your destination doesn't natively support nested data, attributes will be denested into a subtable. <a href='/en-US/stitch/replication/loading/understanding-loading-row-usage-for-nested-data-structures' target='new'>Learn more</a>. |
||||||||||||||||||||
|
taxExempt BOOLEAN |
||||||||||||||||||||
|
id STRING |
||||||||||||||||||||
|
createdAt STRING |
||||||||||||||||||||
|
taxExemptions ARRAY This is a nested data structure. If your destination doesn't natively support nested data, attributes will be denested into a subtable. <a href='/en-US/stitch/replication/loading/understanding-loading-row-usage-for-nested-data-structures' target='new'>Learn more</a>. |
||||||||||||||||||||
|
emailMarketingConsent OBJECT This is a nested data structure. If your destination doesn't natively support nested data, attributes in this object will be flattened into the table. <a href='/en-US/stitch/replication/loading/understanding-loading-row-usage-for-nested-data-structures' target='new'>Learn more</a>.
|
||||||||||||||||||||
|
smsMarketingConsent OBJECT This is a nested data structure. If your destination doesn't natively support nested data, attributes in this object will be flattened into the table. <a href='/en-US/stitch/replication/loading/understanding-loading-row-usage-for-nested-data-structures' target='new'>Learn more</a>.
|
||||||||||||||||||||
|
validEmailAddress BOOLEAN |
||||||||||||||||||||
|
productSubscriberStatus STRING |
||||||||||||||||||||
|
amountSpent OBJECT This is a nested data structure. If your destination doesn't natively support nested data, attributes in this object will be flattened into the table. <a href='/en-US/stitch/replication/loading/understanding-loading-row-usage-for-nested-data-structures' target='new'>Learn more</a>.
|
||||||||||||||||||||
|
dataSaleOptOut BOOLEAN |
||||||||||||||||||||
|
displayName STRING |
||||||||||||||||||||
|
locale STRING |
||||||||||||||||||||
|
lifetimeDuration STRING |
||||||||||||||||||||
|
lastOrder OBJECT This is a nested data structure. If your destination doesn't natively support nested data, attributes in this object will be flattened into the table. <a href='/en-US/stitch/replication/loading/understanding-loading-row-usage-for-nested-data-structures' target='new'>Learn more</a>.
|
events
The events table contains info about events in the shop.
|
Key-based Incremental |
|
|
Primary Key |
id |
|
Replication Key |
createdAt |
| Useful links |
|
id STRING |
|
|
createdAt STRING |
|
|
action STRING |
|
|
appTitle STRING |
|
|
attributeToApp BOOLEAN |
|
|
attributeToUser BOOLEAN |
|
|
criticalAlert BOOLEAN |
|
|
message STRING |
|
|
subjectId STRING |
|
|
subjectType STRING |
|
|
additionalContent STRING |
|
|
additionalData STRING |
|
|
arguments ARRAY This is a nested data structure. If your destination doesn't natively support nested data, attributes will be denested into a subtable. <a href='/en-US/stitch/replication/loading/understanding-loading-row-usage-for-nested-data-structures' target='new'>Learn more</a>. |
|
|
hasAdditionalContent BOOLEAN |
|
|
secondaryMessage STRING |
|
|
attachments ARRAY This is a nested data structure. If your destination doesn't natively support nested data, attributes will be denested into a subtable. <a href='/en-US/stitch/replication/loading/understanding-loading-row-usage-for-nested-data-structures' target='new'>Learn more</a>. |
|
|
author OBJECT This is a nested data structure. If your destination doesn't natively support nested data, attributes in this object will be flattened into the table. <a href='/en-US/stitch/replication/loading/understanding-loading-row-usage-for-nested-data-structures' target='new'>Learn more</a>.
|
|
|
canDelete BOOLEAN |
|
|
canEdit BOOLEAN |
|
|
edited BOOLEAN |
|
|
rawMessage STRING |
fulfillment_orders
The fulfillment_orders table contains datails about fulfillment orders.
|
Key-based Incremental |
|
|
Primary Key |
id |
| Useful links |
|
id STRING |
||||||||||||||||||||||||||||||||||||||||||||||||||||
|
orderId STRING |
||||||||||||||||||||||||||||||||||||||||||||||||||||
|
updatedAt STRING |
||||||||||||||||||||||||||||||||||||||||||||||||||||
|
supportedActions ARRAY This is a nested data structure. If your destination doesn't natively support nested data, attributes will be denested into a subtable. <a href='/en-US/stitch/replication/loading/understanding-loading-row-usage-for-nested-data-structures' target='new'>Learn more</a>.
|
||||||||||||||||||||||||||||||||||||||||||||||||||||
|
status STRING |
||||||||||||||||||||||||||||||||||||||||||||||||||||
|
requestStatus STRING |
||||||||||||||||||||||||||||||||||||||||||||||||||||
|
orderProcessedAt STRING |
||||||||||||||||||||||||||||||||||||||||||||||||||||
|
orderName STRING |
||||||||||||||||||||||||||||||||||||||||||||||||||||
|
channelId STRING |
||||||||||||||||||||||||||||||||||||||||||||||||||||
|
fulfillAt STRING |
||||||||||||||||||||||||||||||||||||||||||||||||||||
|
fulfillBy STRING |
||||||||||||||||||||||||||||||||||||||||||||||||||||
|
createdAt STRING |
||||||||||||||||||||||||||||||||||||||||||||||||||||
|
destination OBJECT This is a nested data structure. If your destination doesn't natively support nested data, attributes in this object will be flattened into the table. <a href='/en-US/stitch/replication/loading/understanding-loading-row-usage-for-nested-data-structures' target='new'>Learn more</a>.
|
||||||||||||||||||||||||||||||||||||||||||||||||||||
|
fulfillmentHolds ARRAY This is a nested data structure. If your destination doesn't natively support nested data, attributes will be denested into a subtable. <a href='/en-US/stitch/replication/loading/understanding-loading-row-usage-for-nested-data-structures' target='new'>Learn more</a>.
|
||||||||||||||||||||||||||||||||||||||||||||||||||||
|
internationalDuties ARRAY This is a nested data structure. If your destination doesn't natively support nested data, attributes will be denested into a subtable. <a href='/en-US/stitch/replication/loading/understanding-loading-row-usage-for-nested-data-structures' target='new'>Learn more</a>.
|
||||||||||||||||||||||||||||||||||||||||||||||||||||
|
deliveryMethod OBJECT This is a nested data structure. If your destination doesn't natively support nested data, attributes in this object will be flattened into the table. <a href='/en-US/stitch/replication/loading/understanding-loading-row-usage-for-nested-data-structures' target='new'>Learn more</a>.
|
||||||||||||||||||||||||||||||||||||||||||||||||||||
|
assignedLocation OBJECT This is a nested data structure. If your destination doesn't natively support nested data, attributes in this object will be flattened into the table. <a href='/en-US/stitch/replication/loading/understanding-loading-row-usage-for-nested-data-structures' target='new'>Learn more</a>.
|
||||||||||||||||||||||||||||||||||||||||||||||||||||
|
merchantRequests ARRAY This is a nested data structure. If your destination doesn't natively support nested data, attributes will be denested into a subtable. <a href='/en-US/stitch/replication/loading/understanding-loading-row-usage-for-nested-data-structures' target='new'>Learn more</a>.
|
||||||||||||||||||||||||||||||||||||||||||||||||||||
|
locationsForMove ARRAY This is a nested data structure. If your destination doesn't natively support nested data, attributes will be denested into a subtable. <a href='/en-US/stitch/replication/loading/understanding-loading-row-usage-for-nested-data-structures' target='new'>Learn more</a>.
|
||||||||||||||||||||||||||||||||||||||||||||||||||||
|
fulfillmentOrdersForMerge ARRAY This is a nested data structure. If your destination doesn't natively support nested data, attributes will be denested into a subtable. <a href='/en-US/stitch/replication/loading/understanding-loading-row-usage-for-nested-data-structures' target='new'>Learn more</a>.
|
||||||||||||||||||||||||||||||||||||||||||||||||||||
|
fulfillments ARRAY This is a nested data structure. If your destination doesn't natively support nested data, attributes will be denested into a subtable. <a href='/en-US/stitch/replication/loading/understanding-loading-row-usage-for-nested-data-structures' target='new'>Learn more</a>.
|
inventory_items
The inventory_items table contains info about items in a shop.
|
Key-based Incremental |
|
|
Primary Key |
id |
|
Replication Key |
updatedAt |
| Useful links |
|
id STRING |
||
|
sku STRING |
||
|
createdAt STRING |
||
|
updatedAt STRING |
||
|
requiresShipping BOOLEAN |
||
|
unitCost OBJECT This is a nested data structure. If your destination doesn't natively support nested data, attributes in this object will be flattened into the table. <a href='/en-US/stitch/replication/loading/understanding-loading-row-usage-for-nested-data-structures' target='new'>Learn more</a>.
|
||
|
countryCodeOfOrigin STRING |
||
|
provinceCodeOfOrigin STRING |
||
|
harmonizedSystemCode STRING |
||
|
tracked BOOLEAN |
||
|
countryHarmonizedSystemCodes ARRAY This is a nested data structure. If your destination doesn't natively support nested data, attributes will be denested into a subtable. <a href='/en-US/stitch/replication/loading/understanding-loading-row-usage-for-nested-data-structures' target='new'>Learn more</a>.
|
inventory_levels
The inventory_levels table contains info about quantities of an inventory item for a location.
|
Key-based Incremental |
|
|
Primary Keys |
id |
|
Replication Key |
updatedAt |
| Useful links |
|
id STRING |
||||
|
canDeactivate BOOLEAN |
||||
|
createdAt STRING |
||||
|
updatedAt STRING |
||||
|
deactivationAlert STRING |
||||
|
item OBJECT This is a nested data structure. If your destination doesn't natively support nested data, attributes in this object will be flattened into the table. <a href='/en-US/stitch/replication/loading/understanding-loading-row-usage-for-nested-data-structures' target='new'>Learn more</a>.
|
||||
|
location OBJECT This is a nested data structure. If your destination doesn't natively support nested data, attributes in this object will be flattened into the table. <a href='/en-US/stitch/replication/loading/understanding-loading-row-usage-for-nested-data-structures' target='new'>Learn more</a>.
|
||||
|
quantities ARRAY This is a nested data structure. If your destination doesn't natively support nested data, attributes will be denested into a subtable. <a href='/en-US/stitch/replication/loading/understanding-loading-row-usage-for-nested-data-structures' target='new'>Learn more</a>.
|
locations
The locations table contains info about .
|
Key-based Incremental |
|
|
Primary Key |
id |
|
Replication Key |
createdAt |
| Useful links |
|
id STRING |
||||||||||||
|
name STRING |
||||||||||||
|
updatedAt STRING |
||||||||||||
|
createdAt STRING |
||||||||||||
|
isActive BOOLEAN |
||||||||||||
|
addressVerified BOOLEAN |
||||||||||||
|
deactivatable BOOLEAN |
||||||||||||
|
deactivatedAt STRING |
||||||||||||
|
deletable BOOLEAN |
||||||||||||
|
fulfillsOnlineOrders BOOLEAN |
||||||||||||
|
hasActiveInventory BOOLEAN |
||||||||||||
|
hasUnfulfilledOrders BOOLEAN |
||||||||||||
|
isFulfillmentService BOOLEAN |
||||||||||||
|
legacyResourceId STRING |
||||||||||||
|
shipsInventory BOOLEAN |
||||||||||||
|
address OBJECT This is a nested data structure. If your destination doesn't natively support nested data, attributes in this object will be flattened into the table. <a href='/en-US/stitch/replication/loading/understanding-loading-row-usage-for-nested-data-structures' target='new'>Learn more</a>.
|
||||||||||||
|
localPickupSettingsV2 OBJECT This is a nested data structure. If your destination doesn't natively support nested data, attributes in this object will be flattened into the table. <a href='/en-US/stitch/replication/loading/understanding-loading-row-usage-for-nested-data-structures' target='new'>Learn more</a>.
|
metafields_collections
The metafields_collections table contains info about metafields for collections.
|
Key-based Incremental |
|
|
Primary Keys |
id |
|
Replication Key |
updatedAt |
| Useful links |
|
owner OBJECT This is a nested data structure. If your destination doesn't natively support nested data, attributes in this object will be flattened into the table. <a href='/en-US/stitch/replication/loading/understanding-loading-row-usage-for-nested-data-structures' target='new'>Learn more</a>.
|
|
|
ownerType STRING |
|
|
value_type STRING |
|
|
key STRING |
|
|
createdAt STRING |
|
|
id STRING |
|
|
namespace STRING |
|
|
description STRING |
|
|
value INTEGER, OBJECT, STRING This is a nested data structure. If your destination doesn't natively support nested data, attributes in this object will be flattened into the table. <a href='/en-US/stitch/replication/loading/understanding-loading-row-usage-for-nested-data-structures' target='new'>Learn more</a>. |
|
|
updatedAt STRING |
|
|
type STRING |
metafields_customers
The metafields_customers table contains info about metafields for customers.
|
Key-based Incremental |
|
|
Primary Keys |
id |
|
Replication Key |
updatedAt |
| Useful links |
|
owner OBJECT This is a nested data structure. If your destination doesn't natively support nested data, attributes in this object will be flattened into the table. <a href='/en-US/stitch/replication/loading/understanding-loading-row-usage-for-nested-data-structures' target='new'>Learn more</a>.
|
|
|
ownerType STRING |
|
|
value_type STRING |
|
|
key STRING |
|
|
createdAt STRING |
|
|
id STRING |
|
|
namespace STRING |
|
|
description STRING |
|
|
value INTEGER, OBJECT, STRING This is a nested data structure. If your destination doesn't natively support nested data, attributes in this object will be flattened into the table. <a href='/en-US/stitch/replication/loading/understanding-loading-row-usage-for-nested-data-structures' target='new'>Learn more</a>. |
|
|
updatedAt STRING |
|
|
type STRING |
metafields_orders
The metafields_orders table contains info about metafields for orders.
|
Key-based Incremental |
|
|
Primary Keys |
id |
|
Replication Key |
updatedAt |
| Useful links |
|
owner OBJECT This is a nested data structure. If your destination doesn't natively support nested data, attributes in this object will be flattened into the table. <a href='/en-US/stitch/replication/loading/understanding-loading-row-usage-for-nested-data-structures' target='new'>Learn more</a>.
|
|
|
ownerType STRING |
|
|
value_type STRING |
|
|
key STRING |
|
|
createdAt STRING |
|
|
id STRING |
|
|
namespace STRING |
|
|
description STRING |
|
|
value INTEGER, OBJECT, STRING This is a nested data structure. If your destination doesn't natively support nested data, attributes in this object will be flattened into the table. <a href='/en-US/stitch/replication/loading/understanding-loading-row-usage-for-nested-data-structures' target='new'>Learn more</a>. |
|
|
updatedAt STRING |
|
|
type STRING |
metafields_products
The metafields_products table contains info about metafields for products.
|
Key-based Incremental |
|
|
Primary Keys |
id |
|
Replication Key |
updatedAt |
| Useful links |
|
owner OBJECT This is a nested data structure. If your destination doesn't natively support nested data, attributes in this object will be flattened into the table. <a href='/en-US/stitch/replication/loading/understanding-loading-row-usage-for-nested-data-structures' target='new'>Learn more</a>.
|
|
|
ownerType STRING |
|
|
value_type STRING |
|
|
key STRING |
|
|
createdAt STRING |
|
|
id STRING |
|
|
namespace STRING |
|
|
description STRING |
|
|
value INTEGER, OBJECT, STRING This is a nested data structure. If your destination doesn't natively support nested data, attributes in this object will be flattened into the table. <a href='/en-US/stitch/replication/loading/understanding-loading-row-usage-for-nested-data-structures' target='new'>Learn more</a>. |
|
|
updatedAt STRING |
|
|
type STRING |
order_refunds
The order_refunds table contains info about refunds associated with orders.
|
Key-based Incremental |
|
|
Primary Key |
id |
|
Replication Key |
createdAt |
| Useful links |
| Join order_refunds with | on |
|---|---|
| abandoned_checkouts |
order_refunds.order.id = abandoned_checkouts.customers.lastOrder.id order_refunds.refundLineItems.lineItem.product.id = abandoned_checkouts.lineItems.product.id |
| customers |
order_refunds.order.id = customers.lastOrder.id |
| orders |
order_refunds.order.id = orders.id order_refunds.refundLineItems.lineItem.product.id = orders.lineItems.product.id |
| transactions |
order_refunds.order.id = transactions.order.id |
| products |
order_refunds.refundLineItems.lineItem.product.id = products.id |
|
id STRING |
||||||||||||||||||||||||||||||||||||||||||||||||||||||||||||||||||||||||||||||||||||||||||||||||||||||||||||||||||||
|
createdAt STRING |
||||||||||||||||||||||||||||||||||||||||||||||||||||||||||||||||||||||||||||||||||||||||||||||||||||||||||||||||||||
|
legacyResourceId STRING |
||||||||||||||||||||||||||||||||||||||||||||||||||||||||||||||||||||||||||||||||||||||||||||||||||||||||||||||||||||
|
note STRING |
||||||||||||||||||||||||||||||||||||||||||||||||||||||||||||||||||||||||||||||||||||||||||||||||||||||||||||||||||||
|
order OBJECT This is a nested data structure. If your destination doesn't natively support nested data, attributes in this object will be flattened into the table. <a href='/en-US/stitch/replication/loading/understanding-loading-row-usage-for-nested-data-structures' target='new'>Learn more</a>.
|
||||||||||||||||||||||||||||||||||||||||||||||||||||||||||||||||||||||||||||||||||||||||||||||||||||||||||||||||||||
|
refundLineItems ARRAY This is a nested data structure. If your destination doesn't natively support nested data, attributes will be denested into a subtable. <a href='/en-US/stitch/replication/loading/understanding-loading-row-usage-for-nested-data-structures' target='new'>Learn more</a>.
|
||||||||||||||||||||||||||||||||||||||||||||||||||||||||||||||||||||||||||||||||||||||||||||||||||||||||||||||||||||
|
orderAdjustments ARRAY This is a nested data structure. If your destination doesn't natively support nested data, attributes will be denested into a subtable. <a href='/en-US/stitch/replication/loading/understanding-loading-row-usage-for-nested-data-structures' target='new'>Learn more</a>.
|
||||||||||||||||||||||||||||||||||||||||||||||||||||||||||||||||||||||||||||||||||||||||||||||||||||||||||||||||||||
|
updatedAt STRING |
order_shipping_lines
The order_shipping_lines table contains the shipping details that the customer chose for their order.
|
Key-based Incremental |
|
|
Primary Key |
id |
| Useful links |
|
carrierIdentifier STRING |
|||||||||||||||||||||
|
code STRING |
|||||||||||||||||||||
|
orderId STRING |
|||||||||||||||||||||
|
currentDiscountedPriceSet OBJECT This is a nested data structure. If your destination doesn't natively support nested data, attributes in this object will be flattened into the table. <a href='/en-US/stitch/replication/loading/understanding-loading-row-usage-for-nested-data-structures' target='new'>Learn more</a>.
|
|||||||||||||||||||||
|
custom BOOLEAN |
|||||||||||||||||||||
|
deliveryCategory STRING |
|||||||||||||||||||||
|
discountAllocations ARRAY This is a nested data structure. If your destination doesn't natively support nested data, attributes will be denested into a subtable. <a href='/en-US/stitch/replication/loading/understanding-loading-row-usage-for-nested-data-structures' target='new'>Learn more</a>.
|
|||||||||||||||||||||
|
discountedPriceSet OBJECT This is a nested data structure. If your destination doesn't natively support nested data, attributes in this object will be flattened into the table. <a href='/en-US/stitch/replication/loading/understanding-loading-row-usage-for-nested-data-structures' target='new'>Learn more</a>.
|
|||||||||||||||||||||
|
id STRING |
|||||||||||||||||||||
|
isRemoved BOOLEAN |
|||||||||||||||||||||
|
originalPriceSet OBJECT This is a nested data structure. If your destination doesn't natively support nested data, attributes in this object will be flattened into the table. <a href='/en-US/stitch/replication/loading/understanding-loading-row-usage-for-nested-data-structures' target='new'>Learn more</a>.
|
|||||||||||||||||||||
|
phone STRING |
|||||||||||||||||||||
|
shippingRateHandle STRING |
|||||||||||||||||||||
|
source STRING |
|||||||||||||||||||||
|
taxLines ARRAY This is a nested data structure. If your destination doesn't natively support nested data, attributes will be denested into a subtable. <a href='/en-US/stitch/replication/loading/understanding-loading-row-usage-for-nested-data-structures' target='new'>Learn more</a>.
|
|||||||||||||||||||||
|
title STRING |
|||||||||||||||||||||
|
updatedAt STRING |
orders
The orders table contains info about a shop’s completed orders.
|
Key-based Incremental |
|
|
Primary Key |
id |
|
Replication Key |
updatedAt |
| Useful links |
| Join orders with | on |
|---|---|
| abandoned_checkouts |
orders.id = abandoned_checkouts.customers.lastOrder.id orders.lineItems.product.id = abandoned_checkouts.lineItems.product.id |
| customers |
orders.id = customers.lastOrder.id |
| order_refunds |
orders.id = order_refunds.order.id orders.lineItems.product.id = order_refunds.refundLineItems.lineItem.product.id |
| transactions |
orders.id = transactions.order.id |
| products |
orders.lineItems.product.id = products.id |
|
additionalFees ARRAY This is a nested data structure. If your destination doesn't natively support nested data, attributes will be denested into a subtable. <a href='/en-US/stitch/replication/loading/understanding-loading-row-usage-for-nested-data-structures' target='new'>Learn more</a>.
|
||||||||||||||||||||||||||||||||||||||||||||||||||||||||||||||||||||||||||||||||||||||||||||||||||||||||||||||||
|
app OBJECT This is a nested data structure. If your destination doesn't natively support nested data, attributes in this object will be flattened into the table. <a href='/en-US/stitch/replication/loading/understanding-loading-row-usage-for-nested-data-structures' target='new'>Learn more</a>.
|
||||||||||||||||||||||||||||||||||||||||||||||||||||||||||||||||||||||||||||||||||||||||||||||||||||||||||||||||
|
billingAddress OBJECT This is a nested data structure. If your destination doesn't natively support nested data, attributes in this object will be flattened into the table. <a href='/en-US/stitch/replication/loading/understanding-loading-row-usage-for-nested-data-structures' target='new'>Learn more</a>.
|
||||||||||||||||||||||||||||||||||||||||||||||||||||||||||||||||||||||||||||||||||||||||||||||||||||||||||||||||
|
billingAddressMatchesShippingAddress BOOLEAN |
||||||||||||||||||||||||||||||||||||||||||||||||||||||||||||||||||||||||||||||||||||||||||||||||||||||||||||||||
|
canMarkAsPaid BOOLEAN |
||||||||||||||||||||||||||||||||||||||||||||||||||||||||||||||||||||||||||||||||||||||||||||||||||||||||||||||||
|
canNotifyCustomer BOOLEAN |
||||||||||||||||||||||||||||||||||||||||||||||||||||||||||||||||||||||||||||||||||||||||||||||||||||||||||||||||
|
cancelReason STRING |
||||||||||||||||||||||||||||||||||||||||||||||||||||||||||||||||||||||||||||||||||||||||||||||||||||||||||||||||
|
cancellation OBJECT This is a nested data structure. If your destination doesn't natively support nested data, attributes in this object will be flattened into the table. <a href='/en-US/stitch/replication/loading/understanding-loading-row-usage-for-nested-data-structures' target='new'>Learn more</a>.
|
||||||||||||||||||||||||||||||||||||||||||||||||||||||||||||||||||||||||||||||||||||||||||||||||||||||||||||||||
|
cancelledAt STRING |
||||||||||||||||||||||||||||||||||||||||||||||||||||||||||||||||||||||||||||||||||||||||||||||||||||||||||||||||
|
capturable BOOLEAN |
||||||||||||||||||||||||||||||||||||||||||||||||||||||||||||||||||||||||||||||||||||||||||||||||||||||||||||||||
|
cartDiscountAmountSet OBJECT This is a nested data structure. If your destination doesn't natively support nested data, attributes in this object will be flattened into the table. <a href='/en-US/stitch/replication/loading/understanding-loading-row-usage-for-nested-data-structures' target='new'>Learn more</a>.
|
||||||||||||||||||||||||||||||||||||||||||||||||||||||||||||||||||||||||||||||||||||||||||||||||||||||||||||||||
|
channelInformation OBJECT This is a nested data structure. If your destination doesn't natively support nested data, attributes in this object will be flattened into the table. <a href='/en-US/stitch/replication/loading/understanding-loading-row-usage-for-nested-data-structures' target='new'>Learn more</a>.
|
||||||||||||||||||||||||||||||||||||||||||||||||||||||||||||||||||||||||||||||||||||||||||||||||||||||||||||||||
|
clientIp STRING |
||||||||||||||||||||||||||||||||||||||||||||||||||||||||||||||||||||||||||||||||||||||||||||||||||||||||||||||||
|
closed BOOLEAN |
||||||||||||||||||||||||||||||||||||||||||||||||||||||||||||||||||||||||||||||||||||||||||||||||||||||||||||||||
|
closedAt STRING |
||||||||||||||||||||||||||||||||||||||||||||||||||||||||||||||||||||||||||||||||||||||||||||||||||||||||||||||||
|
confirmationNumber STRING |
||||||||||||||||||||||||||||||||||||||||||||||||||||||||||||||||||||||||||||||||||||||||||||||||||||||||||||||||
|
confirmed BOOLEAN |
||||||||||||||||||||||||||||||||||||||||||||||||||||||||||||||||||||||||||||||||||||||||||||||||||||||||||||||||
|
createdAt STRING |
||||||||||||||||||||||||||||||||||||||||||||||||||||||||||||||||||||||||||||||||||||||||||||||||||||||||||||||||
|
currencyCode STRING |
||||||||||||||||||||||||||||||||||||||||||||||||||||||||||||||||||||||||||||||||||||||||||||||||||||||||||||||||
|
currentCartDiscountAmountSet OBJECT This is a nested data structure. If your destination doesn't natively support nested data, attributes in this object will be flattened into the table. <a href='/en-US/stitch/replication/loading/understanding-loading-row-usage-for-nested-data-structures' target='new'>Learn more</a>.
|
||||||||||||||||||||||||||||||||||||||||||||||||||||||||||||||||||||||||||||||||||||||||||||||||||||||||||||||||
|
currentShippingPriceSet OBJECT This is a nested data structure. If your destination doesn't natively support nested data, attributes in this object will be flattened into the table. <a href='/en-US/stitch/replication/loading/understanding-loading-row-usage-for-nested-data-structures' target='new'>Learn more</a>.
|
||||||||||||||||||||||||||||||||||||||||||||||||||||||||||||||||||||||||||||||||||||||||||||||||||||||||||||||||
|
currentSubtotalLineItemsQuantity INTEGER |
||||||||||||||||||||||||||||||||||||||||||||||||||||||||||||||||||||||||||||||||||||||||||||||||||||||||||||||||
|
currentSubtotalPriceSet OBJECT This is a nested data structure. If your destination doesn't natively support nested data, attributes in this object will be flattened into the table. <a href='/en-US/stitch/replication/loading/understanding-loading-row-usage-for-nested-data-structures' target='new'>Learn more</a>.
|
||||||||||||||||||||||||||||||||||||||||||||||||||||||||||||||||||||||||||||||||||||||||||||||||||||||||||||||||
|
currentTotalAdditionalFeesSet OBJECT This is a nested data structure. If your destination doesn't natively support nested data, attributes in this object will be flattened into the table. <a href='/en-US/stitch/replication/loading/understanding-loading-row-usage-for-nested-data-structures' target='new'>Learn more</a>.
|
||||||||||||||||||||||||||||||||||||||||||||||||||||||||||||||||||||||||||||||||||||||||||||||||||||||||||||||||
|
currentTotalDiscountsSet OBJECT This is a nested data structure. If your destination doesn't natively support nested data, attributes in this object will be flattened into the table. <a href='/en-US/stitch/replication/loading/understanding-loading-row-usage-for-nested-data-structures' target='new'>Learn more</a>.
|
||||||||||||||||||||||||||||||||||||||||||||||||||||||||||||||||||||||||||||||||||||||||||||||||||||||||||||||||
|
currentTotalDutiesSet OBJECT This is a nested data structure. If your destination doesn't natively support nested data, attributes in this object will be flattened into the table. <a href='/en-US/stitch/replication/loading/understanding-loading-row-usage-for-nested-data-structures' target='new'>Learn more</a>.
|
||||||||||||||||||||||||||||||||||||||||||||||||||||||||||||||||||||||||||||||||||||||||||||||||||||||||||||||||
|
currentTotalPriceSet OBJECT This is a nested data structure. If your destination doesn't natively support nested data, attributes in this object will be flattened into the table. <a href='/en-US/stitch/replication/loading/understanding-loading-row-usage-for-nested-data-structures' target='new'>Learn more</a>.
|
||||||||||||||||||||||||||||||||||||||||||||||||||||||||||||||||||||||||||||||||||||||||||||||||||||||||||||||||
|
currentTotalTaxSet OBJECT This is a nested data structure. If your destination doesn't natively support nested data, attributes in this object will be flattened into the table. <a href='/en-US/stitch/replication/loading/understanding-loading-row-usage-for-nested-data-structures' target='new'>Learn more</a>.
|
||||||||||||||||||||||||||||||||||||||||||||||||||||||||||||||||||||||||||||||||||||||||||||||||||||||||||||||||
|
currentTotalWeight NUMBER |
||||||||||||||||||||||||||||||||||||||||||||||||||||||||||||||||||||||||||||||||||||||||||||||||||||||||||||||||
|
customer OBJECT This is a nested data structure. If your destination doesn't natively support nested data, attributes in this object will be flattened into the table. <a href='/en-US/stitch/replication/loading/understanding-loading-row-usage-for-nested-data-structures' target='new'>Learn more</a>.
|
||||||||||||||||||||||||||||||||||||||||||||||||||||||||||||||||||||||||||||||||||||||||||||||||||||||||||||||||
|
customerJourneySummary OBJECT This is a nested data structure. If your destination doesn't natively support nested data, attributes in this object will be flattened into the table. <a href='/en-US/stitch/replication/loading/understanding-loading-row-usage-for-nested-data-structures' target='new'>Learn more</a>. |
||||||||||||||||||||||||||||||||||||||||||||||||||||||||||||||||||||||||||||||||||||||||||||||||||||||||||||||||
|
merchantOfRecordApp OBJECT This is a nested data structure. If your destination doesn't natively support nested data, attributes in this object will be flattened into the table. <a href='/en-US/stitch/replication/loading/understanding-loading-row-usage-for-nested-data-structures' target='new'>Learn more</a>.
|
||||||||||||||||||||||||||||||||||||||||||||||||||||||||||||||||||||||||||||||||||||||||||||||||||||||||||||||||
|
customerAcceptsMarketing BOOLEAN |
||||||||||||||||||||||||||||||||||||||||||||||||||||||||||||||||||||||||||||||||||||||||||||||||||||||||||||||||
|
customerLocale STRING |
||||||||||||||||||||||||||||||||||||||||||||||||||||||||||||||||||||||||||||||||||||||||||||||||||||||||||||||||
|
discountCodes ARRAY This is a nested data structure. If your destination doesn't natively support nested data, attributes will be denested into a subtable. <a href='/en-US/stitch/replication/loading/understanding-loading-row-usage-for-nested-data-structures' target='new'>Learn more</a>. |
||||||||||||||||||||||||||||||||||||||||||||||||||||||||||||||||||||||||||||||||||||||||||||||||||||||||||||||||
|
discountCode STRING |
||||||||||||||||||||||||||||||||||||||||||||||||||||||||||||||||||||||||||||||||||||||||||||||||||||||||||||||||
|
displayFinancialStatus STRING |
||||||||||||||||||||||||||||||||||||||||||||||||||||||||||||||||||||||||||||||||||||||||||||||||||||||||||||||||
|
displayFulfillmentStatus STRING |
||||||||||||||||||||||||||||||||||||||||||||||||||||||||||||||||||||||||||||||||||||||||||||||||||||||||||||||||
|
disputes ARRAY This is a nested data structure. If your destination doesn't natively support nested data, attributes will be denested into a subtable. <a href='/en-US/stitch/replication/loading/understanding-loading-row-usage-for-nested-data-structures' target='new'>Learn more</a>.
|
||||||||||||||||||||||||||||||||||||||||||||||||||||||||||||||||||||||||||||||||||||||||||||||||||||||||||||||||
|
dutiesIncluded BOOLEAN |
||||||||||||||||||||||||||||||||||||||||||||||||||||||||||||||||||||||||||||||||||||||||||||||||||||||||||||||||
|
STRING |
||||||||||||||||||||||||||||||||||||||||||||||||||||||||||||||||||||||||||||||||||||||||||||||||||||||||||||||||
|
edited BOOLEAN |
||||||||||||||||||||||||||||||||||||||||||||||||||||||||||||||||||||||||||||||||||||||||||||||||||||||||||||||||
|
estimatedTaxes BOOLEAN |
||||||||||||||||||||||||||||||||||||||||||||||||||||||||||||||||||||||||||||||||||||||||||||||||||||||||||||||||
|
fulfillable BOOLEAN |
||||||||||||||||||||||||||||||||||||||||||||||||||||||||||||||||||||||||||||||||||||||||||||||||||||||||||||||||
|
fullyPaid BOOLEAN |
||||||||||||||||||||||||||||||||||||||||||||||||||||||||||||||||||||||||||||||||||||||||||||||||||||||||||||||||
|
hasTimelineComment BOOLEAN |
||||||||||||||||||||||||||||||||||||||||||||||||||||||||||||||||||||||||||||||||||||||||||||||||||||||||||||||||
|
fulfillmentsCount OBJECT This is a nested data structure. If your destination doesn't natively support nested data, attributes in this object will be flattened into the table. <a href='/en-US/stitch/replication/loading/understanding-loading-row-usage-for-nested-data-structures' target='new'>Learn more</a>.
|
||||||||||||||||||||||||||||||||||||||||||||||||||||||||||||||||||||||||||||||||||||||||||||||||||||||||||||||||
|
id STRING |
||||||||||||||||||||||||||||||||||||||||||||||||||||||||||||||||||||||||||||||||||||||||||||||||||||||||||||||||
|
legacyResourceId STRING |
||||||||||||||||||||||||||||||||||||||||||||||||||||||||||||||||||||||||||||||||||||||||||||||||||||||||||||||||
|
merchantBusinessEntity OBJECT This is a nested data structure. If your destination doesn't natively support nested data, attributes in this object will be flattened into the table. <a href='/en-US/stitch/replication/loading/understanding-loading-row-usage-for-nested-data-structures' target='new'>Learn more</a>.
|
||||||||||||||||||||||||||||||||||||||||||||||||||||||||||||||||||||||||||||||||||||||||||||||||||||||||||||||||
|
name STRING |
||||||||||||||||||||||||||||||||||||||||||||||||||||||||||||||||||||||||||||||||||||||||||||||||||||||||||||||||
|
note STRING |
||||||||||||||||||||||||||||||||||||||||||||||||||||||||||||||||||||||||||||||||||||||||||||||||||||||||||||||||
|
netPaymentSet OBJECT This is a nested data structure. If your destination doesn't natively support nested data, attributes in this object will be flattened into the table. <a href='/en-US/stitch/replication/loading/understanding-loading-row-usage-for-nested-data-structures' target='new'>Learn more</a>.
|
||||||||||||||||||||||||||||||||||||||||||||||||||||||||||||||||||||||||||||||||||||||||||||||||||||||||||||||||
|
originalTotalAdditionalFeesSet OBJECT This is a nested data structure. If your destination doesn't natively support nested data, attributes in this object will be flattened into the table. <a href='/en-US/stitch/replication/loading/understanding-loading-row-usage-for-nested-data-structures' target='new'>Learn more</a>.
|
||||||||||||||||||||||||||||||||||||||||||||||||||||||||||||||||||||||||||||||||||||||||||||||||||||||||||||||||
|
originalTotalDutiesSet OBJECT This is a nested data structure. If your destination doesn't natively support nested data, attributes in this object will be flattened into the table. <a href='/en-US/stitch/replication/loading/understanding-loading-row-usage-for-nested-data-structures' target='new'>Learn more</a>.
|
||||||||||||||||||||||||||||||||||||||||||||||||||||||||||||||||||||||||||||||||||||||||||||||||||||||||||||||||
|
originalTotalPriceSet OBJECT This is a nested data structure. If your destination doesn't natively support nested data, attributes in this object will be flattened into the table. <a href='/en-US/stitch/replication/loading/understanding-loading-row-usage-for-nested-data-structures' target='new'>Learn more</a>.
|
||||||||||||||||||||||||||||||||||||||||||||||||||||||||||||||||||||||||||||||||||||||||||||||||||||||||||||||||
|
paymentGatewayNames ARRAY This is a nested data structure. If your destination doesn't natively support nested data, attributes will be denested into a subtable. <a href='/en-US/stitch/replication/loading/understanding-loading-row-usage-for-nested-data-structures' target='new'>Learn more</a>. |
||||||||||||||||||||||||||||||||||||||||||||||||||||||||||||||||||||||||||||||||||||||||||||||||||||||||||||||||
|
phone STRING |
||||||||||||||||||||||||||||||||||||||||||||||||||||||||||||||||||||||||||||||||||||||||||||||||||||||||||||||||
|
poNumber STRING |
||||||||||||||||||||||||||||||||||||||||||||||||||||||||||||||||||||||||||||||||||||||||||||||||||||||||||||||||
|
presentmentCurrencyCode STRING |
||||||||||||||||||||||||||||||||||||||||||||||||||||||||||||||||||||||||||||||||||||||||||||||||||||||||||||||||
|
processedAt STRING |
||||||||||||||||||||||||||||||||||||||||||||||||||||||||||||||||||||||||||||||||||||||||||||||||||||||||||||||||
|
refundable BOOLEAN |
||||||||||||||||||||||||||||||||||||||||||||||||||||||||||||||||||||||||||||||||||||||||||||||||||||||||||||||||
|
refundDiscrepancySet OBJECT This is a nested data structure. If your destination doesn't natively support nested data, attributes in this object will be flattened into the table. <a href='/en-US/stitch/replication/loading/understanding-loading-row-usage-for-nested-data-structures' target='new'>Learn more</a>.
|
||||||||||||||||||||||||||||||||||||||||||||||||||||||||||||||||||||||||||||||||||||||||||||||||||||||||||||||||
|
registeredSourceUrl STRING |
||||||||||||||||||||||||||||||||||||||||||||||||||||||||||||||||||||||||||||||||||||||||||||||||||||||||||||||||
|
requiresShipping BOOLEAN |
||||||||||||||||||||||||||||||||||||||||||||||||||||||||||||||||||||||||||||||||||||||||||||||||||||||||||||||||
|
restockable BOOLEAN |
||||||||||||||||||||||||||||||||||||||||||||||||||||||||||||||||||||||||||||||||||||||||||||||||||||||||||||||||
|
returnStatus STRING |
||||||||||||||||||||||||||||||||||||||||||||||||||||||||||||||||||||||||||||||||||||||||||||||||||||||||||||||||
|
shippingAddress OBJECT This is a nested data structure. If your destination doesn't natively support nested data, attributes in this object will be flattened into the table. <a href='/en-US/stitch/replication/loading/understanding-loading-row-usage-for-nested-data-structures' target='new'>Learn more</a>.
|
||||||||||||||||||||||||||||||||||||||||||||||||||||||||||||||||||||||||||||||||||||||||||||||||||||||||||||||||
|
shopifyProtect OBJECT This is a nested data structure. If your destination doesn't natively support nested data, attributes in this object will be flattened into the table. <a href='/en-US/stitch/replication/loading/understanding-loading-row-usage-for-nested-data-structures' target='new'>Learn more</a>.
|
||||||||||||||||||||||||||||||||||||||||||||||||||||||||||||||||||||||||||||||||||||||||||||||||||||||||||||||||
|
sourceIdentifier STRING |
||||||||||||||||||||||||||||||||||||||||||||||||||||||||||||||||||||||||||||||||||||||||||||||||||||||||||||||||
|
sourceName STRING |
||||||||||||||||||||||||||||||||||||||||||||||||||||||||||||||||||||||||||||||||||||||||||||||||||||||||||||||||
|
statusPageUrl STRING |
||||||||||||||||||||||||||||||||||||||||||||||||||||||||||||||||||||||||||||||||||||||||||||||||||||||||||||||||
|
subtotalLineItemsQuantity INTEGER |
||||||||||||||||||||||||||||||||||||||||||||||||||||||||||||||||||||||||||||||||||||||||||||||||||||||||||||||||
|
subtotalPriceSet OBJECT This is a nested data structure. If your destination doesn't natively support nested data, attributes in this object will be flattened into the table. <a href='/en-US/stitch/replication/loading/understanding-loading-row-usage-for-nested-data-structures' target='new'>Learn more</a>.
|
||||||||||||||||||||||||||||||||||||||||||||||||||||||||||||||||||||||||||||||||||||||||||||||||||||||||||||||||
|
tags ARRAY This is a nested data structure. If your destination doesn't natively support nested data, attributes will be denested into a subtable. <a href='/en-US/stitch/replication/loading/understanding-loading-row-usage-for-nested-data-structures' target='new'>Learn more</a>. |
||||||||||||||||||||||||||||||||||||||||||||||||||||||||||||||||||||||||||||||||||||||||||||||||||||||||||||||||
|
taxExempt BOOLEAN |
||||||||||||||||||||||||||||||||||||||||||||||||||||||||||||||||||||||||||||||||||||||||||||||||||||||||||||||||
|
taxLines ARRAY This is a nested data structure. If your destination doesn't natively support nested data, attributes will be denested into a subtable. <a href='/en-US/stitch/replication/loading/understanding-loading-row-usage-for-nested-data-structures' target='new'>Learn more</a>.
|
||||||||||||||||||||||||||||||||||||||||||||||||||||||||||||||||||||||||||||||||||||||||||||||||||||||||||||||||
|
taxesIncluded BOOLEAN |
||||||||||||||||||||||||||||||||||||||||||||||||||||||||||||||||||||||||||||||||||||||||||||||||||||||||||||||||
|
test BOOLEAN |
||||||||||||||||||||||||||||||||||||||||||||||||||||||||||||||||||||||||||||||||||||||||||||||||||||||||||||||||
|
totalCapturableSet OBJECT This is a nested data structure. If your destination doesn't natively support nested data, attributes in this object will be flattened into the table. <a href='/en-US/stitch/replication/loading/understanding-loading-row-usage-for-nested-data-structures' target='new'>Learn more</a>.
|
||||||||||||||||||||||||||||||||||||||||||||||||||||||||||||||||||||||||||||||||||||||||||||||||||||||||||||||||
|
totalCashRoundingAdjustment OBJECT This is a nested data structure. If your destination doesn't natively support nested data, attributes in this object will be flattened into the table. <a href='/en-US/stitch/replication/loading/understanding-loading-row-usage-for-nested-data-structures' target='new'>Learn more</a>.
|
||||||||||||||||||||||||||||||||||||||||||||||||||||||||||||||||||||||||||||||||||||||||||||||||||||||||||||||||
|
totalDiscountsSet OBJECT This is a nested data structure. If your destination doesn't natively support nested data, attributes in this object will be flattened into the table. <a href='/en-US/stitch/replication/loading/understanding-loading-row-usage-for-nested-data-structures' target='new'>Learn more</a>.
|
||||||||||||||||||||||||||||||||||||||||||||||||||||||||||||||||||||||||||||||||||||||||||||||||||||||||||||||||
|
totalOutstandingSet OBJECT This is a nested data structure. If your destination doesn't natively support nested data, attributes in this object will be flattened into the table. <a href='/en-US/stitch/replication/loading/understanding-loading-row-usage-for-nested-data-structures' target='new'>Learn more</a>.
|
||||||||||||||||||||||||||||||||||||||||||||||||||||||||||||||||||||||||||||||||||||||||||||||||||||||||||||||||
|
totalPriceSet OBJECT This is a nested data structure. If your destination doesn't natively support nested data, attributes in this object will be flattened into the table. <a href='/en-US/stitch/replication/loading/understanding-loading-row-usage-for-nested-data-structures' target='new'>Learn more</a>.
|
||||||||||||||||||||||||||||||||||||||||||||||||||||||||||||||||||||||||||||||||||||||||||||||||||||||||||||||||
|
totalReceivedSet OBJECT This is a nested data structure. If your destination doesn't natively support nested data, attributes in this object will be flattened into the table. <a href='/en-US/stitch/replication/loading/understanding-loading-row-usage-for-nested-data-structures' target='new'>Learn more</a>.
|
||||||||||||||||||||||||||||||||||||||||||||||||||||||||||||||||||||||||||||||||||||||||||||||||||||||||||||||||
|
totalRefundedSet OBJECT This is a nested data structure. If your destination doesn't natively support nested data, attributes in this object will be flattened into the table. <a href='/en-US/stitch/replication/loading/understanding-loading-row-usage-for-nested-data-structures' target='new'>Learn more</a>.
|
||||||||||||||||||||||||||||||||||||||||||||||||||||||||||||||||||||||||||||||||||||||||||||||||||||||||||||||||
|
totalRefundedShippingSet OBJECT This is a nested data structure. If your destination doesn't natively support nested data, attributes in this object will be flattened into the table. <a href='/en-US/stitch/replication/loading/understanding-loading-row-usage-for-nested-data-structures' target='new'>Learn more</a>.
|
||||||||||||||||||||||||||||||||||||||||||||||||||||||||||||||||||||||||||||||||||||||||||||||||||||||||||||||||
|
totalShippingPriceSet OBJECT This is a nested data structure. If your destination doesn't natively support nested data, attributes in this object will be flattened into the table. <a href='/en-US/stitch/replication/loading/understanding-loading-row-usage-for-nested-data-structures' target='new'>Learn more</a>.
|
||||||||||||||||||||||||||||||||||||||||||||||||||||||||||||||||||||||||||||||||||||||||||||||||||||||||||||||||
|
totalTaxSet OBJECT This is a nested data structure. If your destination doesn't natively support nested data, attributes in this object will be flattened into the table. <a href='/en-US/stitch/replication/loading/understanding-loading-row-usage-for-nested-data-structures' target='new'>Learn more</a>.
|
||||||||||||||||||||||||||||||||||||||||||||||||||||||||||||||||||||||||||||||||||||||||||||||||||||||||||||||||
|
totalTipReceivedSet OBJECT This is a nested data structure. If your destination doesn't natively support nested data, attributes in this object will be flattened into the table. <a href='/en-US/stitch/replication/loading/understanding-loading-row-usage-for-nested-data-structures' target='new'>Learn more</a>.
|
||||||||||||||||||||||||||||||||||||||||||||||||||||||||||||||||||||||||||||||||||||||||||||||||||||||||||||||||
|
totalWeight NUMBER |
||||||||||||||||||||||||||||||||||||||||||||||||||||||||||||||||||||||||||||||||||||||||||||||||||||||||||||||||
|
transactionsCount OBJECT This is a nested data structure. If your destination doesn't natively support nested data, attributes in this object will be flattened into the table. <a href='/en-US/stitch/replication/loading/understanding-loading-row-usage-for-nested-data-structures' target='new'>Learn more</a>.
|
||||||||||||||||||||||||||||||||||||||||||||||||||||||||||||||||||||||||||||||||||||||||||||||||||||||||||||||||
|
unpaid BOOLEAN |
||||||||||||||||||||||||||||||||||||||||||||||||||||||||||||||||||||||||||||||||||||||||||||||||||||||||||||||||
|
updatedAt STRING |
||||||||||||||||||||||||||||||||||||||||||||||||||||||||||||||||||||||||||||||||||||||||||||||||||||||||||||||||
|
fulfillments ARRAY This is a nested data structure. If your destination doesn't natively support nested data, attributes will be denested into a subtable. <a href='/en-US/stitch/replication/loading/understanding-loading-row-usage-for-nested-data-structures' target='new'>Learn more</a>.
|
||||||||||||||||||||||||||||||||||||||||||||||||||||||||||||||||||||||||||||||||||||||||||||||||||||||||||||||||
|
lineItems ARRAY This is a nested data structure. If your destination doesn't natively support nested data, attributes will be denested into a subtable. <a href='/en-US/stitch/replication/loading/understanding-loading-row-usage-for-nested-data-structures' target='new'>Learn more</a>.
|
||||||||||||||||||||||||||||||||||||||||||||||||||||||||||||||||||||||||||||||||||||||||||||||||||||||||||||||||
|
shippingLine OBJECT This is a nested data structure. If your destination doesn't natively support nested data, attributes in this object will be flattened into the table. <a href='/en-US/stitch/replication/loading/understanding-loading-row-usage-for-nested-data-structures' target='new'>Learn more</a>.
|
product_variants
The product_variants table contains info about variants that can be added to a product to represent one version of a product with several options.
|
Key-based Incremental |
|
|
Primary Key |
id |
|
Replication Key |
updatedAt |
| Useful links |
|
id STRING |
|||||
|
createdAt STRING |
|||||
|
barcode STRING |
|||||
|
availableForSale BOOLEAN |
|||||
|
compareAtPrice STRING |
|||||
|
displayName STRING |
|||||
|
image OBJECT This is a nested data structure. If your destination doesn't natively support nested data, attributes in this object will be flattened into the table. <a href='/en-US/stitch/replication/loading/understanding-loading-row-usage-for-nested-data-structures' target='new'>Learn more</a>.
|
|||||
|
inventoryPolicy STRING |
|||||
|
inventoryQuantity INTEGER |
|||||
|
position INTEGER |
|||||
|
price STRING |
|||||
|
requiresComponents BOOLEAN |
|||||
|
sellableOnlineQuantity INTEGER |
|||||
|
sku STRING |
|||||
|
taxCode STRING |
|||||
|
taxable BOOLEAN |
|||||
|
title STRING |
|||||
|
updatedAt STRING |
|||||
|
product OBJECT This is a nested data structure. If your destination doesn't natively support nested data, attributes in this object will be flattened into the table. <a href='/en-US/stitch/replication/loading/understanding-loading-row-usage-for-nested-data-structures' target='new'>Learn more</a>.
|
|||||
|
inventoryItem OBJECT This is a nested data structure. If your destination doesn't natively support nested data, attributes in this object will be flattened into the table. <a href='/en-US/stitch/replication/loading/understanding-loading-row-usage-for-nested-data-structures' target='new'>Learn more</a>.
|
products
The products table contains info about a shop’s products.
|
Key-based Incremental |
|
|
Primary Key |
id |
|
Replication Key |
updatedAt |
| Useful links |
| Join products with | on |
|---|---|
| abandoned_checkouts |
products.id = abandoned_checkouts.lineItems.product.id |
| order_refunds |
products.id = order_refunds.refundLineItems.lineItem.product.id |
| orders |
products.id = orders.lineItems.product.id |
|
status STRING |
||||||||||||||||||||||||
|
publishedAt STRING |
||||||||||||||||||||||||
|
createdAt STRING |
||||||||||||||||||||||||
|
vendor STRING |
||||||||||||||||||||||||
|
updatedAt STRING |
||||||||||||||||||||||||
|
productType STRING |
||||||||||||||||||||||||
|
tags STRING |
||||||||||||||||||||||||
|
options ARRAY This is a nested data structure. If your destination doesn't natively support nested data, attributes will be denested into a subtable. <a href='/en-US/stitch/replication/loading/understanding-loading-row-usage-for-nested-data-structures' target='new'>Learn more</a>.
|
||||||||||||||||||||||||
|
handle STRING |
||||||||||||||||||||||||
|
templateSuffix STRING |
||||||||||||||||||||||||
|
title STRING |
||||||||||||||||||||||||
|
id STRING |
||||||||||||||||||||||||
|
giftCardTemplateSuffix STRING |
||||||||||||||||||||||||
|
hasOnlyDefaultVariant STRING |
||||||||||||||||||||||||
|
hasOutOfStockVariants BOOLEAN |
||||||||||||||||||||||||
|
hasVariantsThatRequiresComponents BOOLEAN |
||||||||||||||||||||||||
|
isGiftCard BOOLEAN |
||||||||||||||||||||||||
|
description STRING |
||||||||||||||||||||||||
|
descriptionHtml STRING |
||||||||||||||||||||||||
|
category OBJECT This is a nested data structure. If your destination doesn't natively support nested data, attributes in this object will be flattened into the table. <a href='/en-US/stitch/replication/loading/understanding-loading-row-usage-for-nested-data-structures' target='new'>Learn more</a>.
|
||||||||||||||||||||||||
|
featuredMedia OBJECT This is a nested data structure. If your destination doesn't natively support nested data, attributes in this object will be flattened into the table. <a href='/en-US/stitch/replication/loading/understanding-loading-row-usage-for-nested-data-structures' target='new'>Learn more</a>.
|
||||||||||||||||||||||||
|
requiresSellingPlan BOOLEAN |
||||||||||||||||||||||||
|
totalInventory INTEGER |
||||||||||||||||||||||||
|
tracksInventory BOOLEAN |
||||||||||||||||||||||||
|
media ARRAY This is a nested data structure. If your destination doesn't natively support nested data, attributes will be denested into a subtable. <a href='/en-US/stitch/replication/loading/understanding-loading-row-usage-for-nested-data-structures' target='new'>Learn more</a>.
|
transactions
The transactions table contains info about transactions.
|
Key-based Incremental |
|
|
Primary Key |
id |
|
Replication Key |
createdAt |
| Useful links |
| Join transactions with | on |
|---|---|
| abandoned_checkouts |
transactions.order.id = abandoned_checkouts.customers.lastOrder.id |
| customers |
transactions.order.id = customers.lastOrder.id |
| order_refunds |
transactions.order.id = order_refunds.order.id |
| orders |
transactions.order.id = orders.id |
|
accountNumber STRING |
||||||||||||||
|
amountRoundingSet OBJECT This is a nested data structure. If your destination doesn't natively support nested data, attributes in this object will be flattened into the table. <a href='/en-US/stitch/replication/loading/understanding-loading-row-usage-for-nested-data-structures' target='new'>Learn more</a>.
|
||||||||||||||
|
amountSet OBJECT This is a nested data structure. If your destination doesn't natively support nested data, attributes in this object will be flattened into the table. <a href='/en-US/stitch/replication/loading/understanding-loading-row-usage-for-nested-data-structures' target='new'>Learn more</a>.
|
||||||||||||||
|
authorizationCode STRING |
||||||||||||||
|
authorizationExpiresAt STRING |
||||||||||||||
|
createdAt STRING |
||||||||||||||
|
errorCode STRING |
||||||||||||||
|
formattedGateway STRING |
||||||||||||||
|
gateway STRING |
||||||||||||||
|
id STRING |
||||||||||||||
|
kind STRING |
||||||||||||||
|
manualPaymentGateway BOOLEAN |
||||||||||||||
|
maximumRefundableV2 OBJECT This is a nested data structure. If your destination doesn't natively support nested data, attributes in this object will be flattened into the table. <a href='/en-US/stitch/replication/loading/understanding-loading-row-usage-for-nested-data-structures' target='new'>Learn more</a>. |
||||||||||||||
|
multiCapturable BOOLEAN |
||||||||||||||
|
order OBJECT This is a nested data structure. If your destination doesn't natively support nested data, attributes in this object will be flattened into the table. <a href='/en-US/stitch/replication/loading/understanding-loading-row-usage-for-nested-data-structures' target='new'>Learn more</a>.
|
||||||||||||||
|
parentTransaction OBJECT This is a nested data structure. If your destination doesn't natively support nested data, attributes in this object will be flattened into the table. <a href='/en-US/stitch/replication/loading/understanding-loading-row-usage-for-nested-data-structures' target='new'>Learn more</a>.
|
||||||||||||||
|
paymentId STRING |
||||||||||||||
|
processedAt STRING |
||||||||||||||
|
receiptJson STRING |
||||||||||||||
|
settlementCurrency STRING |
||||||||||||||
|
settlementCurrencyRate STRING |
||||||||||||||
|
shopifyPaymentsSet OBJECT This is a nested data structure. If your destination doesn't natively support nested data, attributes in this object will be flattened into the table. <a href='/en-US/stitch/replication/loading/understanding-loading-row-usage-for-nested-data-structures' target='new'>Learn more</a>.
|
||||||||||||||
|
status STRING |
||||||||||||||
|
test BOOLEAN |
||||||||||||||
|
totalUnsettledSet OBJECT This is a nested data structure. If your destination doesn't natively support nested data, attributes in this object will be flattened into the table. <a href='/en-US/stitch/replication/loading/understanding-loading-row-usage-for-nested-data-structures' target='new'>Learn more</a>.
|
||||||||||||||
|
fees ARRAY This is a nested data structure. If your destination doesn't natively support nested data, attributes will be denested into a subtable. <a href='/en-US/stitch/replication/loading/understanding-loading-row-usage-for-nested-data-structures' target='new'>Learn more</a>.
|
||||||||||||||
|
manuallyCapturable BOOLEAN |
||||||||||||||
|
paymentDetails OBJECT This is a nested data structure. If your destination doesn't natively support nested data, attributes in this object will be flattened into the table. <a href='/en-US/stitch/replication/loading/understanding-loading-row-usage-for-nested-data-structures' target='new'>Learn more</a>.
|
Did this page help you?
If you find any issues with this page or its content – a typo, a missing step, or a technical error – please let us know!