This scenario describes a Spark Batch Job that allows you to prepare, analyze and
transform data stored in managed Delta Lake tables using Unity Catalog.
In this
scenario, you are working on streaming music records that contain the most streamed
songs and albums in a Delta Lake dataset. You want to analyze the songs by popularity
and genre so that it can be consumed seamlessly on the same table in
Databricks.
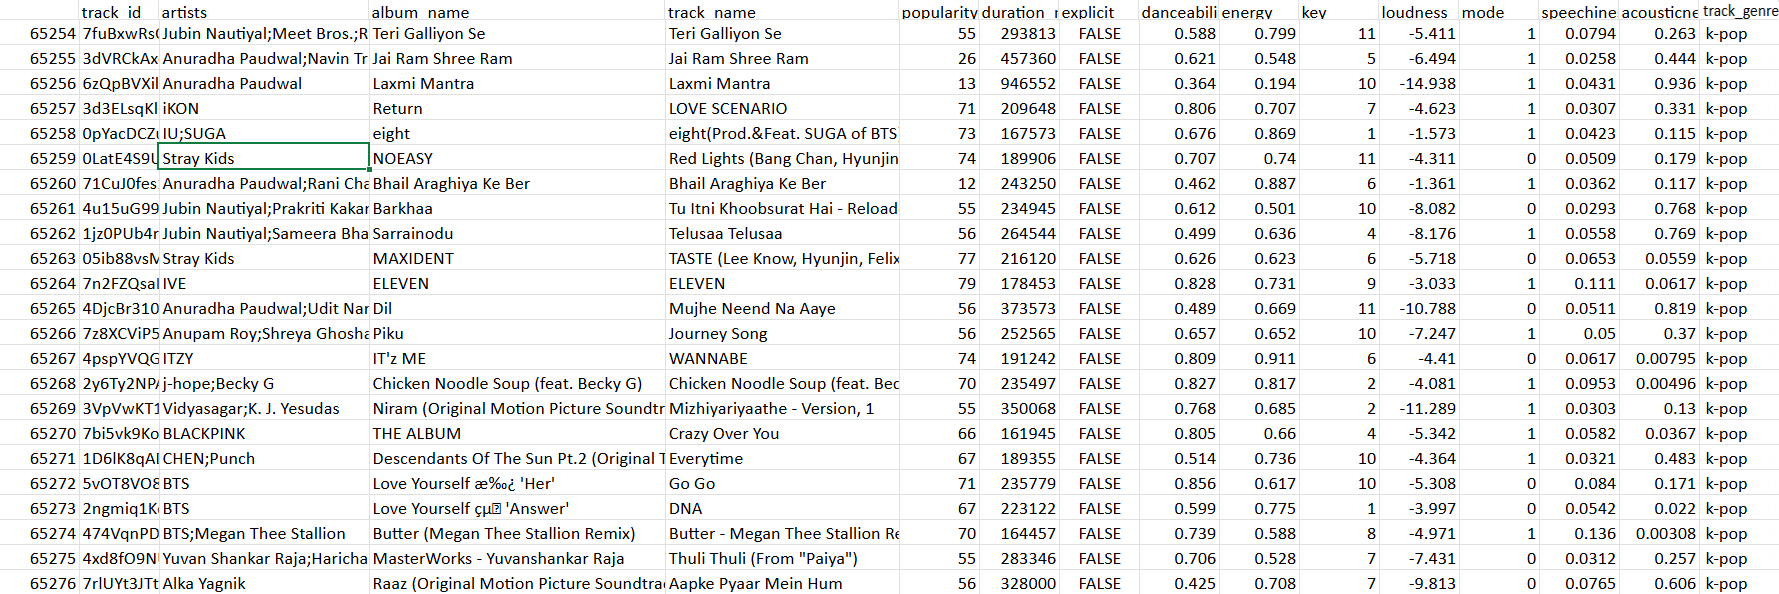
Here is a sample of the dataset used for the purpose of this scenario:
For the purpose of this scenario, you need to create a Spark Batch Job
containing several subJobs. Each subJob is used to perform a different action.
Procedure
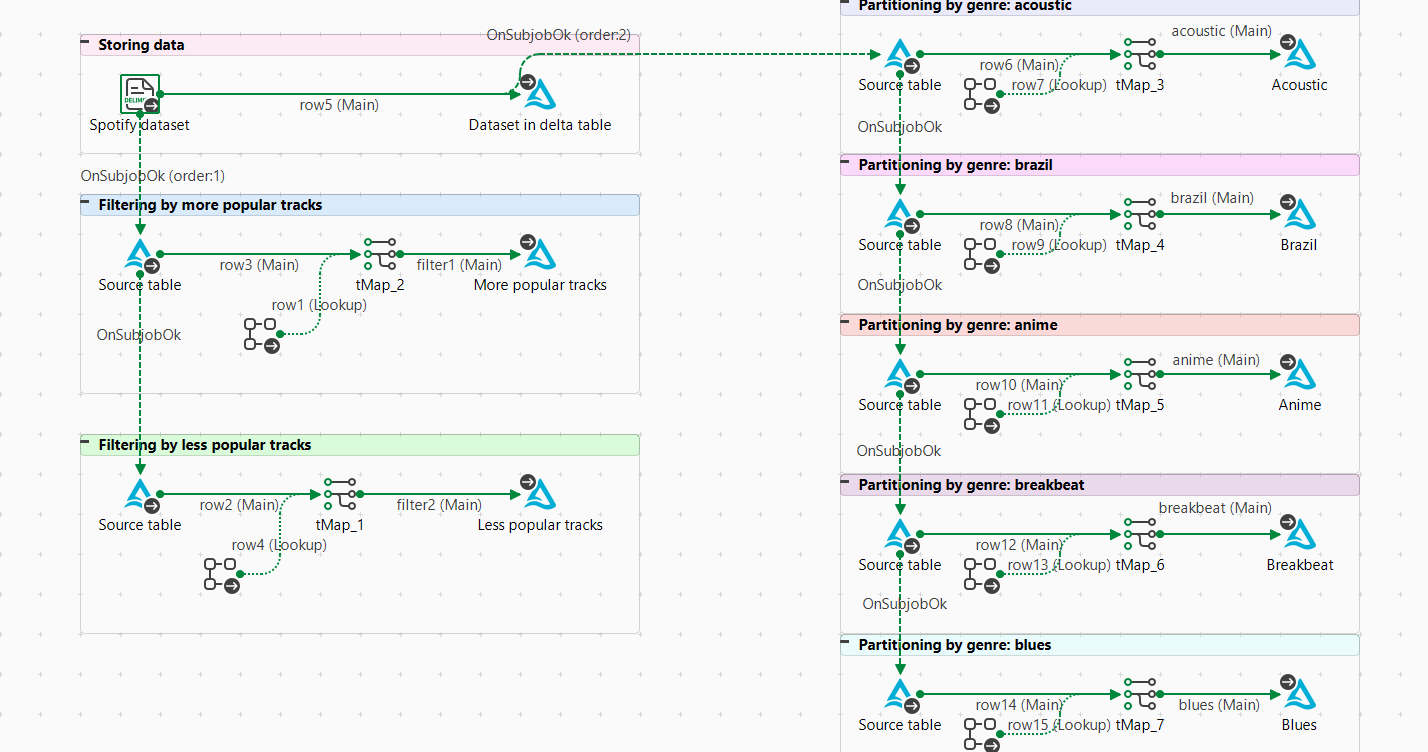
Create a new Spark Batch Job and add the following components:
seven tDeltaLakeInput
eight tDeltaLakeOutput
one tFileInputDelimited
seven tFixedFlowInput
seven tMap
Create the Storing data subJob:
Connect tFileInputDelimited to tDeltaLakeOuput.
Create the Filtering subJobs for each filtering
action, for example more popular tracks:
Connect tDeltaLakeInput to tMap.
Connect tFixedFlowInput to tMap.
Connect tMap to tDeltaLakeOutput.
Create the Partitioning by genre subJobs for each
genre, for example anime:
Connect tDeltaLakeInput to tMap.
Connect tFixedFlowInput to tMap.
Connect tMap to tDeltaLakeOutput.
Connect the Filtering subJobs to the
Storing data subJob.
Connect the Partitioning by genre subJobs to the
Storing data subJob.
Storing data into Unity Catalog
The first step of this scenario is to load the CSV file containing the
streaming music records into Talend Studio,
and then store the dataset into a Delta Lake table.
About this task
For this task, the Storing data subJob is
used.
Procedure
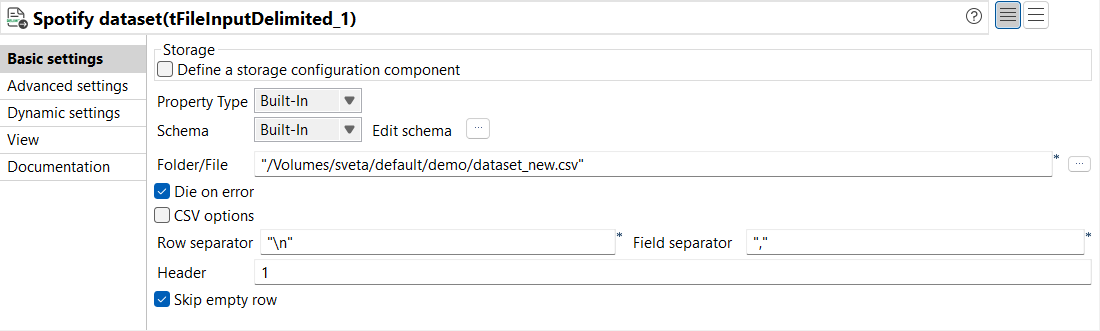
From the Basic settings view of tFileInputDelimited,
configure the parameters as follows:
From the Property Type and
Schema drop-down lists, select
Built-In.
In the Folder/File parameter, enter the path
pointing to the data to be used. In this example, it is a CSV
file.
Leave the other parameters as is.
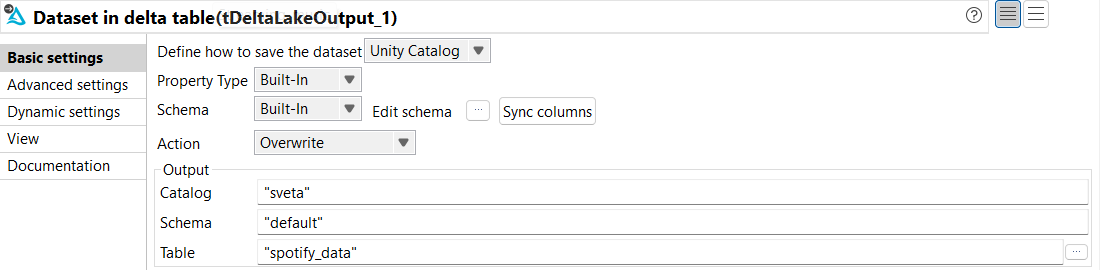
From the Basic settings view of tDeltaLakeOutput,
configure the parameters as follows:
From the Define how to save the dataset
drop-down list, select Unity Catalog.
From the Property Type and
Schema drop-down lists, select
Built-In.
From the Action drop-down list, select
Overwrite.
In the Catalog parameter, enter the name of
the catalog where you want to store the data.
In the Schema parameter, enter the name of
the schema where you want to store the data.
In the Table parameter, enter the name of the
table where you want to store the data. In this example, it is
spotify_data.
Results
The Storing data subJob is ready to use. Once you launch
the subJob, the spotify_data Delta Lake table is
created.
Filtering songs by popularity
The second step of this scenario is to filter the songs from the Delta Lake
dataset by popularity. The first filter applies to the most popular tracks and the
second filter applies to the less popular tracks.
About this task
For this task, the Filtering by more popular tracks
subJob is used. You can repeat the same actions for the Filtering by less
popular tracks subJob.
Procedure
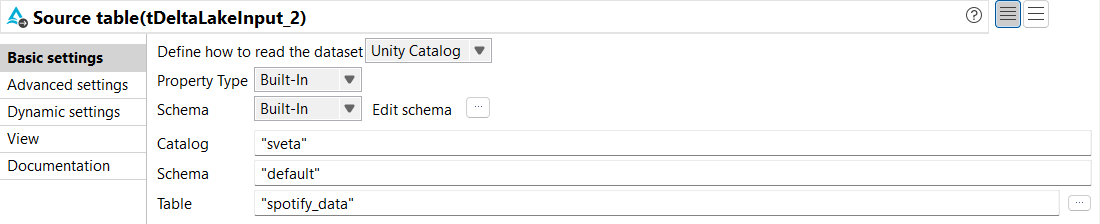
From the Basic settings view of tDeltaLakeInput,
configure the parameters as follows:
From the Define how to read the dataset
drop-down list, select Unity Catalog.
From the Property Type and
Schema drop-down lists, select
Built-In.
From the Action drop-down list, select
Overwrite.
In the Catalog parameter, enter the name of
the catalog where you want to store the data.
In the Schema parameter, enter the name of
the schema where you want to store the data.
In the Table parameter, enter the name of the
table from which you want to read the data. In this example, it is
spotify_data.
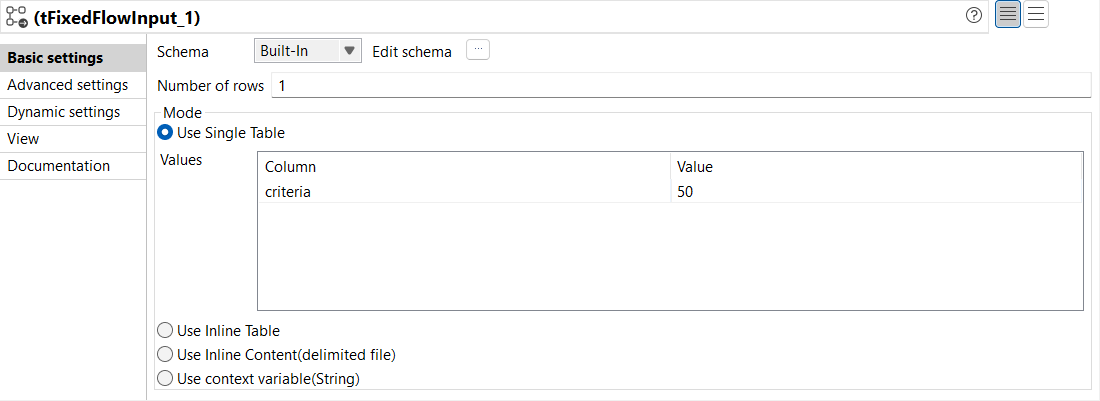
From the Basic settings view of tFixedFlowInput,
configure the parameters as follows:
From the Schema drop-down list, select
Built-In.
In the Number of rows, enter the number of
lines to be generated. In this example, it is
1.
Select the Use Single Table mode, and enter
the data that you want to generate in the relevant field. In this
example, it is a column named criteria with a
value of 50.
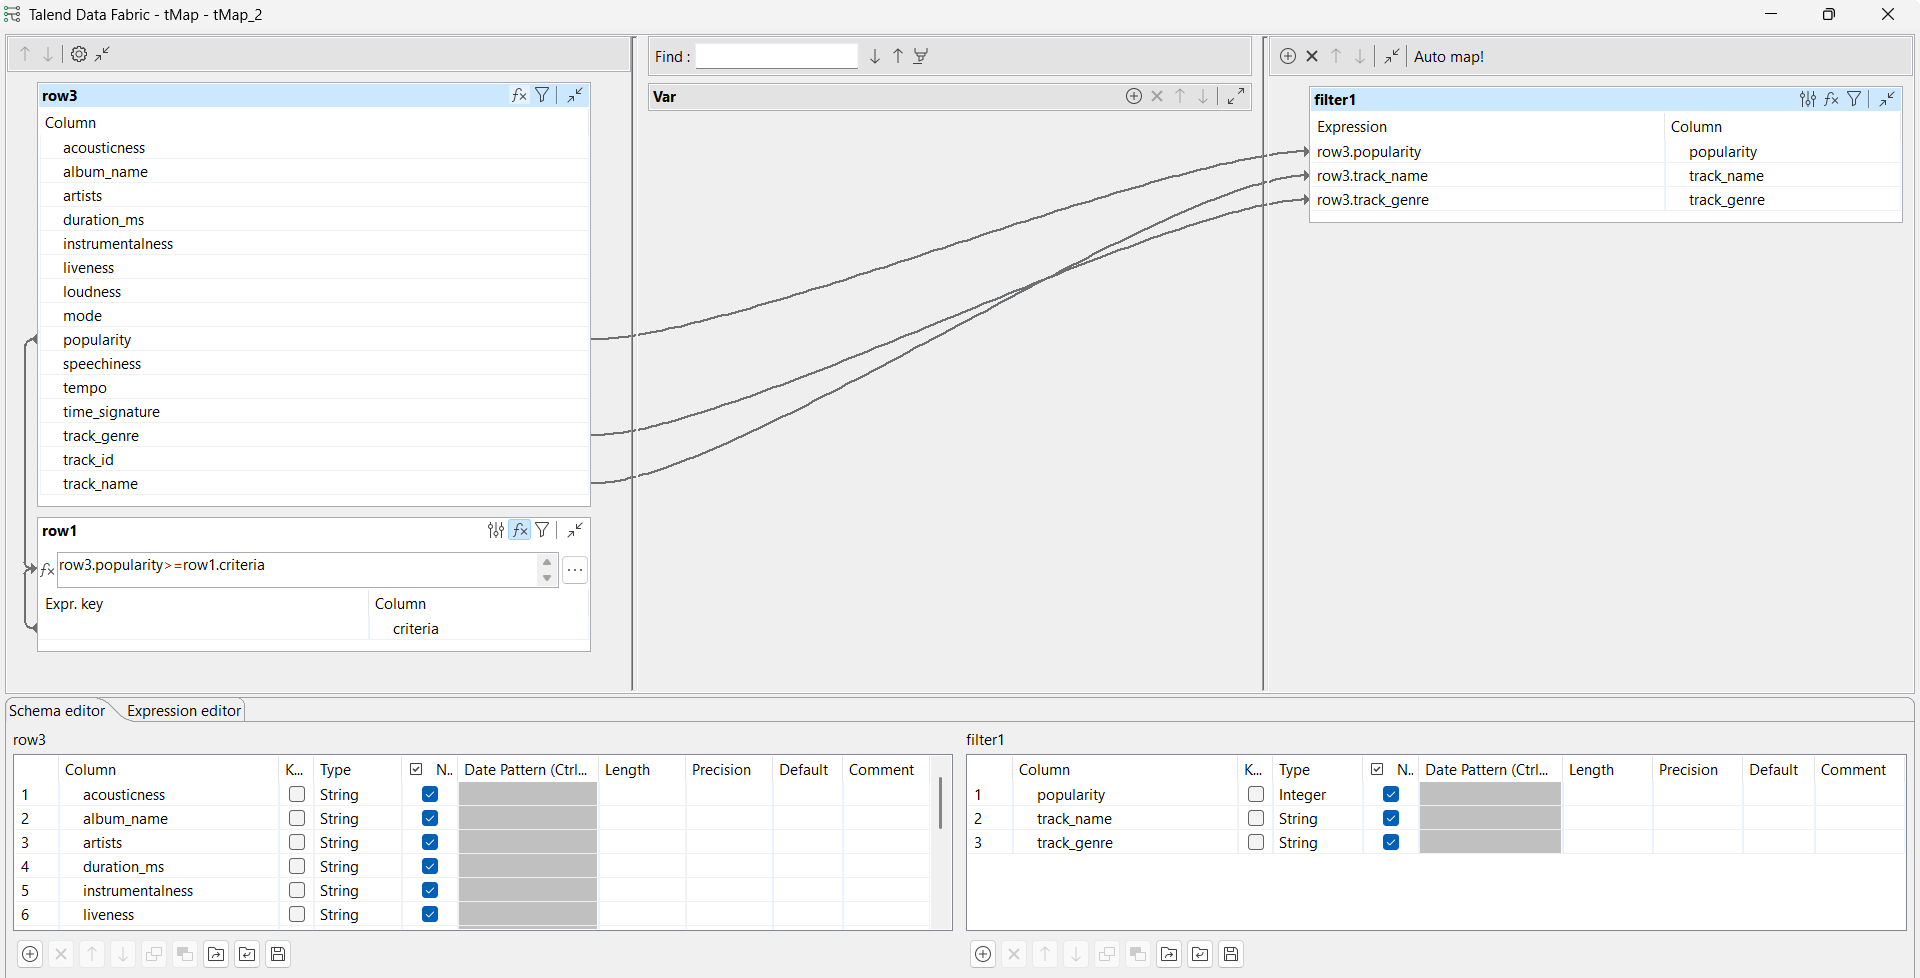
From the Basic settings view of tMap, configure the
mapping as follows:
Double-click the tMap component to open the Map
Editor.
Create an expression for the popularity row.
In this example, it is
row3.popularity>=row1.criteria, where
criteria is set to
50 in the tFixedFlowInput component,
which means that the expression filters only the songs that have a
popularity equal or greater than 50.
Create a join between the main input flow and the new input flow for
the popularity,
track_name, and
track_genre rows.
Click OK to validate the map settings and
close the Map Editor.
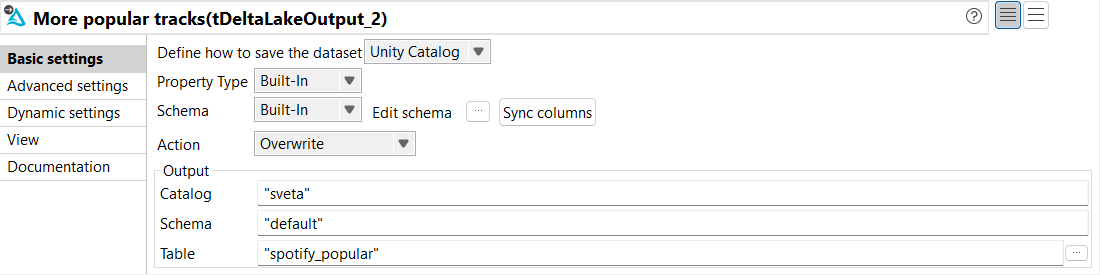
From the Basic settings view of tDeltaLakeOutput,
configure the parameters as follows:
From the Define how to save the dataset
drop-down list, select Unity Catalog.
From the Property Type and
Schema drop-down lists, select
Built-In.
From the Action drop-down list, select
Overwrite.
In the Catalog parameter, enter the name of
the catalog where you want to store the data.
In the Schema parameter, enter the name of
the schema where you want to store the data.
In the Table parameter, enter the name of the
table where you want to store the data. In this example, it is
spotify_popular.
Results
The Filtering by more popular tracks subJob is ready to
use. Once you launch the subJob, the spotify_popular Delta
Lake table is created.
Partitioning songs by genre
The third step of this scenario is to partition the songs into five genres:
acoustic, brazilian, anime, breakbeat, and blues in this example. Each genre
represents a new table.
About this task
For this task, the Partitioning by genre: anime subJob
is used. You can repeat the same actions for the following other subJobs:
Partitioning by genre: acoustic
Partitioning by genre: brazil
Partitioning by genre: breakbeat
Partitioning by genre: blues
Procedure
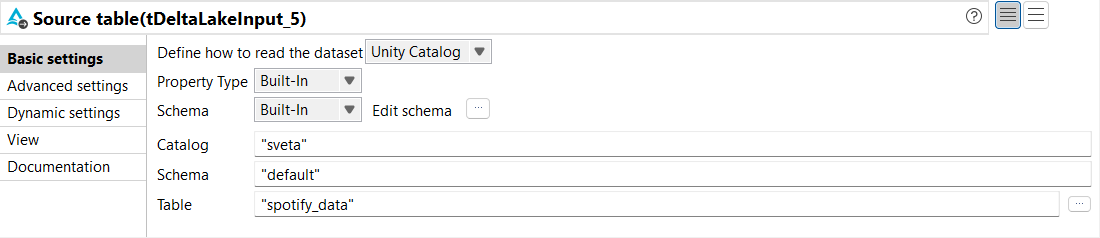
From the Basic settings view of tDeltaLakeInput,
configure the parameters as follows:
From the Define how to read the dataset
drop-down list, select Unity Catalog.
From the Property Type and
Schema drop-down lists, select
Built-In.
From the Action drop-down list, select
Overwrite.
In the Catalog parameter, enter the name of
the catalog where you want to store the data.
In the Schema parameter, enter the name of
the schema where you want to store the data.
In the Table parameter, enter the name of the
table from which you want to read the data. In this example, it is
spotify_data.
From the Basic settings view of tFixedFlowInput,
configure the parameters as follows:
From the Schema drop-down list, select
Built-In.
In the Number of rows, enter the number of
lines to be generated. In this example, it is
1.
Select the Use Single Table mode, and enter
the data that you want to generate in the relevant field. In this
example, it is a colomn named criteria3 with
a value of anime.
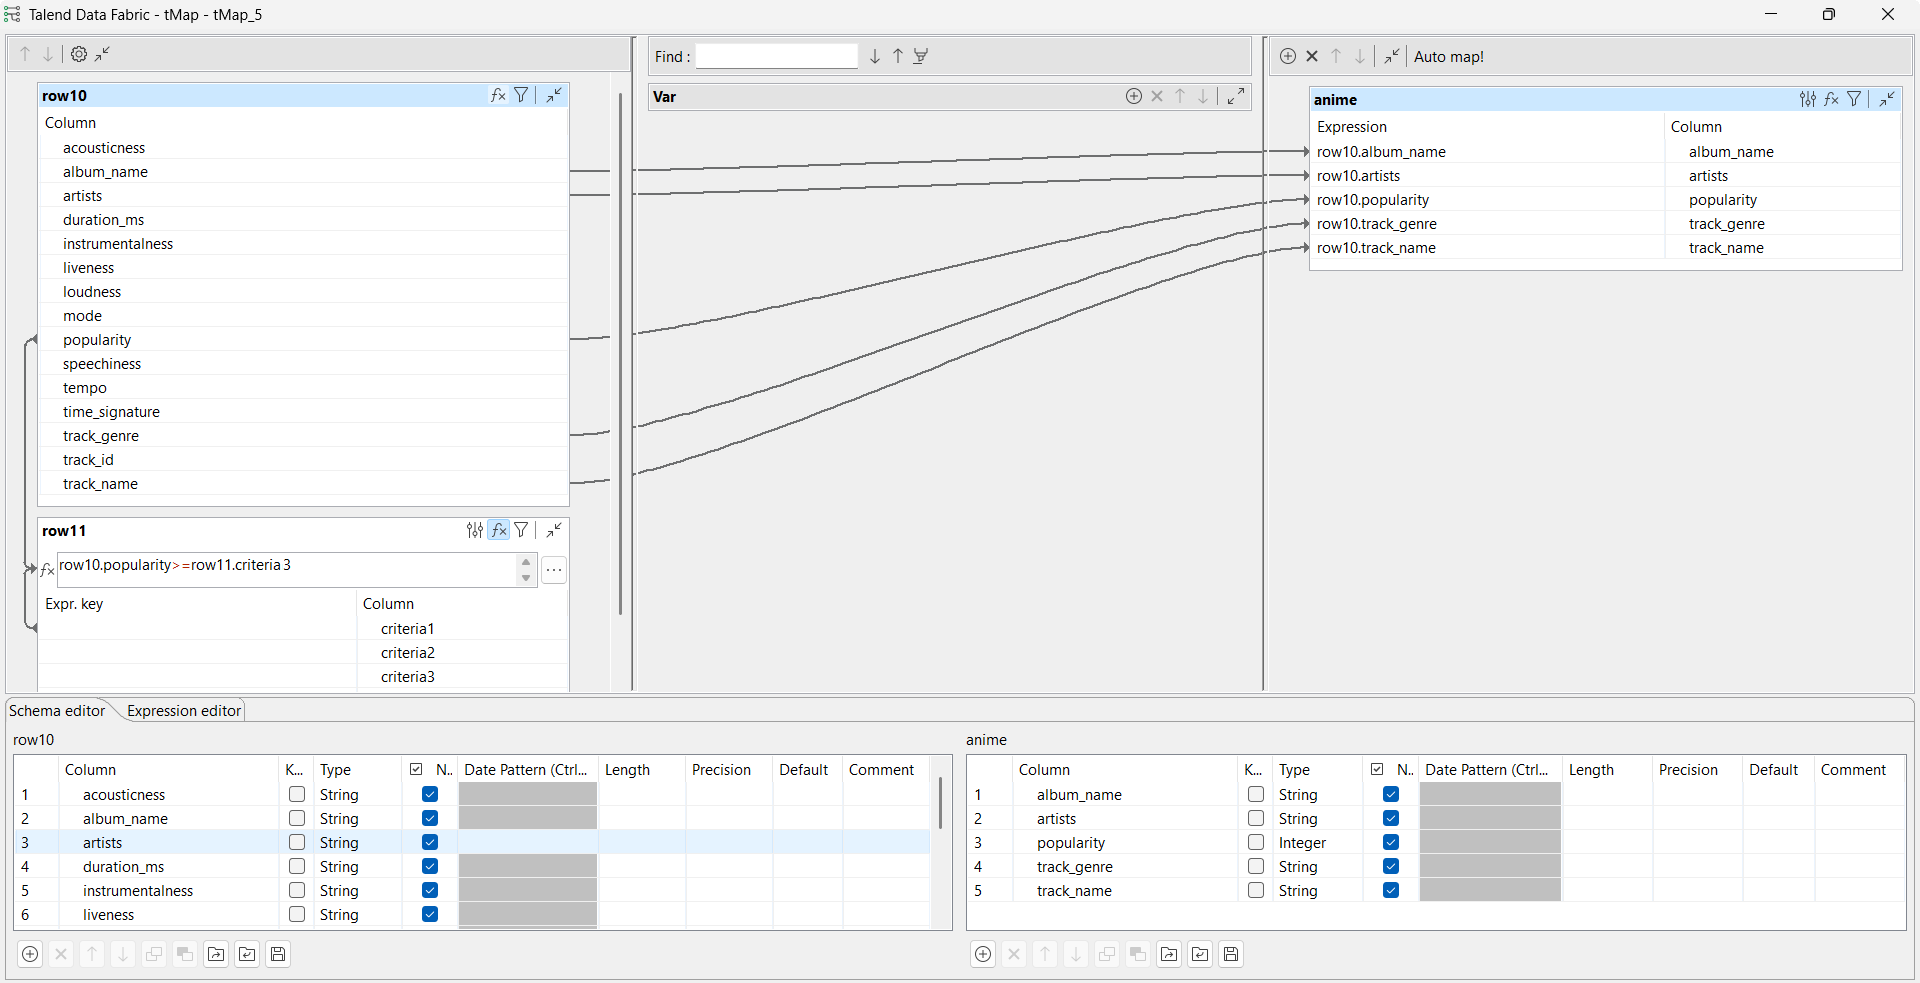
From the Basic settings view of tMap, configure the
mapping as follows:
Double-click the tMap component to open the Map
Editor.
Create an expression for the popularity row.
In this example, it is
row10.popularity>=row11.criteria3, where
criteria3 is set to
anime in the tFixedFlowInput component,
which means that the expression filters only the songs that have the
anime genre.
Create a join between the main input flow and the new input flow for
the album_name,
artists,
popularity,
track_genre and
track_name rows.
Click OK to validate the map settings and
close the Map Editor.
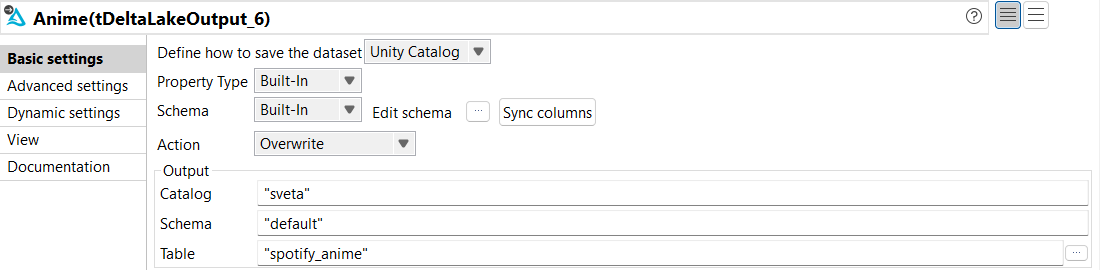
From the Basic settings view of tDeltaLakeOutput,
configure the parameters as follows:
From the Define how to save the dataset
drop-down list, select Unity Catalog.
From the Property Type and
Schema drop-down lists, select
Built-In.
From the Action drop-down list, select
Overwrite.
In the Catalog parameter, enter the name of
the catalog where you want to store the data.
In the Schema parameter, enter the name of
the schema where you want to store the data.
In the Table parameter, enter the name of the
table where you want to store the data. In this example, it is
spotify_anime.
Results
The Partitioning by genre: anime subJob is ready to use.
Once you launch the subJob, the spotify_anime Delta Lake
table is created.
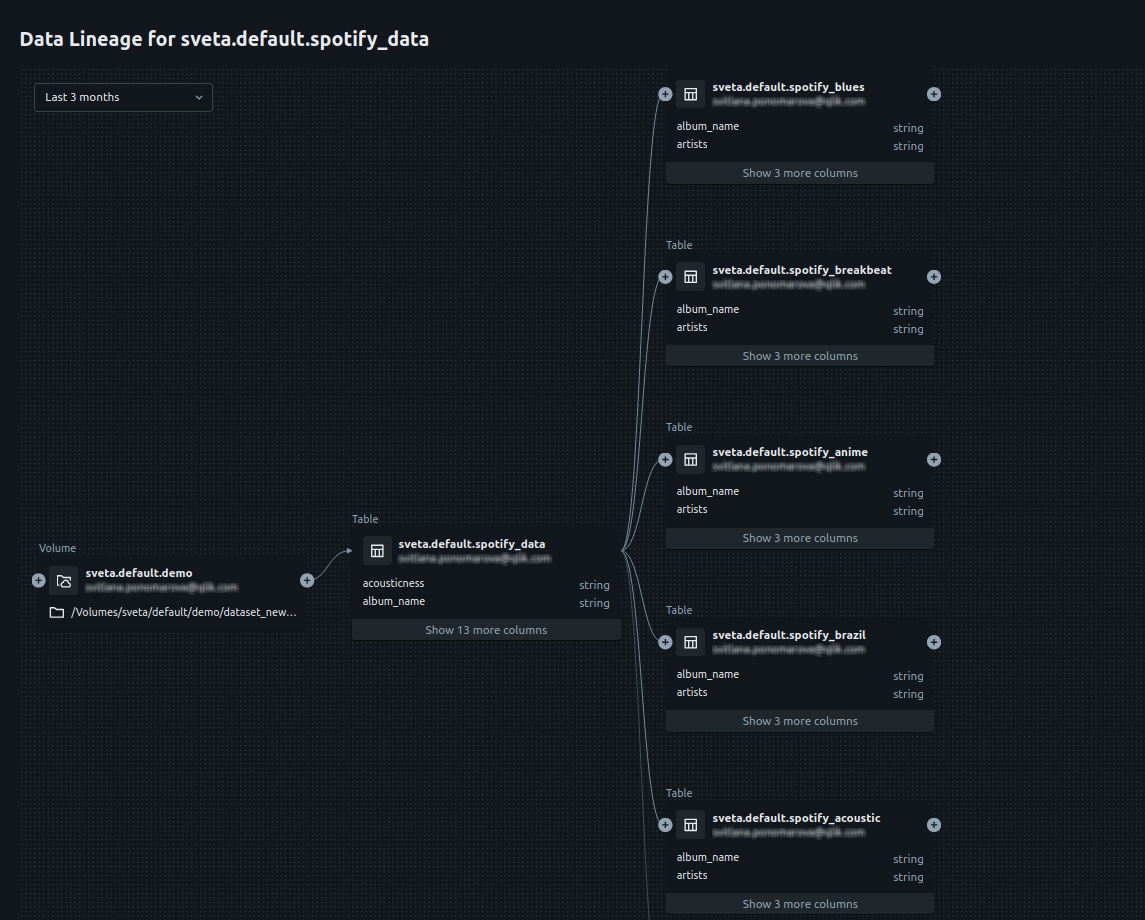
Analyzing the data lineage
The last step of this scenario is to analyze the final data with the data
lineage tool in Unity Catalog.
Procedure
Run the Spark Batch Job.
The new tables are created based on the popularity and on the
genre.
On Databricks side, select the spotify_data table,
and go to the Lineage tab. For more information, see
Capture and view data lineage using Unity
Catalog from the Databricks official documentation.
The lineage graph appears. You can now analyze the graph to see how
the various tables have been created based on the initial Unity Catalog
volume that comes from the CSV file.
Did this page help you?
If you find any issues with this page or its content – a typo, a missing step, or a technical error – please let us know!