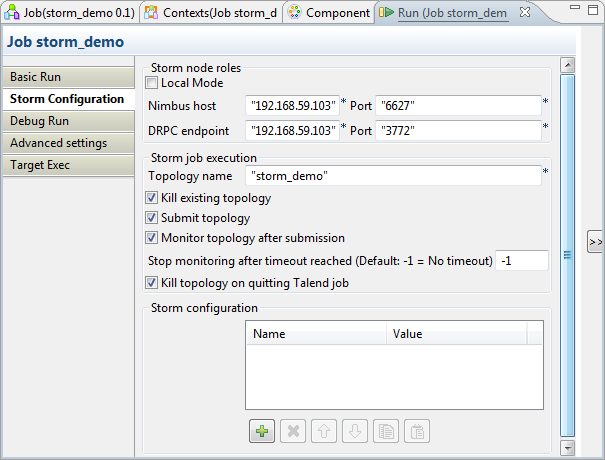
Configuring the connection
Procedure
-
Click Run to open its view and then click
Storm configuration to set up the
connection to the Storm system to be used.

-
In the Storm node roles
area, indicate the locations of the Nimbus server and the DRPC endpoint of the
Storm cluster to be used:
Option/Fields
Description
Local mode
Select this check box to build the Storm environment within the Studio. In this situation, the Storm Job you are designing is run locally within the Studio and you do not need to define any specific Nimbus and DRPC endpoint addresses.
Nimbus host and Port
In these two fields, enter the location of the Storm Nimbus server and its port number, respectively.
DRPC endpoint and Port
In these two fields, enter the location of the Storm DRPC endpoint and its port number, respectively.
- In the Topology name field, enter the name you want the Storm system to use for the Storm Job, or topology in terms of the Storm, you are designing. It is recommended to use the same name as you have named this Storm Job so that you can easily recognize this Job even within the Storm system.
-
Select the Kill existing topology check box to make the
Storm system stop any topology that has the same name as the Job you are
designing and want to run.
If you clear this check box and that Job of the same name is already running in the Storm system, the current Job will fail when you send it to Storm to run.
-
Select the Submit topology check box to submit the
current Job to the Storm system. This feature is used when you need to send
a new topology to Storm or used together with the Kill
existing topology feature when you need to update a running
topology in the Storm system.
If you clear this check box, when you run the current Job, the submission of this Job is ignored while the other configuration information is still taken into account, for example, killing an existing topology.
-
Select the Monitor topology after
submission check box to monitor the current Storm Job in the
console of the Run view.
If you clear this check box, you cannot read the monitoring information in the console.
- In the Stop monitoring after timeout reached field, enter, without the double quotation marks, the numeric value to indicate whether to stop the monitoring when a running topology reaches its timeout. The default value is -1, which means no timeout is applied.
-
Select the Kill topology on quitting Talend Job check
box to allow the Studio to kill, if it is still running, the current Job
from the Storm system when you stop this Job from the Studio.
If you clear this check box, the topology for this Job continues to run in the Storm system even though you kill it within the Studio or eventually shut down the Studio.
- If you need to use any other Storm properties specific to your situation, add them to the Storm configuration table.
Did this page help you?
If you find any issues with this page or its content – a typo, a missing step, or a technical error – please let us know!
