
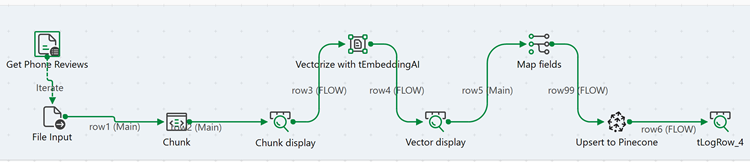
Indexing phone reviews with embeddings and vector database
This Job reads phone review text files from a folder, splits the content into smaller chunks for better analysis, generates vector embeddings using Azure OpenAI, and stores them in a Pinecone vector database to enable semantic search.
Before you begin
Before running this Job, ensure you have:
- An active Azure OpenAI account with access to the text-embedding-3-small model.
- Your Azure OpenAI API key and endpoint configured.
- A Pinecone account with an index created for storing embeddings.
- Your Pinecone API key and host endpoint configured.
- Downloaded the archive file tembeddingai-tpineconeclient_phone-review-files.zip and extracted the LG.txt and Iphones.txt files.
- Created the directory <folder_path>/phone-reviews/ with the phone review text files.
Linking the components
Procedure
-
Connect tPineconeClient to the last
tLogRow using a Row >
FLOW connection.
Configuring the components
About this task
Procedure
-
In the Basic settings tab, configure the following parameters:
- Click Edit schema and verify the schema has the following column: embedding (List).
- In the Platform list, select Azure OpenAI.
- In the Model name field, click the [...] button and select text-embedding-3-small.
- In the Token/API Key field, click the [...] button and enter your Azure OpenAI API key, then click OK.
- In the Azure endpoint field, enter your Azure OpenAI endpoint (for example: https://your-resource-name.openai.azure.com/).
- In the Column for embedding list, select chunk.
This component generates vector embeddings for each phone review text chunk.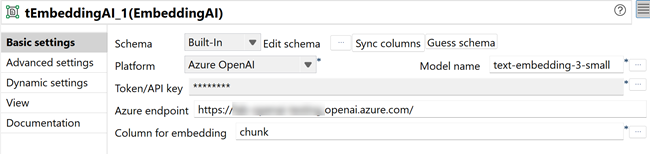
-
In the Map Editor, create the output schema with the following columns:
- id (String)
- vector (List) - Map it with the embedding input column
- text (String)
This mapping verifies that all metadata are correctly transferred to tPineconeClient. The id and values columns are required by Pinecone for upsert operations.
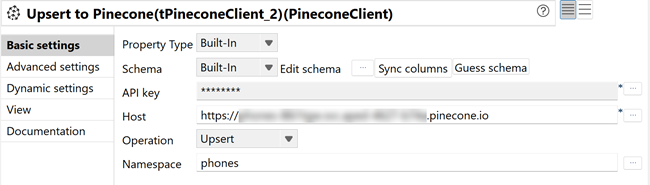
-
In the Basic settings tab, configure the following parameters:
- Click Edit schema and verify the schema has the following column: upsertedCount (Int).
- In the API Key field, click the [...] button and enter your Pinecone API key, then click OK.
- In the Host field, enter your Pinecone index host (for example: "your-index-name.svc.environment.pinecone.io").
- In the Operation list, select Upsert to load the vectorized phone review data into the Pinecone index.
- In the Namespace field, enter the namespace name
(for example: phones") or leave empty to use the
default namespace.
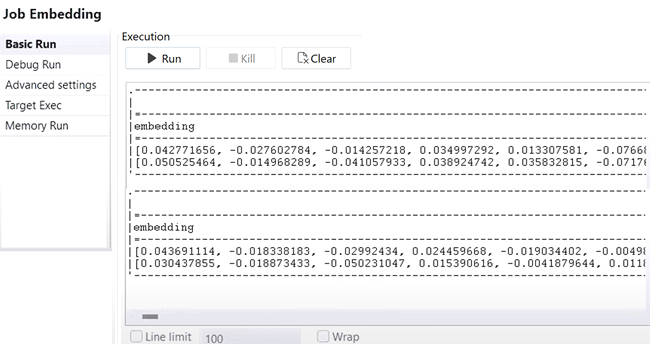
Executing the Job
Procedure
- Press Ctrl+S to save the Job.
- Press F6 to execute the Job.
Results
The Job reads the phone review files, chunks the text, generates embeddings using Azure OpenAI, verifies metadata transfer through tMap, and upserts the vectorized data into Pinecone for semantic search.
The phone review embeddings stored in Pinecone enable semantic search queries, allowing users to find relevant reviews based on meaning and context rather than exact keyword matches. The text chunking ensures more precise search results and better analysis capabilities.