Creating a map with multiple background layers
You can use multiple background layers in a map chart. This enables you to create layered base maps for your map chart data.
Some WMS sources include layers with transparency. With these sources, you can overlay the WMS background layer on top of a base map or other layers. Images can also be placed over other background layers. This enables you to create more complex base maps for your data.
Whether or not an WMS transparency layer supports transparency is dependent on the WMS source.
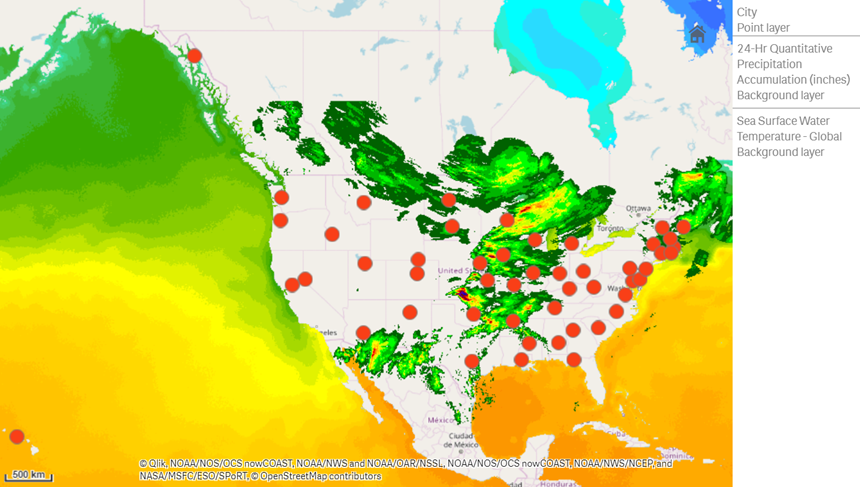
In this map example, a custom TMS is used in a background layer. Two WMS background layers are placed on top, using WMS endpoints from the National Ocean and Atmospheric Administration. The first contains sea temperature data. The second contains 24-hour rainfall data. A point layer containing cities is overlaid these background layers.
Map chart with a point layer overlaid on a TMS background layer and two WMS background layers

Dataset
This example uses a single table for data, Cities, with an external TMS and WMS data from external sources. You can import the two tables into your app using the web file connector.
How I built this
This example adds layers so that they are layered on top of each other in the final order. If you add these layers in a different order, you click and drag layers into the correct order you want in Layers.
Do the following:
- Add the table Cities to your app. You can copy and paste the table using manual entry or you can import the table into your app using the web file connector.
- In a sheet, add a map chart.
- In Map settings, set Base map to None.
-
Add a background layer and do the following:
-
In Data, do the following:
- For Format, select TMS.
- For URL, enter https://a.tile.openstreetmap.org/${z}/${x}/${y}.png.
- For Attribution, enter © OpenStreetMap contributors.
-
In Options, do the following:
- Set Show legend to None.
-
-
Add a background layer and do the following:
-
For Label, enter Sea Surface Water Temperature - Global.
- For Format, select WMS and click WMS setup. Do the following:
- For WMS server URL, enter https://nowcoast.noaa.gov/arcgis/services/nowcoast/analysis_ocean_sfc_sst_time/MapServer/WMSServer.
- For Version, select 1.3.0.
- Click Load WMS.
- In Step 2 (Settings), select the first Image layer.
- Click Save.
- For Attribution, enter NOAA/NOS/OCS nowCOAST, NOAA/NWS/NCEP, and NASA/MSFC/ESO/SPoRT.
-
-
Add a background layer and do the following:
- For Label, enter 24-Hr Quantitative Precipitation Accumulation (inches).
- For Format, select WMS and click WMS setup. Do the following:
- For WMS server URL, enter https://nowcoast.noaa.gov/arcgis/services/nowcoast/analysis_meteohydro_sfc_qpe_time/MapServer/WMSServer.
- For Version, select 1.3.0.
- Click Load WMS.
- In Step 2 (Settings), under layers, select the third Image layer.
- Click Save.
- For Attribution, enter NOAA/NOS/OCS nowCOAST, NOAA/NWS and NOAA/OAR/NSSL.
-
Add a point layer and do the following:
- In Data, add Cities as the dimension.
- In Location, do the following:
- Set Scope for locations to Custom.
- Set Country to 'USA'.
- In Colors, set Colors to Custom and set Color to f93f17.
