
Connecting to data sources
The Qlik Web Connectors let you connect to many web-based data sources from a single web-service. The way you connect to a data source and interact with the Qlik Web Connectors is mostly the same regardless of the data source. This page describes how to open a data source connection and how you select data.
Opening a connector
To open a data source connector, select the Connectors tab.
Connecting to a data source
Authenticating the connector
Do the following:
- Click on the Qlik Twitter Connector.
-
Under Select Tables, select CanAuthenticate.
Tip note Click the Authenticate button to open the data source login page in a new window. Make sure your browser is not blocking pop-up windows for Qlik Web Connectors. -
Enter your account login credentials.
- Copy the authentication code and paste it into the CanAuthenticate table.
- Click Save.
You only have to authenticate the connector once. After you do this, you can run any of the tables for the data source that you logged into. You can also authenticate the connector from any of the other tables.
Defining table parameters
Each connector table is used to select different types of data from your data source. Before the connector can send a request, you need to define some table parameters. Parameters that are required are marked with an asterisk (*).
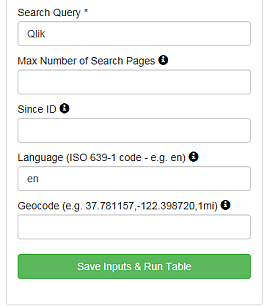
In this example, we use the Twitter Search Query table to retrieve tweets in English that contain the word Qlik.
Do the following:
- Select Search (simple) from the list of tables.
- In the Search Query box, enter Qlik.
-
In the Language box, enter en for English.
-
Click Save Inputs & Run Table.
The Twitter connector makes a request to get all Tweets in English that contain the search term Qlik.
As the table search is running, you will see its progress bar along the bottom, with a Cancel button if you need to abort. The Data Preview tab, shows a preview of the data so that you can check if the data as expected.
- Click on the QlikView, Qlik Sense (Standard Mode), or Qlik Sense (Legacy Mode) tabs to view the relevant script to copy into your QlikView or Qlik Sense application.
- Click on Copy to clipboard to copy the script.
- Paste the script into your application.
When reloading in QlikView or Qlik Sense, the load script makes the same request to Qlik Web Connectors, which contacts the relevant platform to get the data and stream it into your application.
Using standard mode or legacy mode
Depending on the Qlik Web Connectors and Qlik Sense version you are using, you might need to put Qlik Sense in legacy mode. To do this you have to disable standard mode, which prevents Qlik Sense from creating or running requests from arbitrary URLs. If you have problems running your script in Qlik Sense try disabling standard mode. To learn how to disable standard mode see Disabling standard mode.
Standard mode
You can only use the script from Qlik Sense (Standard Mode) tab in your Qlik Sense application if you are using Qlik Sense February 2018 or later.
Do the following:
- In Qlik Sense, Create new connection and choose Web file from the list of data sources.
- Use the URL to your Qlik Web Connectors installation and give the connection a name.
-
Place the following line at the top of your script:
let vQwcConnectionName = 'lib://YOUR_CONNECTION_NAME';
- Replace YOUR_CONNECTION_NAME with the name that you gave to the connection.
Connector overview
Each connector has a number of other tabs:
- Support - Links to the Qlik Help page.
- Settings - Displays the cached data and reset settings option.
- Change Log - Shows the history of changes that have been made to the specific connector
- About - Contains information about version, permissions, and links to other documentation sources.