
Worksheets
Last updated: 10/8/2026Overview
Worksheets provides metadata reporting capabilities where both search and browse (as well as a direct link in the OBJECTS menu) lead to a common worksheet page:
One may start from search and then migrating to a worksheet allows for simple text filtering as a basis for a worksheet (e.g. customer)
One may easily start from a category (e.g. database / tables)
One may save and share worksheets so that other users may quickly reproduce and build on earlier queries/filtering/column selections
Direct access to a default worksheet does not predefine anything.
The worksheet capabilities offer you the ability to select multiple object types (e.g. database / tables + Flat files) and subset by model (My Data lake + Sales DW database) before drilling down with a large number of filters:
Filtering is available on a number of properties of an object, includingg most all properties which may be included as columns in a worksheet. Filters of particular note are detailed individually.
Worksheets can be reused and shared using the Share functionality. However, one may also do so by saving the URL as favorites (further versions will support full report management within the application).
Search Worksheet by Category
You may also
Steps
- Select WORKSHEETS > CATEGORIES and pick an object category to build a worksheet.
You have created a transient search worksheet.
Example
Sign in as Administrator and go to WORKSHEETS > CATEGORIES > File > Fields and enter a NAME and DEFINITION.

Create a Worksheet
To build a worksheet, you generally begin by searching. You may also go straight to the create option on the manage worksheets page. There are several options available for creating as worksheet.
Create a Worksheet from the Worksheets Menu.
In this way you are creating a full worksheet (not the limited search worksheet).
Steps
Sign in as a user with the Worksheet Customization capability global role assignment.
Select WORKSHEETS > New Worksheet from the header.
Enter a NAME and DEFINITION for the worksheet.
You have created a new worksheet object, not simply a transient search worksheet.
Example
Sign in as Administrator and go to WORKSHEETS > New Worksheet and enter a NAME and DEFINITION.


You are presented with an empty worksheet. Refresh to see a default worksheet.

Create a Worksheet from Immediate Search
You may always use the search to create a search worksheet, which you may then open as a complete worksheet.
Steps
Enter text in the Search text box in the upper right.
Click ENTER
Example
Enter cust
in the Search text box in the upper right and press
ENTER.

The current search worksheet selected in the pull-down to the left of the search text box in the upper right (in this case it is All Objects) forms the basis or scope of the search.
Create a Worksheet with Objects Search
You may also select OBJECTS > Search to begin working on a worksheet where you have an empty results and may filter from there.
Open a Worksheet
To open a worksheet, there are three main methods:
Creating a new worksheet
Searching
Opening an existing saved worksheet
Steps
Sign in as a user with the Worksheet Customization capability global role assignment.
Go to the WORKSHEETS menu. From here you may:
Explore for saved worksheets
Manage saved worksheets
See FAVORITES and / or RECENTLY VIEWED worksheets
Create a new worksheet scoped by CATEGORIES of objects.
Explore Worksheets
Sign in as Administrator and go to WORKSHEETS > Manage.

Results Panel in a Worksheet
Whether editing a saved worksheet or simply working with a search result that is presented as a worksheet, this is the common environment for filtering and manipulating that worksheet.
Steps
Open a worksheet by any of the create methods detailed., or go to
WORKSHEETS > Manage,
WORKSHEETS > Favorites >,
WORKSHEETS > Recent >.
From here you may:
Page through the results using the first, previous, next and last controls above the results.
Expand the Filters panel on the left to add additional filters.
Expand the Details panel on the right to view details about the selected result line.
Click on the option icons:
Click Refresh to redisplay with all the latest filters and configuration details
Click Download as CSV to produce a CSV file of the results reflecting the filters, columns, sort order and other configuration details.
Click Configure Columns to add/remove heading columns from the worksheet.
Click Configure Sort to specify sort order by columns.
Click Display Options for the worksheet, including:
ITEMS PER PAGE to control the number of results per page in the UI
DISPAY MODE to toggle among the List mode (with name and definition) the Grid mode (allowing multiple header columns and sort order by column) and the Card mode (individual cards for each object along with property values for each header column)
DETAILS PANEL to toggle between showing only the equivalent of the Overview tab of the object page or Full to show the entire object page for the selection in the Details panel (on the right).
RELATED OBJECT DEPTH to specify the patch depth to display for relationship worksheet column contents or Full to show the entire path.
SHOW CURRENT QUERY to toggle the display of the filter Metadata Query Language (MQL).
ENABLE WORD WRAP to toggle the display of multiple lines per result item in Grid model.
These worksheet preferences are stored in the worksheet itself. Thus, when you save, share, or capture a URL of a worksheet or use it in a dashboard, etc., it maintains these preferences until updated.
- Click the More actions icon in the far right of the header to select
the following:
- Get Sharable Link for a worksheet
There is currently no REST API method to download
a worksheet to a CSV file. This limitation is because the methods to
execute a query, e.g. /entities/executeMQLQuery
, already exist in the
REST API producing a JSON output of what would be contained in an
equivalent worksheet.
- Save AS a saved (and sharable) worksheet.
Editing cells
If you have sufficient permission, you may edit cells in the metadata results. To do this, either double-click that cell or right-click and select Edit. You may then use the Tab and Enter keys to traverse the grid for editing further.
Curating rows
You may click the Certify, Endorse and/or Warn icons for any row.
Bulk Editing
Multi-select: You may select more than one row (Shift-click, Ctrl-click, etc.). With this feature one may apply an action to all of the selected rows. Only those actions available to ALL of the selected rows will be presented.

For all the selected objects, you may bulk edit:
Common Attributes that apply to all object types, including curation
Custom attributes available to all the objects
Basic Object Attributes that apply to all the objects.

You may also add multi-selections to a collection

Special Bulk Edit Example
Responsibilities
You may edit the object role responsibility assignments for multiple items in a worksheet. To do so, select multiple items and right-click one and select Edit Responsibilities.

Bulk editing of stewardship is handled this way as stewardship is assigned via assignment of the Steward object role. In addition, in earlier versions of the production, stewards were the ones notified of changes to model. This is no longer the case. Instead, watchers are notified of changes to models when enabled. The migration from stewards to watchers is performed automatically on upgrade from previous versions and thus all stewards become watchers.

Click ADD ROLE and select Steward as the role to add.

As you are editing multiple objects and multiple responsibilities, any changes you make will apply identically to ALL the objects. However, you may control whether the new role assignment replaces, extends for removes a current role assignment.
We want to simply assign the Steward role to Stu in addition to (adding) whatever other assignments are there, so click Add.
Click EDIT and select Stu (Stewart Steward).

Click OK.

and again click OK to commit all changes.

Now, Stu is assigned the object role of Steward to all the selected objects.
Specify Columns
You may control the heading columns displayed in the Grid view and properties in the Card view of a worksheet.
Steps
- Open a worksheet by: Select the worksheet to use from the pick lists:
- Favorites

- Recent

- Personal

- Shared with me
Click Configure Columns.
Pick columns to display
You may sort by any number of columns. Click OK.
Example
Open a the Non Certified Terms worksheet.

Click Configure Columns and pick the Commented By column to display:

The category is displayed next to the ATTRIBUTE names to make it easier to identify what it is.
In addition, there is a info icon which provide a definition.

Click OK.

Specify Sort Direction
You may also sort the results by these heading columns.
Specify Heading Columns to Include in a Worksheet
Click the Configure Columns icon to add/remove columns from the worksheet
Select the columns you wish to add from the available columns side and click the Add selected column(s) icon.
Select the columns you wish to remove from the Select columns side and click the Remove selected column(s) icon.
Remove all the selected columns with the << icon.
Any of the filter criteria may also be selected as column values.
Specify Sort Order of Heading Columns in a Worksheet
You may specify the sort order of the worksheet results.
Sorting in this manner applies to all the results of the search, not just the page you are viewing. These are the only criteria where you may sort the entire result set, rather than just sorting the page as the column sorting options only apply to the current page in the user interface.
In addition, the column included in this ORDER BY option will be remembered when saving or sharing the worksheet or when send the URL to others.
Steps
- Open a worksheet by: Select the worksheet to use from the pick lists:
- Favorites

- Recent

- Personal

- Shared with me
Click Configure Sort.
Pick columns to sort by
Information noteYou may sort by any number of columns. Some columns are not indexed and thus cannot be sorted on. These will not be selectable and the UI will warn that the column may not be sorted.
Specify Ascending or Descending.
Click OK.
Example
Go to any worksheet. Click Configure Sort and select the ObjectType column in Sort By columns

Click OK.

There is a downward pointing arrow in the column header for ObjectType, show the sort order.
The sort order applies to the complete set of results, in this case, 7543 results, not only to the first 5o displayed.
Some columns are not sortable. These are documented in the Developer's Guide as it is a fundamental feature of Metadata Query Language (MQL). If a column does not support sort the UI will provide a temporary dialog to that effect.

Again, click Configure Sort and select the Name column in Sort By columns and specify Descending.

Click OK.

There are now two arrows, the upward pointing arrow (Ascending) on the Name and the downward pointing arrow (Descending) next to Object Type. Note, the number, showin the sort order.
Column Header Sort
You may simply click on a column header to toggle the sort on that column between ascending and descending and relevance order
Not attributes may be sorted in the Worksheet. Please refer to the Object Attributes section to see details about all attributes which may be used in an ORDER BY clause in the query, i.e., that may be used for sorting the results. To determine those attributes which may be used as a filter, refer to the Supported in ORDER BY column header of the list of attributes.
Display Mode Grid, List or Card Mode
One may toggle among presenting the results as a simple collection, as a spreadsheet-like grid, or as a set of cards, one for each result object. TDC provides a rich set of features to manage the columns in a grid and allows for editing of the cells just as with a spreadsheet.

Grid Mode

List Mode

Card Mode

Including a relationship (e.g. Contains) in card mode will show all the contained objects. In this case, we see all the sub terms in a term. Or, one could see all the columns in a result of tables.

The Card Size option allows you to select the relative size of the cards.

Related Object Depth
You can specify the depth of path that is displayed for any worksheet column that show a relationship (e.g., Is Defined By) in order to identify where this related object is located in the repository.
Steps
Open a worksheet (search or otherwise).
In the Results panel click the Configure Columns icon and add a relationship based column.
Click Display Options > RELATED OBJECT DEPTH and select the path depth to display.
Example
Sign in as Administrator and select WORKSHEETS > Dataset > Data Attributes. Add a filter on Is Defined By and specify exists. Then click the Configure Columns icon to add the Is Defined By relationships as a worksheet column.

Click Display Options > RELATED OBJECT DEPTH and select Full as the path depth to display.

And the path is shown in the Is Defined By column.
Paginated Display and Navigation
If the list of objects is long, only a portion of that list is presented. This portion is referred to as a Page. TDC provides a number of common display and navigation tools for these lists.
Identify distinct values by column
You may quickly obtain a list of the distinct values available in the metadata. To do this, right-click a cell in the grid and select that option.
Example
Filter on the Dataset objects Category and search for customer
. Switch to Grid mode.
Right-click on the Object Type column and select Distinct
Values.

The result is statistics on the distinct values present according to the filters defined:


Show Execution History
You can see a history of the queries executed as part of updates to filtering, etc., in a worksheet.
Steps
Open a worksheet (search or otherwise).
In the Results panel click Preferences > SHOW CURRENT QUERY
Click the Show execution history icon.
Example

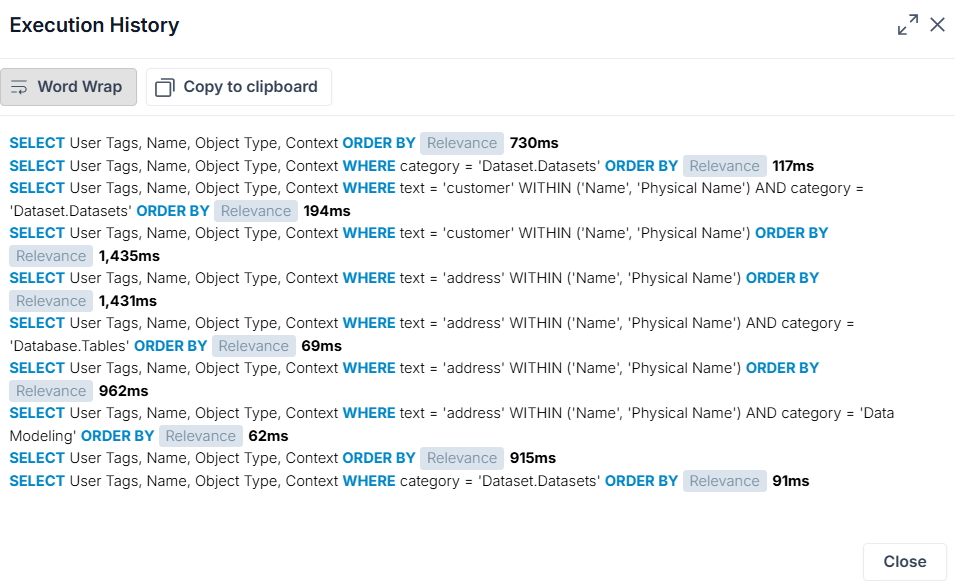
Worksheet Results Preferences

Steps
Click Display Options for the worksheet, including:
ITEMS PER PAGE to control the number of results per page in the UI
DISPAY MODE to toggle among the List mode (with name and definition), Grid mode (allowing multiple header columns and sort order by column), and Card model
DETAILS PANEL to toggle between showing only the equivalent of the Overview tab of the object page or Full to show the entire object page for the selection in the Details panel (on the right).
SHOW CURRENT QUERY to toggle the display of the filter MQL display.
ENABLE WORD WRAP to toggle the display of multiple lines per result item in Grid model.
These worksheet preferences are stored in the worksheet itself. Thus, when you save, share, or capture a URL of a worksheet or use it in a dashboard, etc., it maintains these preferences until updated.
You may specify larger limits on the number of items per page and items to export by updating the Worksheet Export Maximum number of objects and Worksheet Maximum number of objects per Page in Group Preferences for a group that the user is a member of.
Metadata Filtering in a Worksheet
A filter panel can be presented to the left of the results. TDC provides a sophisticated set of post filtering options.

You may filter to only those results which have specific values in specific properties. In fact, the category filter drives what attributes are available in the select or filter. With no category filter you may pick from all custom and system attributes. However, profile attributes or relationships are not shown, as there is no scope defined. Those will only be shown once you specify a category filter.
Filter Preferences
You may specify filter Preferences including:
Apply Filters Automatically – When checked, if you update or define a new filter, the results are updated automatically. Otherwise, the an APPY button appears in the UI and you must click this button to update the results.
Ignore Connection Objects – not show objects which are part of connection definitions, such as ETL sources and targets, or BI sources. These are not a part of the actual data store models (databases, files, etc.) and are often not important for data analysis.
Ignore Connection Objects only removes from the search results those
matching objects which are actually contained inside connection models.
Simply because the word connection
is in the object type name does not
mean they are a part of the connection models. E.g., objects of type,
connectioncolumn are not removed from the search results.
Apply Filters Automatically or Manually
Depending upon the worksheet Apply Filters Automatically preferences settings, worksheets will either:
Apply Filters Automatically is checked – Every action, such as to update the filter, add a column set preferences, etc., will cause the worksheet to re-run the query
Apply Filters Automatically is un-checked – You must click the Apply button (which is only available in this mode) to re-run the query. The button is highlighted when a refresh of the query would produce new results.

Depending upon how your group preferences are configured, you may not be able to adjust the Apply Filters Automatically.
Ignore Connection Objects
If Ignore connection Objects is checked – Do not include objects which are part of a connection definition (used for stitching), e.g., in BI or DI tools.
This is a very valuable option for nearly all users and is checked by default. Connection objects are often just repeats of the objects in data stores (which they are connected to after stitching), so this option removes a large number of redundant results.
Validate Filter
Select this entry to validate the current filter for MQL syntax validity.
Filter by example by column
You may always filter the results by what is already presented. E.g., if one wishes to only see columns for Type View Column, you may simply right-click a cell in the grid that contains that value and select that option.

Using the Filter Panel

You may also expand the Filters panel on the left in order to limit the results based upon advanced matching criteria.
Use +FILTER to add addition filter criteria, criteria, click the X next to a specific filter to clear that one, or double-click on the name of the filter to clear it.
You may always filter the results by what is already presented. E.g., if one wishes to only see columns for Object Type of View Column, you may simply right-click a cell in the grid that contains that value and select that option.

Common Filter Criteria
Please refer to the Object Attributes section to see details about all attributes which may be used in a where clause in the query, i.e., that may be used as a filter. To determine those attributes which may be used as a filter, refer to the Supported operators in WHERE column header of the list of attributes.
Special Columns Which May Not be Used in Filters
These are documented in the Developer's Guide as it is a fundamental feature of Metadata Query Language (MQL). Obviously, they will not appear in the list of possible filters as a result of the +FILTER button.
Remove a Filter Criteria from the Worksheet
Click the X that appears in the upper right corner of the criterion in the Filter panel.

Define the Order of the Filter Criteria
To change the order of a particular filter criterion click on the Configure icon that appears in the upper right corner of the criterion in the Filter panel and select Move Up or Move Down.

Filter by Numeric Attributes
Filtering criteria may be based upon the <, <=, >, >= or BETWEEN (Note: NOT is not supported) operators on all numeric data profiling filters and all integer attribute types.
Steps
- Open a worksheet by any of the create methods detailed, or go to
- WORKSHEETS > Manage
,

- WORKSHEETS > RECENT >
,

- WORKSHEETS > FAVORITES >
.
Click +FILTER and add a numeric column.
Specify the criteria, <, <=, >, >= or BETWEEN
Click outside the dialog box.
Example
Create a worksheet (search) for Fields in Files.

Click +FILTER and select Data Profiling Distinct, specify less than and specify 6.

Specific Filter Examples
Filter by Search Text
You may enter text to filter by, and the text will be matched to the properties specified, as follows.
Steps
Open a worksheet by any of the create methods detailed, or go to
WORKSHEETS > Manage,
WORKSHEETS > RECENT >,
WORKSHEETS > FAVORITES >.
Click the Search Text and enter the search text.
Optionally, specify Search Options, including
What attributes to search within for the text
Include Semantic Search
Obtain Help on the search
Click outside the dialog box.
Example
Open a worksheet by clicking the Search box in the upper right
corner, entering Invoice
and pressing ENTER. Click Search
Options

The semantic search language is defined here.
Filter by Category
You may specify from a hierarchical pick list which object types to include in the results. Thus, you may include, e.g., both Terms and Database Columns in the search results.
Steps
- Open a worksheet by any of the create methods detailed, or go to
- WORKSHEETS > Manage
,

- WORKSHEETS > RECENT >
,

- WORKSHEETS > FAVORITES >
.
Click the pull-down under CATEGORY and check the box for one or more categories of object types.
Click outside the dialog box.
Example
Create a worksheet and click the pull-down under CATEGORY and check the box for Fields in Files.

The list of categories includes:
System Objects – E.g., Worksheets, Dashboards, Collections, Groups, Users

Import Model types – E.g., File, Database, Data Modeling, Tableau, Informatica PowerCenter, etc.

Dataset is a special category that includes all the different types of data set categories, like Database, File, JSON Database, Data Modeling, etc., so that one may refer to Data Attributes generically, and not have to specify all the types of attributes.

Custom Models and Objects – e.g., Glossaries, Data Mappings, Business Rules, etc.

Filter by Model
Use this filter to restrict the results to only those which are contained within particular models (e.g., a specific imported model or glossary).
In addition, if there is a directory structure in a model (e.g., a database import containing multiple schemas or a repository import containing directory structure, models, connections, etc.) then one may also use checkboxes to filter the results.
Steps
- Open a worksheet by any of the create methods detailed, or go to
- WORKSHEETS > Manage
,

- WORKSHEETS > RECENT >
,

- WORKSHEETS > FAVORITES >
.
Click +FILTER and select Model.
Click in the dropdown box and select one or more models in which the results will be included.
Click outside the dialog box.
Example
Create a worksheet. Then, click +FILTER and select Model.

The faceted search is intelligent first suggesting the models with the largest number of matching potential results. The number of these results is displayed next to the Model.
Click SHOW MORE.

Now, the list is complete (up to 100 items).
Filter by Model Path
Use this filter to restrict the results to only those which are contained within a particular path to objects. The Path MQL system attribute represents the full path of the object except the model name. It is applicable only to imported objects (not system objects or custom model objects).
For example, for a database column, the Path attribute value will be /<catalog>/<schema>/<table>/<column>.
Path supports SELECT and WHERE (=, STARTS WITH, CONTAINS, EXISTS and NOT EXISTS).
No order by and facet support on the Path property.
In addition, if there is a directory structure in a model (e.g., a database import containing multiple schemas or a repository import containing directory structure, models, connections, etc.) then one may also use checkboxes to filter the results.
You must re-import for the Path property to be populated for the objects in an imported model.
There is no Path for objects in custom models.
Steps
Open a worksheet by any of the create methods detailed, or go to
WORKSHEETS > Manage,
WORKSHEETS > RECENT >,
WORKSHEETS > FAVORITES >.
Click +FILTER and select PATH.
Click in the dropdown box and select one or more models in which the results will be included.
Click outside the dialog box.
Example
Import the Adjustments model.

Create a worksheet. Then, click +FILTER and select Model and pick the Adjustments model.
The faceted search is intelligent first suggesting the models with the largest number of matching potential results. The number of these results is displayed next to the Model.
Filter by Updated Date and Updated By
Filter to only those results which have an Updated Date value in a specific date range.
Steps
- Open a worksheet by any of the create methods detailed, or go to
- WORKSHEETS > Manage
,

- WORKSHEETS > RECENT >
,

- WORKSHEETS > FAVORITES >
.
Click +FILTER and select Updated Date.
Click on the filter condition, including:
equals
not equals
today
yesterday
last hour
last 7 days
last 60 days
last 90 days
last year
before
after
between
Specify a value for the condition.
Click outside the dialog box.
Example
Create a worksheet and
filter on the text Invoice
. Then, click
+FILTER and select Updated Date.

There are several date type fields, all work the same way in worksheets.
Click the filter Condition (equals by default).

Select last 7 days.
The results are empty if you have not updated in the last 7 days any of
the items that would be hit by the other Filter criteria. In this
case the search text Invoice
.
Dates in Worksheets
See Dates in the Product.
Filter by Object Roles
Filter by Object Role responsibility assignment (to users or groups), including Steward. Results then then include all the matching objects which have the particular responsibility assignment specified in the Filter.
Steps
Open a worksheet by any of the create methods detailed, or go to
WORKSHEETS > Manage,
WORKSHEETS > RECENT >,
WORKSHEETS > FAVORITES >.
Click +FILTER and scroll down to the OBJECT ROLES section.
Select a specific role.
Click on the filter condition, including:
equals
not equals
equals any
not equals any
equals all
not equals all
exists
not exists
Specify a value for the condition.
Click in the dropdown box and select one or more users and/or groups that the object role is assigned to.
Click outside the dialog box.
Example
Create a worksheet and
filter on the text Invoice
. Then, click
+FILTER and select Data User.

Select exists as the filter condition.

The results are mostly objects contained within a model that is assigned as Data User to any user or group.
E.g., click the model Staging DW in which the first result (Invoice) is located.


Go to the Responsibilities tab.

This model is indeed assigned the Data User object role to Arif Anar
and thus all its contained objects (like Invoice) are included in
the results that match the other search filters (namely, Search Text
Invoice
).
Filter by Stewardship
In order to filter by stewardship, you must filter by object roles based upon responsibility assignment.
Stewardship is based upon responsibility assignment of the Steward object role. Thus, to see all the objects with stewardship assignment for a user, select Steward object role and pick the user you want.
Filter by Label
Filter to only those results which have one of the selected labels assigned.
Steps
- Open a worksheet by any of the create methods detailed, or go to
- WORKSHEETS > Manage
,

- WORKSHEETS > RECENT >
,

- WORKSHEETS > FAVORITES >
.
Click +FILTER and select Label.
Select one or more LABLES or All.
Example
Create a worksheet and
filter on the text Invoice
. Then, click
+FILTER and select Label.

There are several types of labels in the system. In particular, you may filter by Sensitivity Label and Conditional Labels. Conditional labels work just like labels in terms of filtering.

The faceted search is intelligent first suggesting the models with the largest number of matching potential results. The number of these results is displayed next to the Model.
Click QuarterlyReview in the faceted search filter and only three items are displayed.

Filter by Curation Status
You may endorse, certify, warn and comment on any object.
You may then filter to only those results which have any of these or any of these from a specific set of individuals.
Steps
- Open a worksheet by any of the create methods detailed, or go to
- WORKSHEETS > Manage
,

- WORKSHEETS > RECENT >
,

- WORKSHEETS > FAVORITES >
.
Click +FILTER and scroll down to Certified.
Information noteYou may also filter by Certified by, Warned by, Endorsed by or Commented by in order to Filter on the person who made the curation action.
You may also filter by Warning Count, Endorsement Count or Comment Count in order to Filter on the number of those curations notations made.
Click on the filter condition, including:
equals
not equals
Specify a value for the condition.
Example
Create a worksheet and
filter on the text Customer
. Then, click
+FILTER and select Certified.

Select equals as the filter condition.

Select True for the value of the condition.

Filter by Lineage Status
Object in a configuration may have (or may not have) data flow and/or semantic lineage. You may then filter to only those results which have any of these or do not have lineage of a particular type.
You may use any of the four filter criteria:
| Filter Criteria | Description |
|---|---|
| Has Data Impact | Filter by existence of objects in the data impact trace |
| Has Data Lineage | Filter by existence of objects in the data lineage (source) trace |
| Has Semantic Definition | Filter by existence of objects in the semantic definition trace |
| Has Semantic Usage | Filter by existence of objects in the semantic usage trace |
You may specify:
Exists – Filters to all objects for which the filter can apply (classifier and feature level objects)
Not Exists - Filters to all objects for which the filter does not apply (classifier and feature level objects)
Equals (True/False) – Filters to all objects which have or do not have the lineage.
Example
Search for Invoice
to create a worksheet. Click
+FILTER and select Has Data Impact.

Select equals and True for the condition. Also, it could be useful to add the Has Data Impact column.

Detection of Unused Data Elements in the Architecture
Asking the question the other way, i.e., what objects do not have data impact and are also in the data warehouse, will show you all the data elements which are not being used.
Click +FILTER and select Has Data Impact.
Select Equals and False for the condition.
Use the Model filter to only search Staging DW.dbo.
Also, it could be useful to add the Has Data Impact column.

Filter by Sensitivity Label
You may filter by the data classifications which are associated (tagged) on an object. These filters include:
Sensitivity Label – The current sensitivity label associated with the object
Sensitivity Label Approved – The current approved (or manually assigned) sensitivity label associated with the object
Sensitivity Label Lineage Proposed – inferred from other object using data flow analysis
Sensitivity Label Data Proposed – detected during the data classification process
Sensitivity Label Rejected – All labels which were rejected and will not be assigned automatically as a part of data classification.
Filter by Data Class
You may filter by the data classifications which are associated (tagged) on an object. These filters include:
Data Classifications – Data classes associated with the object. The attribute shows both approved (or manually assigned) data classes as well as proposed ones.
Data Classifications Approved – Data classes approved for (or manually assigned to) the object.
Data Classifications Matched – Data classes detected during the data classification process and thus associated with the object.
Data Classifications Proposed – Data Classes proposed during the data classification process but are not yet approved or rejected.
Data Classifications Rejected – Data classes which were rejected for the object.
Filter by Data Profiling
All of the following data profiling result properties may be used as filters and as columns in a worksheet:
Data Profiling
.Distinct
Data Profiling
.DuplicateData Profiling
.ValidData Profiling
.EmptyData Profiling
.InvalidData Profiling
.MinData Profiling
.MaxData Profiling
.MeanData Profiling
.VarianceData Profiling
.MedianData Profiling
.Lower Quantile
Data Profiling
.Upper Quantile
Data Profiling
.Avg Length
Data Profiling
.Min Length
Data Profiling
.Max Length
Data Profiling
.Inferred Data Types
Filter by Collections
You may filter by which collections each object in the result is a member of.
You may specify multiple collections that the results may be a member of.
You may specify:
- equals: If any of the collections contain an object it is included in the results (same as equals any)
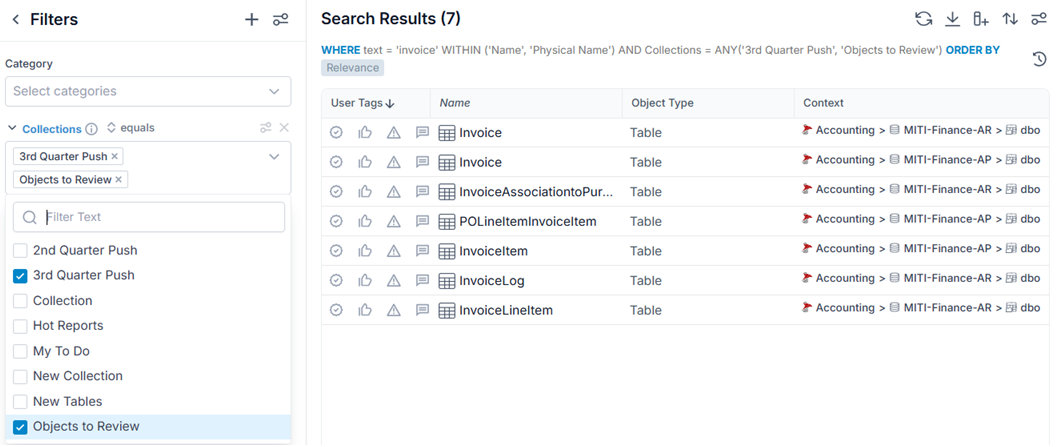
not equals: If any of the collections contain an object it is not included in the results
equals any: If any of the collections contain an object it is included in the results (same as equals)
not equals any: If any of the collections contain an object it is not included in the results (same as not equals)
equals all: If any of the collections contain an object it is included in the results
not equals all: If any of the collections contain an object it is included in the results
exists: If any of the collections contain an object it is included in the results
not exists: If none of the collections contain an object it is included in the results
Filter by Comment
You may filter by the existence or content of comments just as you may do so for curations such as endorsement and warning.
Filter by Object Image
The object image is a single image which may be added to the object page Overview tab optionally.
The filter option is object image.
By default, it is not included in the presentation, so you much first add it to the presentation to see the option.
As this is not an indexed search, it will be slow. Please be sure to filter by category, model and any other criteria that will reduce the scope of the search.
Filter by Relationship
As we can see from the Manage > Metamodel page, there is an association between the two different models for business policies and business rules.

We populated these in the Custom Models section, with worksheet examples there.
Filter by Defines / Is Defined By
Filter by Data Documentation/Cataloging
As an effective tool to:
Identify documented data elements
Identify those data elements which still require documentation
You may define a worksheet which shows term defined, locally defined, mapped and inferred documentation (i.e., Name and Business Definition) for an imported object, e.g., the Fields of a data lake.
Please see examples in the Data Documentation section, such as an inferred documentation worksheet.
Filter by Mentions
Two attributes may be used to filter on mentions in text fields:
Mentioned Objects List of objects that are mentioned by the object
Mentioned Users List of users / groups that are mentioned by the object

Filter by Count Attributes
For each relationship attribute, the UI will propose a Count version of it:

Filtering and column selection is supported on the count attributes, but not sorting.
Filter by Import Bridge
You may include Import Bridge as a result column which shows the name of the bridge used to import the object, e.g.. Microsoft Azure Power BI Service Repository)).
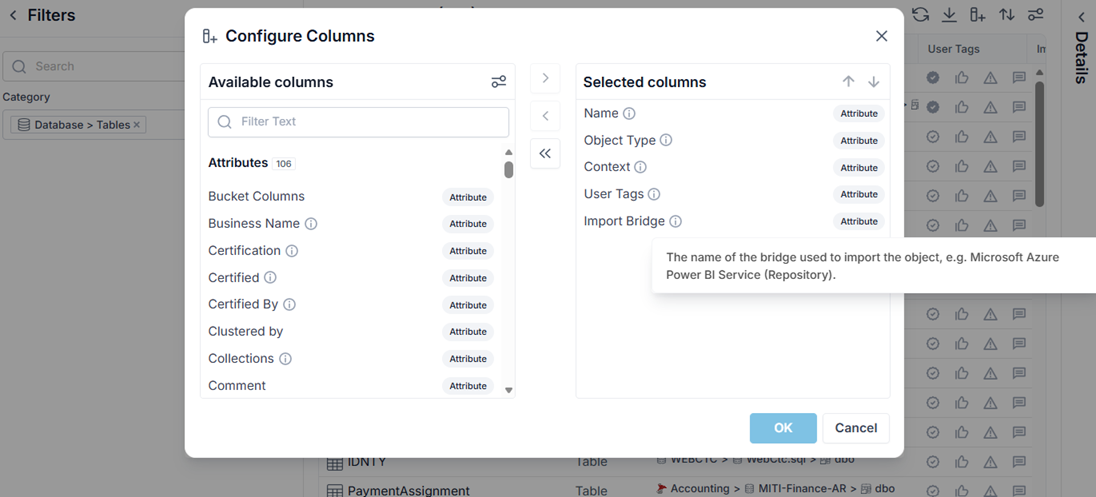
You may also filter on Import Bridge.

Filter by System Objects
As you may now include system
objects, including:
Worksheets
Dashboards
Collections
Groups
Users
in your worksheet searches, you may filter a worksheet by these objects. The objects may now be included in the Metadata Query Language (MQL) query.
Example
Open a new worksheet and under CATEGORY > System > Groups.

Metadata Query Language and Query Filters
MQL allows users to define powerful and complex metadata queries with a familiar SQL syntax.

The MQL is available through the REST API and constitutes the foundation of the search / worksheet page. For syntax details, refer to the Developer Guide.
You may use the worksheet Preferences to toggle showing or hiding the metadata query language (MQL) query.
Anything you do in the Filters is reflected in the MQL. You may also edit the Filters from the perspective of the MQL directly by using the Advanced model.
Steps
- WORKSHEETS > Manage
,

- WORKSHEETS > RECENT >
,

- WORKSHEETS > FAVORITES >
In the Results panel, click Preferences > SHOW CURRENT QUERY in the worksheet Preferences.
Click +FILTER and +QUERY to add MQL directly as additional filters.
You may add any number of query filters. You may toggle them on and off. They become a saved part of any worksheet you save.
Example
Go to WORKSHEETS > Manage > Certified Terms.
Click SHOW CURRENT QUERY in the Worksheet results preferences.

Click +FILTER and +QUERY.


Click EDIT under the MQL FILTER, and build the query for Comment Count greater than or equal to 1.

Click OK.
Name the filter Highly Commented
.


You now have a quick filter that you may enable or disable with the switch control.
If you wish to maintain a quick filter, you should save it as a part of a worksheet.
Filter Group
By default, filters are applied with an implicit AND between then. Thus, if you have specified CATERGORY of Glossary > Term along with CERTIFIED BY of EXISTS, then the result will be:
All results which are:
Terms
AND
The CERTIFIED BY flag EXISTS.
You may change this behavior for a group of filters and specify that they are joined by an OR instead of AND.
Steps
Open a worksheet
In the Results panel, click Preferences > SHOW CURRENT QUERY in the worksheet Preferences.
Click +FILTER and +Group to specify the behavior of the group
You may add any number of filters to a group after it is created.
You may toggle them on and off. They become a saved part of any worksheet you save.
Example
Go to WORKSHEETS > Manage > Certified Terms.
Click SHOW CURRENT QUERY in the Worksheet results preferences.
Click +FILTER and click +GROUP.


Set the properties as above and click OK.
Now, you may add filters that will be joined via OR to your set of filters for this worksheet by clicking the plus sing next to the name of the group.

Filter Order
Filters are applied in order from top to bottom in the Filters panel. You may control the order in which filters are applied by clicking on the Configure icon to the right of the filter title in the panel and selecting Move Up or Move Down.

Advanced Filter Model
By default, a filter is presented as a simplified set of facets (possible selections for the filter). E.g., for filtering by Model (in the configuration), we have a pick list of the different models which contain a matching object:

However, one my have more flexibility in the type of options to apply to the filter by clicking ADVANCED, which appears to the right of the filter title.

Then more options are presented, such as the:
- Filter operand

- Checkboxes and a tree structure to multi-select the facets you want

You may always switch back to the simplified faceted search by clicking BASIC to the right of the filter title.
Configuration filter Options
By default, a filter is presented as a simplified set of facets (possible selections for the filter). E.g., for filtering by Model (in the configuration), we have a pick list of the different models which contain a matching object:
However, one my have more flexibility in the type of options to apply to the filter by clicking the Configure icon, which appears to the right of the filter title.

You now are presented with the Configure Filter dialog.


You may specify the DISPLAY TYPE, including:
Single Selection List (default) – simple list of facets with single click selection
Multi Selection List – checkbox enable multi selection list of facets
Advanced – See ADVANCED.
Details Panel
There is a Details Panel on the right. If you show this panel then you may click on an object and view its properties in the panel. It is presented much like the Overview tab in the object page or details page and may be customized when the Overview tab is customized.

Each time you select an item in the Results panel, the Details panel will be updated for that object.
You may also use the Options menu to perform the following (just as with the full object page):

In addition, you may specify Results Preferences > DETAILS PANEL > Full to see the entire object page, not just the Overview tab.

Get Sharable Link for a Worksheet
This feature provides you with:
A URL link, which you may provide to others, that will take you immediately to this same worksheet with the same customizations/filters/columns, etc., you have done.
A SELECT statement in a JSON request compatible with the REST API .
Steps
- Open a worksheet by any of the create methods detailed, or go to
- WORKSHEETS > Manage
,

- WORKSHEETS > RECENT >
,

- WORKSHEETS > FAVORITES >
Click More options in the upper right and select Get Sharable Link.
Click COPY next to any of the results to copy the specific one to the clipboard.
Example
Go to WORKSHEETS > FAVORITES > Certified Terms.
Click More options in the upper right and select Get Sharable Link.


Metadata Query Language (MQL) cannot include the sort order on columns. In fact, the sorting by column in a worksheet is performed entirely by the UI, and thus is not recorded in the shareable link or the REST API request.
Manage Worksheets
You may also select WORKSHEETS > Manage to manage your existing worksheets.
Steps
1.Go to WORKSHEETS > Manage.
- You see the list of Favorites. It is the default tab.
All the worksheets you have favorited are here.
From here you may:
Open/Edit the worksheet
Restrict the list by using the Search Text
Favorite or un-Favorite a
2.Click the My tab.
All the worksheets you have created are here.
From here you may:
Open/Edit the worksheet
Restrict the list by using the Search Text
Create a new saved worksheet
Delete and existing saved worksheet
Favorite or un-Favorite a worksheet
Set Viewers and Editors for this worksheet with groups and/or users
Edit the Name or Description of a worksheet
Assign a worksheet to one or more (or all) Configurations
3.Click the Recent Tab.
All the worksheets you have recently opened are here.
From here you may:
Open/Edit the worksheet
Restrict the list by using the Search Text
Favorite or un-Favorite a worksheet
Save a Worksheet
You may save any worksheet you are working on at any time, evening existing saved ones by be saved as new worksheets.
Steps
- Open a worksheet by any of the create methods detailed, or go to
- WORKSHEETS > Manage
,

- WORKSHEETS > RECENT >
,

- WORKSHEETS > FAVORITES >
.
- Click Save > Save to save the updated state of an existing saved worksheet or save and assign a name to a not yet saved worksheet.
- Click Save > Save As to save the updated state of an existing saved worksheet and assign a name.
Example
Click WORKSHEETS > FAVORITES > Certified Terms.

Click +FILTER > Model. Include the Finance glossary.

The Finance glossary is the only choice as the Enterprise glossary does not contain any certified terms.
The Save button is enabled as the filter has changed.
Click Save. You have now have updated an existing worksheet.
Click Save > Save As....

Enter the name Recently Certified Terms
and click OK.

Metadata Query Language (MQL) cannot include the sort order on columns. In fact, the sorting by column in a worksheet is performed entirely by the UI, and thus is not in the results.
Create a Worksheet
Go to WORKSHEETS > Manage.
Click the My tab.
Click Create.

Enter the name New Worksheet
and press Enter.

You will then have a worksheet saved but with no filters defined yet.
Delete a Worksheet
Go to WORKSHEETS > Manage.
Click the My tab.

Click  Delete.

Click YES to Confirm.
Favorite / Un-Favorite a Worksheet
Go to Worksheets > Manage.
Click the My tab.

Click Favorite next to New Worksheet to favorite that worksheet.
Click Favorite next to What's new to un-favorite that worksheet

Multi-Select in Manage Worksheets
You may perform all the Manage > Worksheet functions on multiple worksheets in the either the List, Grid or Card mode by multi-selecting. The Show actions control is then presented in the grid header with the number selected.

Shared Worksheet
Worksheets have an owner who is the creator of the worksheet. That owner may open, edit, or remove a worksheet. The worksheets that one owns may always be found in the My tab under WORKSHEETS > Manage.
In addition, a worksheet may be shared, with specific users and/or groups. One may share the worksheet as
Viewer able to see and query with the worksheet, as well as save it as a new worksheet and edit it.
Editor can edit the worksheet name and content. Only the owner can change the sharing options and delete the object.
Once shared, users that are in the sharing criteria specified may view and favorite those worksheets, as well.
Steps
Go to WORKSHEETS > Manage.
Go to the My tab.
Double-click in the Viewers or Editors cell for the row containing the worksheet.
Pick users or groups to assign the sharing role.

Default Shared Search Worksheets
By default there are four default shard search worksheets:
All Objects
Data Inventory – Dataset object
Report Inventory – Reporting tool objects
Vocabulary – Glossary terms.

If we then sign in as Bob we will see the list of current search worksheets to be:

Assign a Worksheet to a Configuration
When you assign a worksheet to one or more configurations, the worksheet will only appear in those configurations for all by the WORKSHEETS > Manage screens, e.g., the WORKSHEETS > Explore menu.
By default, a worksheet is available to all configurations. Once a worksheet assignment is made, then those configurations are the only ones assigned.
If a configuration is deleted, then the assignments to it are removed.
When only one configuration is assigned, on deletion, the assignment reverts to All.
Steps
Go to WORKSHEETS > Manage.
Go to the My tab.
Double-click the Configurations cell for the row containing the worksheet.
Pick one or more configurations to assign the worksheet to.
To assign a worksheet to all configurations, simply remove the specific (or all) specific configuration assignments.
Example
Go to WORKSHEETS > Manage and go to the My tab double-click on the Configurations cell for New Worksheet.

Select the Configuration and click OK.
Now, go to the WORKSHEETS > Explore and note the New Worksheet is not in the FAVORITES list.

But, if you switch configurations to that one, you will see the New Worksheet.

Sharing a Worksheet
The owner (creator) of a worksheet may share that worksheet with and users and/or groups.
Steps
Go to WORKSHEETS > Manage.
Go to the My tab.
Select a worksheet.
Click Share.
Pick one or more users and/or groups to share the worksheet with.
To un-share a worksheet, simply remove the specific (or all) users and/or groups.
Example
Go to WORKSHEETS > Manage. Click the My tab. Click the line for New Worksheet.
Double-click in the Viewers cell and pick the user Bob to assign the sharing role.


Log out and log in as Bob.
Go to WORKSHEETS > Manage. Click the Shared with Me tab.
Click Search. Locate the New Worksheet collection. Click
 Favorite next to that worksheet.
Now, go to the Favorites tab and see this worksheet as Bob.
You cannot add to this worksheet as Bob because Bob does not own it.
Click on the worksheet name and then click Save As and enter the
name Bob's Worksheet
and Click OK.
You may now edit the list. You could also share it back with Administrator.
You may save a shared worksheet before specifying whom to share it with. You may come back later and specify whom it will be shared with.
System Object Children Worksheets
The object page for different types of objects (e.g., Tables or Schemas) contains a number of tabs which present the results of a system object children worksheet for that particular type of object represented by the tab (e.g., Columns for Tables or Tables for Schemas).
When viewing the object page results, say the Columns tab for a Table, you may designate an existing worksheet that you saved or that was shared with you as your personal default.
In addition, users with the Application Administrator capability global role assignment may designate system object children worksheets for groups or users, which will be the system default, unless over-ridden, when one the object page for that type of object.
However, it would be awkward to require that one go to each type of object page and tab in order to manage defaults. Thus, you may manage all of your defaults in Manage > System Object Children Worksheets.
System defaults are not shown on this page as you cannot edit them. It requires an Administrator to do so.
Steps
Go to Manage > System Object Children Worksheets.
Click any item in the list and you may.
- Click the Name
 or right-click and select Rename
 and type a new name.

- Click Delete
 or right-click and select Delete
 to delete.
Example
Go to the object page for the Terminology term of the Finance glossary and go to the Contains tab.

Include Term Data Type as a column.
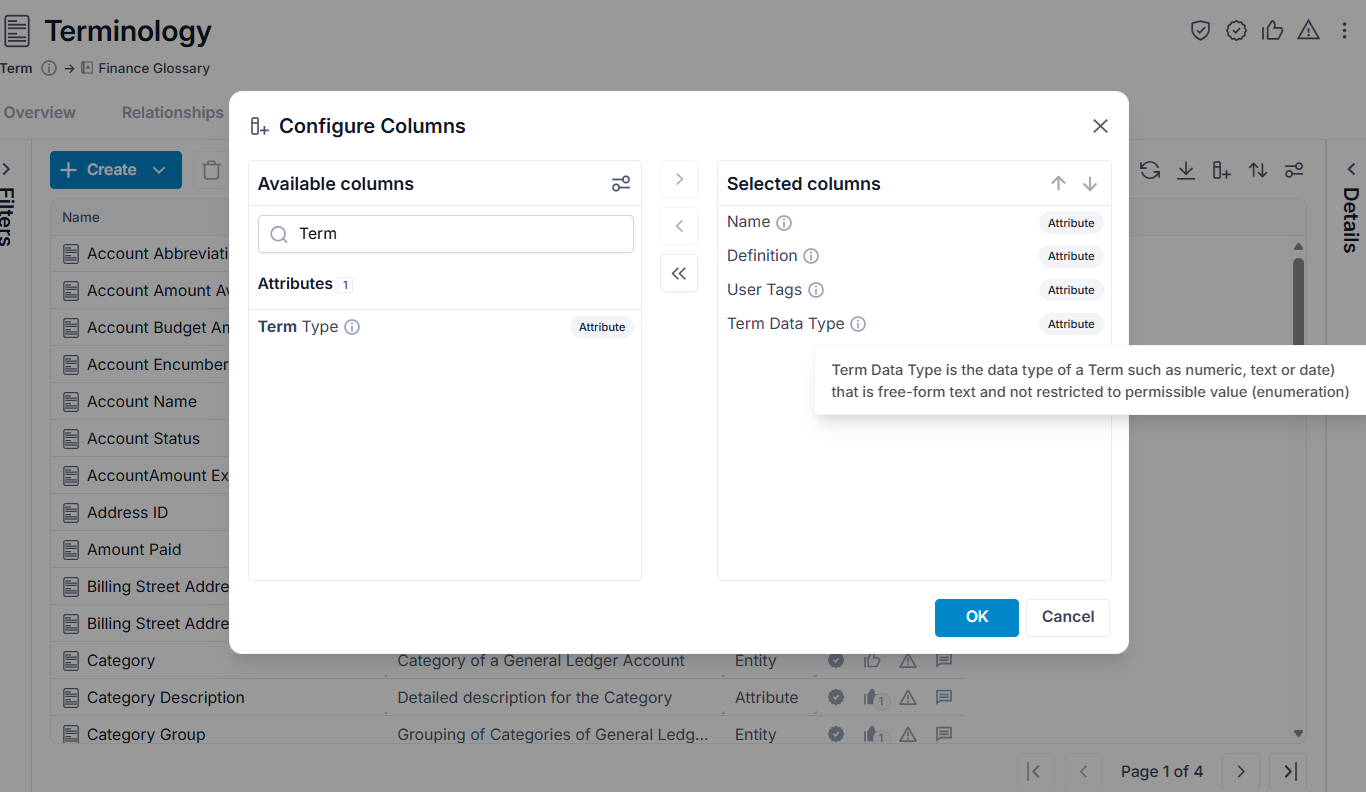
Click the background to remove the dialog.

Click Save AS and create a system type worksheet with the below settings.

It is a System type worksheet, so it may be shared as a default for others. Also, it is already shared with Bob (Robert Robinson).
Now this default worksheet is in the Manage > System Object Children Worksheets and those users will see it by default.

Download the Worksheet Results
You may download the results of a worksheet using the Download button.
You must have at least the Metadata Import / Export capability object role assignment on the model(s) that are included in the results.
Steps
- Open a worksheet.
- Click the Download icon.
Example
Sign in as Administrator and go to a worksheet.

Click the Download icon.

There is currently no REST API method to download
a worksheet to a CSV file. This limitation is because the methods to
execute a query, e.g. /entities/executeMQLQuery
, already exist in the
REST API producing a JSON output of what would be contained in an
equivalent worksheet.
You may download either CSV files or XLSX files. The XLSX file have special handling which safeguards against CSV Injection, also known as Formula Injection, which is a security vulnerability that occurs when untrusted input is included in a CSV file.
[metadata-query-language-and-query-filters]: