Skip to main content Skip to complementary content

Querying Milvus collections using vector embeddings

The following Job demonstrates how to connect to a Milvus vector database, insert product embeddings, and retrieve similar products using vector similarity search.

Before you begin

This scenario uses Milvus vector database capabilities to store and search vector embeddings. For more information, see Milvus documentation. You will need access to a Milvus instance (local or cloud) and a valid authentication token.

Linking the components

Procedure

  1. Drag and drop the following components from the Palette: tPrejob, tJava, tMilvusConnection, tFixedFlowInput, tMilvusOutput, two tLogRow, tMilvusInput, and tLogRow.
  2. Connect tPrejob to tJava using a Trigger > On Component Ok connection.
  3. Connect tJava to tMilvusConnection using a Trigger > On Subjob Ok connection.
  4. Connect tFixedFlowInput to the first tLogRow component using a Row > Main connection.
  5. Connect tLogRow to tMilvusOutput using a Row > FLOW connection.
  6. Connect tMilvusInput to the second tLogRow component using a Row > Main connection.
    Overview of the Job in the Studio showing the components connected.

Configuring the components

Procedure

  1. Double-click the tPrejob component to display its Component view.
    The component is used to initialize the Job execution. No additional configuration is required for this component in this scenario.
  2. Double-click the tJava component to display its Component view.
    In the Basic settings view, enter any initialization code required for your Job. For this scenario, you can leave it empty or add logging statements to track Job execution. Example:
            java.util.List<Float> vector1 = new java.util.ArrayList(512);
            java.util.Random random = new java.util.Random();
            for (int i = 0; i < 512; i++) {
                vector1.add(random.nextFloat());
            }
            globalMap.put("vector1", vector1);
            
            
            java.util.List<Float> vector2 = new java.util.ArrayList(5);
            for (int i = 0; i < 5; i++) {
                vector2.add(random.nextFloat());
            }
            globalMap.put("vector2", vector2);
  3. Double-click the tMilvusConnection component to display its Component view.
  4. In the Basic settings view, configure the connection to your Milvus instance.
    • In the Endpoint field, enter the URL of your Milvus server, for example: http://localhost:19530 for a local instance or your cloud endpoint.
    • In the Token field, click the [...] button and enter your Milvus authentication token.
    • In the Database field, enter your database name.
  5. Double-click the tFixedFlowInput component to display its Component view.
  6. In the Basic settings view, configure the fixed data to insert into Milvus.
    Click Edit schema and define the schema with the following columns:
    • id (Long)
    • bool (Boolean)
    • int8 (Integer)
    • int16 (Integer)
    • int32 (Integer)
    • int64 (Long)
    • _float (Float)
    • _double (Double)
    • varchar (String)
    • json (Object)
    • array_int (List)
    • array_str (List)
    • float_vector (List) - Array of Float values representing the embedding
    In the Mode area, select Use Inline Table and click the [+] button to add sample records with appropriate values for each column. For example:
    id | 4L
    bool | false
    int8 | 2 
    int16 | 3
    int32 | 5
    int64 | 6L
    _float | 0.34f
    _double | 0.34567
    varchar | "dsfdsf"
    json | "{\"id\":5}"
    array_int | null
    array_str | null
    float_vector | (List)globalMap.get("vector1")
    Basic settings view of the tFixedFlowInput configuration showing inline data.
  7. Double-click the first tLogRow component to display its Component view.
    Click Sync columns to retrieve the schema from the previous component.
    In the Mode area, select Table to display the inserted records in a formatted table in the console.
  8. Double-click the tMilvusOutput component to display its Component view.
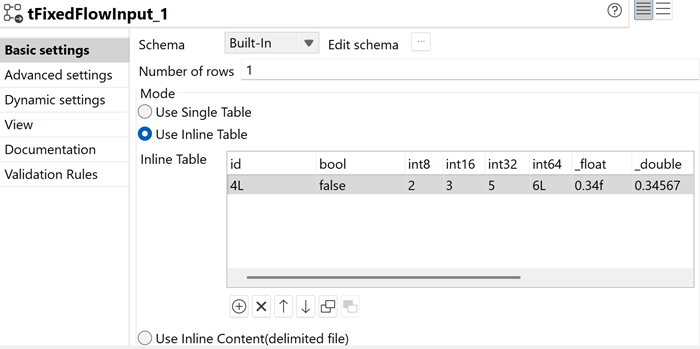
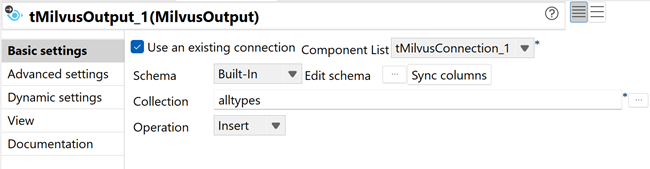
  9. In the Basic settings view, configure the collection and operation.
    • Select the Use existing connection checkbox and choose the tMilvusConnection_1 component.
    • Click Sync columns to retrieve the schema from the previous component.
    • In the Collection field, select or enter your collection name.
    • In the Operation list, select Insert.
    Basic settings view of the tMilvusOutput configuration showing collection and insert operation.
  10. Double-click the tMilvusInput component to display its Component view.
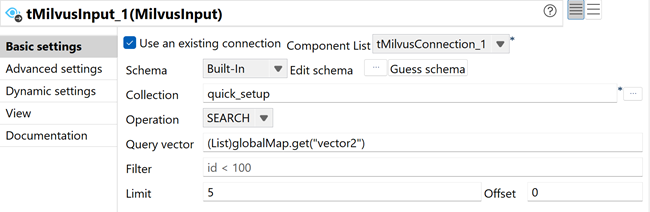
  11. In the Basic settings view, configure the search operation.
    • Select the Use existing connection checkbox and choose the tMilvusConnection_1 component.
    • Click Edit schema and define the output schema matching the collection structure, for example:
      • id (Long)
      • vector (List)
    • In the Collection field, select or enter the name of the collection that contains the vector embedding.
    • In the Operation list, select SEARCH.
    • In the Query vector field, enter the global variable previously created as the query vector, for example: (List)globalMap.get("vector2")
    • Leave the Filter field empty to search all records.
    • In the Limit field, enter 5 to retrieve the top 5 similar records.
    Basic settings view of the tMilvusInput configuration showing search operation with query vector.
  12. In the Advanced settings view of tMilvusInput, select the Load collection into memory checkbox to ensure optimal search performance.
  13. Double-click the second tLogRow component to display its Component view.
    Click Sync columns to retrieve the schema from the previous component.
    In the Mode area, select Table to display the search results in a formatted table in the console.

Executing the Job

Procedure

  1. Press Ctrl + S to save your Job.
  2. Press F6 to execute it.

Results

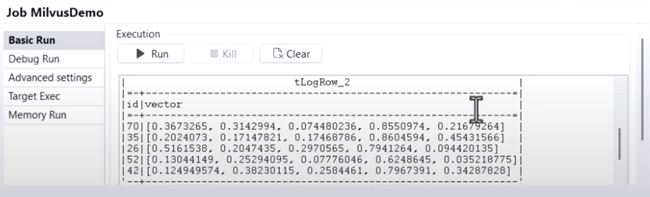
The Job connects to the Milvus database, inserts the fixed data records into the collection and displays them in the console, then performs a vector similarity search using the specified query vector and displays the top 5 most similar records. This demonstrates the complete workflow of storing and retrieving vector embeddings in Milvus.

Execution console showing successful insertion and retrieval of similar products based on vector similarity.

Did this page help you?

If you find any issues with this page or its content – a typo, a missing step, or a technical error – please let us know!