
Retrieving data in error with a Reject link
This scenario describes a four-component Job that carries out migration from a customer file to a MySQL database table and redirects data in error towards a CSV file using a Reject link.

-
In the Repository, select the customer file metadata that you want to migrate and drop it onto the workspace. In the Components dialog box, select tFileInputDelimited and click OK. The component properties will be filled in automatically.
-
If you have not stored the information about your customer file under the Metadata node in the Repository. Drop a tFileInputDelimited component from the family File > Input, in the Palette, and fill in its properties manually in the Component tab.
-
From the Palette, drop a tMap from the Processing family onto the workspace.
-
In the Repository, expand the Metadata node, followed by the Db Connections node and select the connection required to migrate your data to the appropriate database. Drop it onto the workspace. In the Components dialog box, select tMysqlOutput and click OK. The database connection properties will be automatically filled in.
-
If you have not stored the database connection details under the Db Connections node in the Repository, drop a tMysqlOutput from the Databases family in the Palette and fill in its properties manually in the Component tab.
For more information, see Centralizing database metadata.
-
From the Palette, select a tFileOutputDelimited from the File > Output family, and drop it onto the workspace.
-
Link the customers component to the tMap component, and the tMap and Localhost with a Row Main link. Name this second link out.
-
Link the Localhost to the tFileOutputDelimited using a Row > Reject link.
-
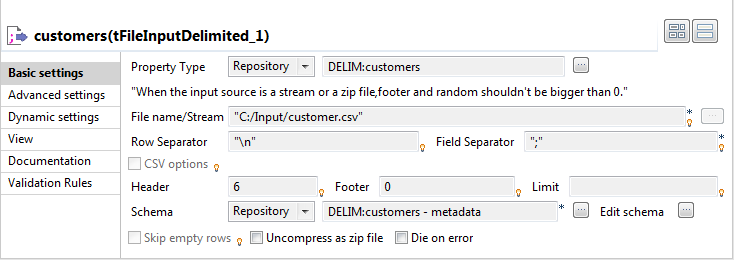
Double-click the customers component to display the Component view.
-
In the Property Type list, select Repository and click the [...] button in order to select the metadata containing the connection to your file. You can also select the Built-in mode and fill in the fields manually.
-
Click the [...] button next to the File Name field, and fill in the path and the name of the file you want to use.
-
In the Row and Field Separator fields, type in between inverted commas the row and field separator used in the file.
-
In the Header, Footer and Limit fields, type in the number of headers and footers to ignore, and the number of rows to which processing should be limited.
-
In the Schema list, select Repository and click the [...] button in order to select the schema of your file, if it is stored under the Metadata node in the Repository. You can also click the [...] button next to the Edit schema field, and set the schema manually.
The schema is as follows:

-
Double-click the tMap component to open its editor.

-
Select the id, CustomerName, CustomerAddress, idSate, id2, RegTime and RegisterTime columns on the table on the left and drop them on the out table, on the right.

-
In the Schema editor area, at the bottom of the tMap editor, in the right table, change the length of the CustomerName column to 28 to create an error. Thus, any data for which the length is greater than 28 will create errors, retrieved with the Reject link.
-
Click OK.
-
In the workspace, double-click the output Localhost component to display its Component view.

-
In the Property Type list, select Repository and click the [...] button to select the connection to the database metadata. The connection details will be automatically filled in. You can also select the Built-in mode and set the fields manually.
-
In the Table field, type in the name of the table to be created. In this scenario, we call it customers_data.
-
In the Action on data list, select the Create table option.
-
Click the Sync columns button to retrieve the schema from the previous component.
-
Make sure the Die on error check box isn't selected, so that the Job can be executed despite the error you just created.
-
Click the Advanced settings tab of the Component view to set the advanced parameters of the component.

-
Deselect the Extend Insert check box which enables you to insert rows in batch, because this option is not compatible with the Reject link.
-
Double-click the tFileOutputDelimited component to set its properties in the Component view.

-
Click the [...] button next to the File name/Stream field to fill in the path and name of the output file.
-
Click the Sync columns button to retrieve the schema of the previous component.
-
Save your Job and press F6 to execute it.

The data in error are sent to the delimited file, as well as the error type met. Here, we have: Data truncation.