Managing key pairs for signed and encrypted ID tokens (OIDC)
With OpenID Connect (OIDC) identity providers, JSON Web Tokens (JWT) are used to authenticate and authorize users. These tokens can be signed to verify their authenticity and encrypted to protect their contents.
Qlik Cloud supports token signature verification and decryption for all OIDC identity providers compatible with the platform.
Understanding key pairs
A key pair, consisting of a public key and a private key, is central to this process:
-
Public key: Used by the identity provider to encrypt tokens.
-
Private key: Used by Qlik Cloud to decrypt tokens and access the information they contain.
How it works:
-
When a user logs in to Qlik Cloud, the external identity provider initiates the OIDC authentication flow with Qlik Cloud.
-
The identity provider sends back the user's ID token, which includes user-specific information such as their identity:
-
The token is signed with the identity provider’s private key to confirm their authenticity and integrity.
-
The token is encrypted using the Qlik Cloud public key to ensure that only Qlik Cloud can decrypt and access the contained information.
-
-
Qlik Cloud verifies the signature of the ID token using the identity provider's public key. It then decrypts the token using its own private key to retrieve the user's details.
This process ensures only authorized parties can access and use the token’s information.
Generating key pairs
You can generate key pairs for token signature verification and decryption for OIDC IdP configurations.
Do the following:
-
In the Administration activity center, go to Identity provider.
-
Create a new IdP configuration.
For detailed steps on configuring IdPs, see Configuring an identity provider (IdP).
-
Expand the Advanced options section.
-
Under Token signature verification and decryption, choose the key type: RSA 2048 or RSA 4096.
-
Click Create.
-
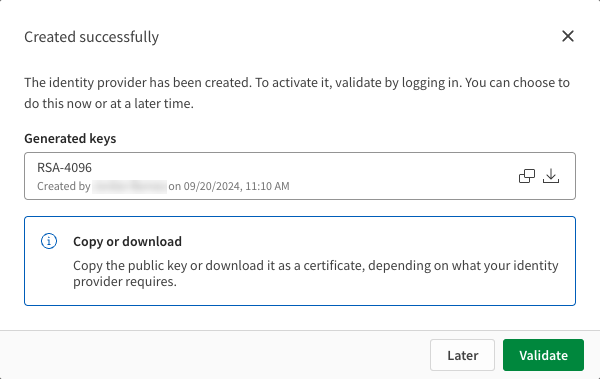
In the confirmation dialog:
-
Click
to copy the public key.
-
Click
to download the key as a certificate.
Confirmation dialog.
 Information noteWhether you need the public key or the certificate depends on your identity provider's requirements. Both are downloaded in PEM format. If your identity provider requires a different format, use a tool like OpenSSL to convert the PEM file.
 -
-
Before you can validate, you need to provide the public key to your identity provider. Click Later to temporarily exit the configuration process.
-
Share the public key or certificate with your identity provider:
-
Go to your identity provider’s setup interface and follow their instructions to upload or enter the public key. Refer to their documentation for detailed steps.
-
-
After completing the setup in your identity provider, return to the Administration activity center to finish the validation:
-
On your IdP configuration, click
and select Validate.
-
Click Validate to start the validation process.
-
Follow the instructions on screen to log in and confirm that the key pair is correctly set up and recognized.
-
Once the key pair is successfully validated, the identity provider can be used for secure token signature verification and decryption.
Rotating key pairs
Key rotation involves periodically replacing cryptographic keys to minimize security risks. In Qlik Cloud, you can regenerate key pairs with the same or different strength. The new key pair will replace the old one after successful validation.
Regenerating key pairs
Do the following:
-
In the Administration activity center, go to Identity provider.
-
Find your IdP configuration, click
and select Edit.
-
Expand the Advanced options section.
-
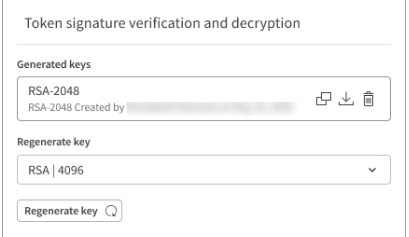
Under Token signature verification and decryption, choose the desired key strength under Regenerate key.
You can select the same or a different strength from the previous key.
Settings for regenerating keys.

-
Click Regenerate key
.
-
In the confirmation dialog:
-
Click
to copy the public key.
-
Click
to download the key as a certificate.
Information noteWhether you need the public key or the certificate depends on your identity provider's requirements. Both are downloaded in PEM format. If your identity provider requires a different format, use a tool like OpenSSL to convert the PEM file. -
-
Before you can validate, you need to update the setup in your identity provider. Click Later to temporarily exit the configuration process.
-
Share the new public key or certificate with the identity provider:
-
Go to your identity provider’s setup interface and follow their instructions to upload or enter the public key. Refer to their documentation for detailed steps.
-
-
After completing the setup in your identity provider, return to the Administration activity center to finish the validation:
-
On your IdP configuration, click
and select Validate.
-
Click Validate to start the validation process.
-
Follow the instructions on screen to log in and confirm that the key pair is correctly set up and recognized.
-
Upon successful validation, the new key pair will replace the previous one for all future logins. If the validation fails, the newly generated key pair will be ignored, and the previous key pair will remain in use.
Deleting key pairs
Do the following:
-
In the Administration activity center, go to Identity provider.
-
On your IdP configuration, click
and select Edit.
-
Expand the Advanced options section.
-
Under Token signature verification and decryption, click
next to the generated key.
-
Confirm the deletion.
Ensure that the public key is also removed from your identity provider to avoid login issues.
