Create connections and load data from JDBC databases
You can create JDBC connections in Qlik Cloud. Once you have created a connection, you can select data from the available tables and then load that data into your app, or onboard data to a data pipeline.
Creating a connection
You can create a connection in:
-
Qlik Cloud Analytics Services: In the Analytics activity center, in Data manager, in Data load editor, and when you add data to a new app.
-
Qlik Talend Data Integration: When you onboard data.
You need to know the server and database name that you want to connect. You must also have access credentials.
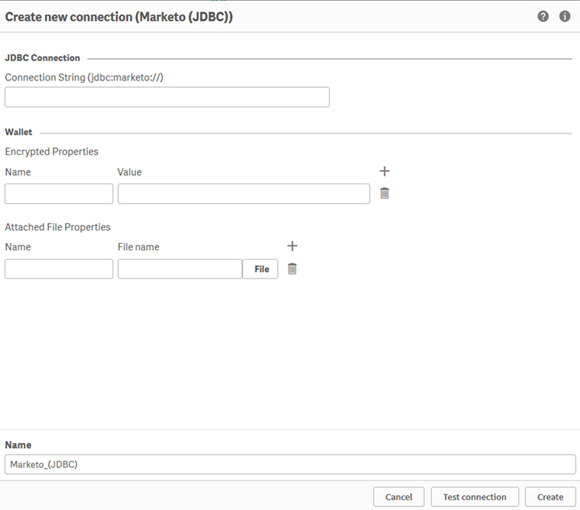
Connection dialog
The connection dialog has the following fields:
| Field | Description |
|---|---|
|
Connection String |
May start with jdbc:[connector]:// If not, jdbc:[connector]:// will be added automatically when connector builds a connection string. |
| Field | Description |
|---|---|
|
Name |
Name of Encrypted Property. |
| Properties |
Value of Encrypted Property. |
| Name |
Name of Attached File Property. |
| File name |
Value of Attached File Property. |
Wallet is used to:
-
Securely store encrypted connection string properties.
-
Store files that can be used in a unencrypted connection string, such as certificates.
For each Encrypted Property, you have to provide a property name and property value. A connection string will be completed with specified property names and their unencrypted values at the time of a connection to data source.
For each Attached File Property, you have to specify property name and a file. A connection string will be completed with specified property names and temporary path to uploaded the file at the time of a connection to data source.
| Field | Description |
|---|---|
|
Name |
Name of the new connection you are creating. The default name will be used if you do not enter a name. |
Fields will be optional or required depending on the connector type.

Connection requirements
Each connector has different authentication and connector field requirements.
| Connector | String format |
Authentication
|
Required fields |
Example |
|---|---|---|---|---|
| Cassandra | jdbc:cassandra://[Host]:[Port];[Property1]=[Value]; [Property2]=[Value];... | None |
Host and port |
jdbc:cassandra://localhost:7000;AuthMech=1;UID=testuser1; PWD=pass123 |
| Couchbase | jdbc:couchbase://[Host]:[Port]/[DatabaseName]?[Property1]=[Value]; [Property2]=[Value];... | Username and password | None | jdbc:couchbase://ec5-36-201-26-177.compute-1.amazonaws.com:8093;AuthMech=2;user=<user>;password=<password>; |
| Couchbase (with SSL) | jdbc:couchbase://[Host]:[Port]/[DatabaseName]?[Property1]=[Value]; [Property2]=[Value];...[EnableSSL]=[Value];[SSLCertificate]=[Path to certificate]\couchbase.jks; | Username and password | None | jdbc:couchbase://ec5-36-201-26-177.compute-1.amazonaws.com:18093;AuthMech=2;user=<user>;password=<password>;EnableSSL=1;SSLCertificate=<path to certificate>\couchbase.jks; |
| SAP HANA | jjdbc:sap://[Host]:[Port]/[DatabaseName]?[Property1]=[Value]; [Property2]=[Value];... | Username and password | None | jdbc:sap://saphana02:30555/Z_ROCK_RnG?user=<user_name>&password=<password> |
Creating a new connection
Do the following:
-
Access the connector through Data manager or the Data load editor:
-
Qlik Cloud Analytics activity center: In the Create page of the Analytics activity center, click Data connection. Under Add data connection, select the JDBC connector from the list.
- Data manager: Click + and then Add new connection. Under Connect to new data source, select the JDBC connector from the list.
- Data load editor: Click Create new connection and select the JDBC connector from the list.
-
-
Fill out the connection dialog fields.
-
Click Create.
-
The location of the connection depends on how you created it:
-
Analytics activity center : It will be available in apps in Data manager and Data load editor.
-
Data manager: It will be listed under DATA CONNECTIONS, on the left.
-
Data load editor: It will be listed under Data connections, on the right.
-
Loading data from tables
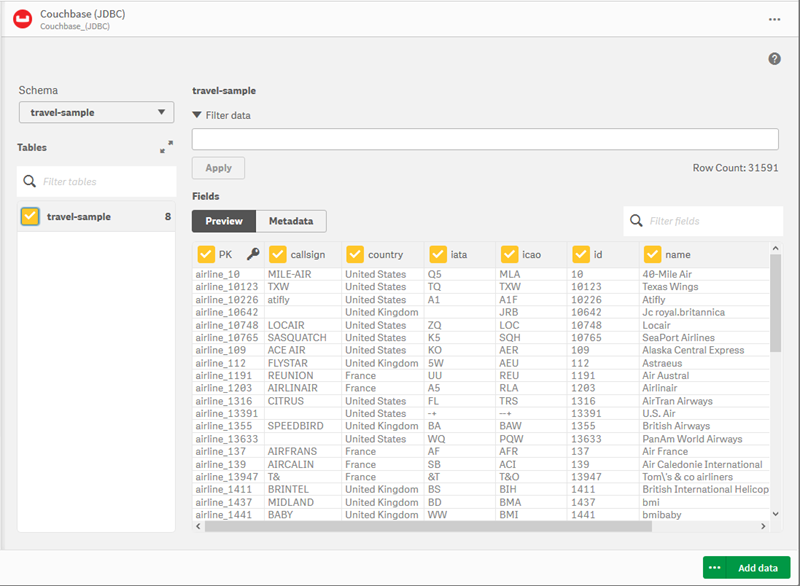
Once you have created a connection, you can select data and load it into a Qlik Sense app. You can load data in Data manager or the Data load editor.
| Properties | Description |
|---|---|
| Schema |
Shows the schema in the database. |
| Tables |
Shows the tables associated with the selected schema. Selecting a table will cause the table fields to be displayed in the Data preview tab. |
| Filter tables | Displays a field where you can filter on table names. |
| Preview |
Shows a preview of the fields and data of the selected table. You can select which data columns to include by checking the box beside the field name. You can also change the field name by clicking on the existing field name. The new name is then used as an alias for the name the field has in the database. |
| Metadata | Shows a table of the fields and whether they are primary keys. Primary-key fields are also labeled with a key icon |
| Fields |
Lists the fields in each selected table. If the table name check box is selected, all the fields in the table are automatically selected. If you click only the table name, fields are displayed but not selected. They can then be selected individually. You can also change the field name by clicking on the existing field name. The new name is then used as an alias for the name the field has in the database. |
| Filter data |
Shows a field where you can enter filter criteria. |
| Filter fields | Displays a field where you can filter on field names. |
| Hide script/Preview script | Shows or hides the load script that is automatically generated when table and field selections are made. |
| Include LOAD statement |
Adds a LOAD statement before the SELECT statement. |
| Add data |
Opens the Associations view of the Data manager. This allows you add more data sources, fix any errors in your data, and create table associations. This option is available only when you use Data manager. For more information, see: Managing data associations. |
| Insert script | Inserts the script displayed in the Data preview panel into the script editor. This option is available only when you use the Data load editor. |
Selecting tables and loading data
Do the following:
-
Open the connector through Data manager or the Data load editor:
-
Data manager: It will be saved under File Locations. Click the connector.
-
Data load editor: It will be saved under DataFiles. Find the connector and click
Select tables.
-
-
Select a Schema from the dropdown. Available tables will appear under Tables.
-
Select a table. Under Fields, you can select or deselect which fields to load.
-
You can rename data fields before loading them into Qlik Sense by clicking on the field name and entering a new name. The new name is mapped by Qlik Sense as an alias to that field name in the database.
-
When done:
-
Data manager: Click Add data. The Associations view will open.
-
Data load editor: Click Insert script. You will see the new script in the Data load editor.
-

