Skip to main content Skip to complementary content

Launching a Joblet

About this task

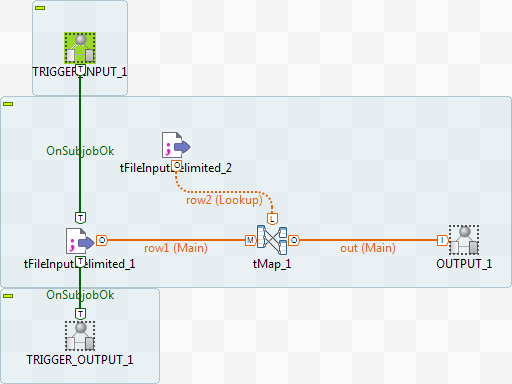
It is possible to use a Joblet as a step in a procedure. You can start a Joblet, or a subJob after the execution of a Joblet, using the Trigger Input and Trigger Output components from the Palette. In this example, the created Joblet is called Transformation.

Using triggers in a Joblet

Procedure

  1. Drag the Trigger Input component from the Palette and drop it above your Joblet.
  2. Right-click Trigger Input, select a link of the type Trigger > OnSubjobOk and then click the input component of the Joblet so that your Joblet starts after the execution of the first subJob.
  3. Drag the Trigger Output component from the Palette and drop it below the Joblet.
  4. Right-click the input component of the Joblet and select a link of the type Trigger > OnSubjobOk and then click the Trigger Output component so that your third subJob starts after the execution of your Joblet.

    Example

    Joblet with triggers.

Launching the Joblet in a Job

Procedure

  1. Create a new Job.
  2. From the Repository tree view, click the created Joblet (Transformation) and drop it in the Job.
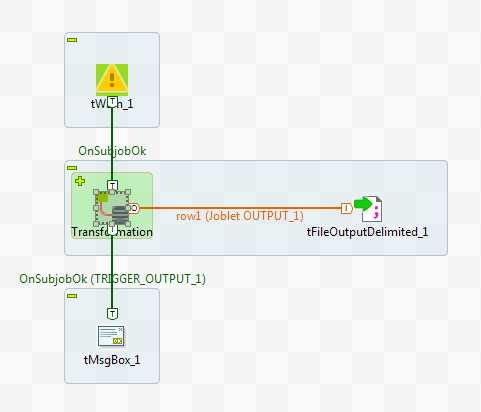
  3. Drop a tFileOutputDelimited component next to the Joblet component, drop a tWarn component above the Joblet component, and drop a tMsgBox component below the Joblet component.
  4. Right-click the Joblet component and then select the Row > Joblet OUTPUT_1 link and click tFileOutputDelimited.
  5. Double-click tFileOutputDelimited to display its basic settings and then define the path to the folder and file to be created in the File Name field.
  6. Right-click the tWarn component and select the link of the type Trigger > On Subjob Ok (TRIGGER_INPUT_1) and then click the Joblet component.
  7. Double-click the component that represents the Joblet to display its basic settings view.
    In the Joblet TRIGGER_INPUT_1 field, the link type defined in the Joblet is read-only.
    Information noteTip: If you use many Triggers Input components in the Joblet and corresponding launching components in the Job, verify that the right component is attached with the right launching link in the Attached node field of the Basic settings view.
  8. From the Version list, select the Joblet version you want to use in your Job. In this example, we use the latest version of the Joblet.

    Example

    Basic settings view of the "Transformation" Joblet.
  9. Right-click the Joblet component, select the link Trigger > On Subjob Ok (TRIGGER_OUTPUT_1), and then click the tMsgBox component.

    Example

  10. Run your Job.

Results

The tWarn component sends a warning massage and launches the next subJob holding the Joblet you created: Transformation. Once the second subJob is successfully executed, it launches a third subJob holding the tMsgBox component indicating at the same time that the transformation has been carried out.

Did this page help you?

If you find any issues with this page or its content – a typo, a missing step, or a technical error – please let us know!