The Custom Directory service provider does not rely on any external system for the users or groups. All data is stored within the QlikView Publisher Repository (QVPR). Unlike the other Directory Service Providers (DSP), the Custom Directory supports authentication through the QlikView AccessPoint, and therefore requires user and password. By default, there is no Custom Directory installed. In order to use Custom Users, a DSP for Custom Users must first be added. The Custom Directory folder contains the following tabs:
- General, where the Custom Directory service settings can be managed.
- Users, where the settings of users and groups can be managed.
Migrating Custom Directory users and groups
If needed, you can migrate Custom Directory users and groups from one machine to another.
In this section, the two machines will be referenced as follows:
-
Machine one: the machine containing the Custom Directory users and groups you want to migrate
-
Machine two: the machine to which you are migrating the Custom Directory users and groups
Preparation of machine one
The following steps must be done on the machine containing the Custom Directory users and groups you want to migrate.
Do the following:
-
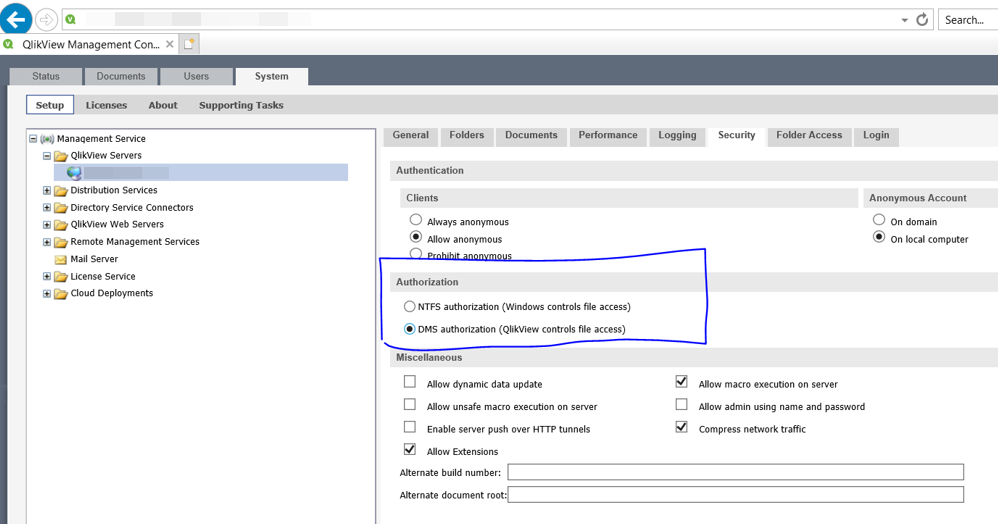
In the QlikView Management Console, select System > Setup.
-
Expand and select the QlikView Server.
-
In the right pane, select the Security tab.
-
Click DMS authorization and click Apply.
DMS authorization settings in QlikView Management Console

-
In the QlikView Management Console, select System > Setup.
-
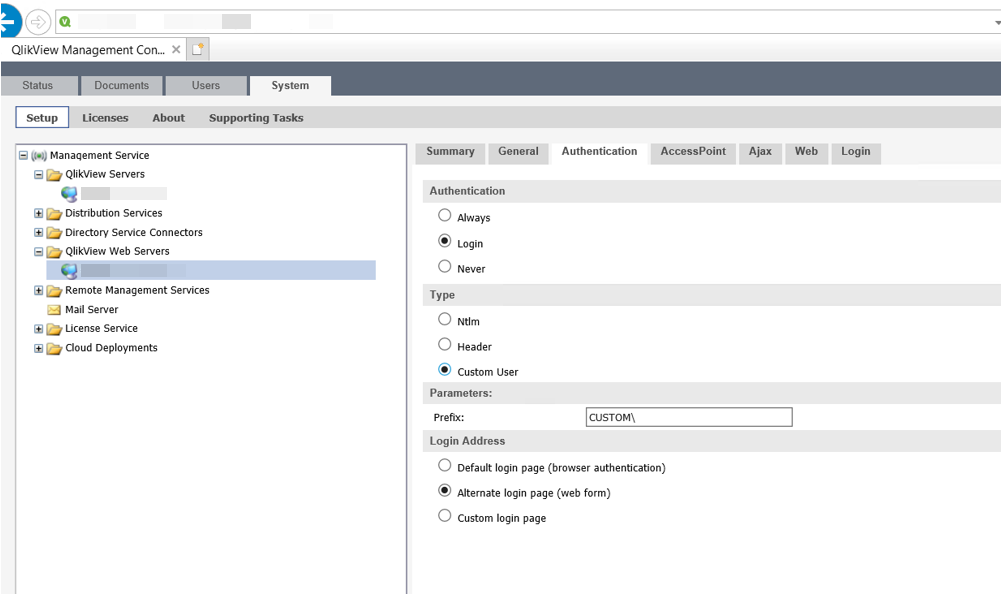
Expand and select the QlikView Web Server.
-
In the right panel, select the Authentication tab.
-
In the Authentication section, select Login.
-
In the Login Address section, leave the setting to Alternative login page. This page can be used for both Windows and non-Windows users to provide credentials.
-
In the Type section, change the authentication type to Custom User because the Custom Users cannot be authenticated using the NTLM protocol. Click Apply.
Authentication settings for QlikView Web Server

-
In the QlikView Management Console, select System > Setup > Directory Service Connectors and expand the tree.
-
Select the Custom Directory.
-
In the right pane, there is only one tab, named General. Click
 .
. -
Click the icon to set a path for the Custom Directory. The path automatically populates to the default Custom.
-
Click Apply.
A second tab named Users appears.
-
Select the Users tab and click to add a new user.
-
Provide a username, full name, password, and email address. Create Bob and Freddy as Custom users. You can pick a password of your choice.
-
Enable the users and click Apply.
-
Also create a Custom User Group named Europe.
-
Click Apply.
-
To add Bob and Freddy to the Custom Group Europe, click in the Custom User Groups section. In the dialog that opens, add * in the Search for User and Groups field and click the magnifying glass icon. Note that the Default Scope dropdown only contains the Custom directory service.
-
Add Bob and Freddy to the Selected Users and click OK to close the dialog.
-
Click Apply.
File transers between the two machines
Next, you need to copy the CustomDirectoryData.xml file from machine one to machine two. After this, restart the services on machine two.
Location of CustomDirectoryData.xml file in Windows File Explorer

Preparation of machine two
The following steps must be done on the machine receiving the migrated Custom Directory.
Do the following:
-
In the QlikView Management Console, select System > Setup.
-
Expand and select the QlikView Server.
-
In the right pane, select the Security tab.
-
Click DMS authorization and click Apply.
-
In the QlikView Management Console, select System > Setup.
-
Expand and select the . QlikView Web Server on QlikServer1.
-
In the right panel, select the Authentication tab.
-
In the Authentication section, select Login.
-
In the Login Address section, leave the setting to Alternative login page. This page can be used for both Windows and non-Windows users to provide credentials.
-
In the Type section, change the authentication type to Custom User because the Custom Users cannot be authenticated using the NTLM protocol. Click Apply.
-
In the QlikView Management Console, select System > Setup > Directory Service Connectors and expand the tree.
-
Select the Custom Directory.
-
In the right pane, there is only one tab, named General. Click
 .
. -
Click the icon to set a path for the Custom Directory. The path automatically populates to the default Custom.
-
Click Apply.
-
In the QlikView Management Console, open the Users section.
The migrated users and groups should now be visible.
