Skip to main content Skip to complementary content

Sharing custom components

Talend Studio allows you to share custom components to other users working on the same remote project.

Note that you can develop custom components using the Talend Component Kit framework and share them on Qlik community. For more information, see Developing a component using Talend Component Kit.

Sharing custom components created using Talend Component Kit

Talend Studio allows you to share custom components created using Talend Component Kit to other users by following the procedure below.

Procedure

  1. Configure the artifact repository for sharing custom components in either one of the following two applications:
  2. Launch a Talend Studio instance, on which the custom component you want to share has not been installed.
  3. Create a folder named patches under the Talend Studio installation directory.
  4. Copy the .car archive file that contains the custom component you want to share to the patches folder.
  5. Restart your Talend Studio and open a remote project managed by Talend Management Console or Talend Administration Center.
    The custom component is deployed automatically to the artifact repository and is available to other users when they open a remote project with the same artifact repository configuration.

Sharing other custom components

Talend Studio allows you to share custom components, except the ones created using Talend Component Kit, by following the procedure below.

Before you begin

You have opened a remote project managed by Talend Management Console or Talend Administration Center.

Procedure

  1. On the toolbar of the Talend Studio main window, click Project settings or click File > Edit Project Properties from the menu bar to open the Project Settings dialog box.
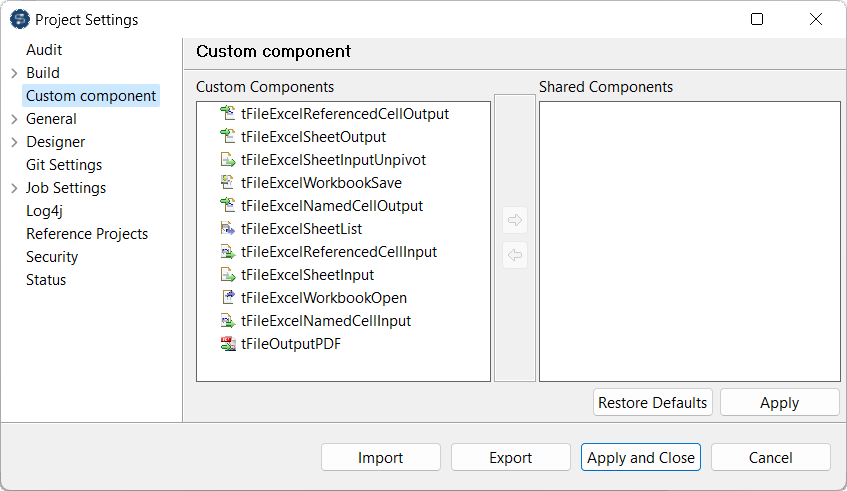
  2. In the tree view of the dialog box, click the Custom component node to open the corresponding view on the right of the dialog box.
    Project Settings dialog box.

    If you have already installed any custom components in Talend Studio, these components display on the left part of the Custom component view.

    For more information about custom components, see Using custom components and How to install and update a custom component.

  3. Click the custom components of your interest, and then click Move right arrow to move the selected components into the Shared Components list.
    To revoke this sharing, select the components you want to stop sharing in the Shared Components list and click Move left arrow to move the selected components into the Custom Components list.
  4. Click Apply to validate this move.
  5. Click Apply and Close to close the dialog box.

Did this page help you?

If you find any issues with this page or its content – a typo, a missing step, or a technical error – please let us know!