Skip to main content Skip to complementary content

Editing a user-defined indicator

You can open the editor of any system or user-defined indicator to check its settings and edit its definition and metadata in order to adapt it to a specific database type or need, if required.

Information noteRemember: When you edit an indicator, make sure that your modifications are suitable for all analyses that may be using the modified indicator.

Before you begin

At least one user-defined indicator is created.

Procedure

  1. In the DQ Repository tree view, expand Libraries > Indicators > User Defined Indicators, and browse through the indicator lists to reach the indicator you want to modify the definition of.
  2. Right-click the indicator name and select Open from the contextual menu.

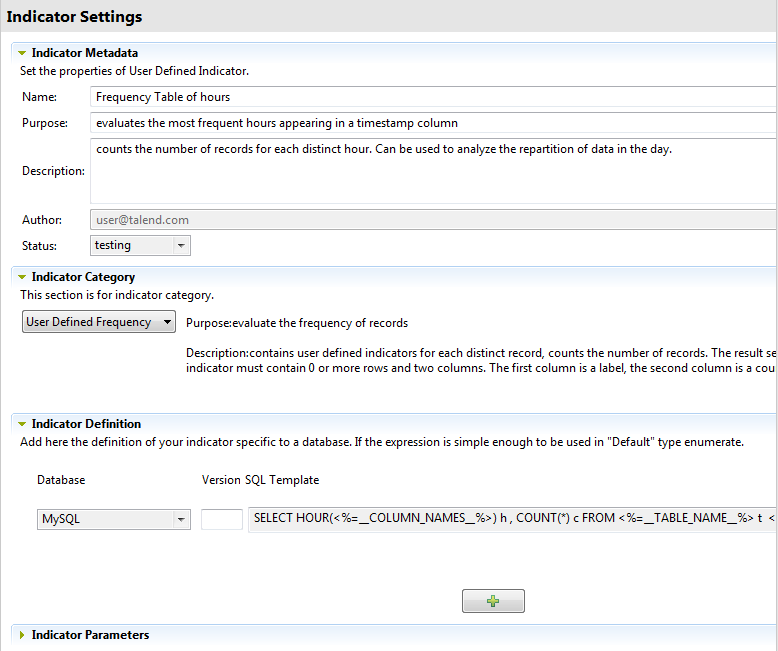
    The indicator editor opens displaying the selected indicator settings.

    Overview of the Indicator Metadata, Indicator Category and Indicator Definition sections.
  3. Modify the indicator metadata, if required.
  4. Click Indicator Category to open the view and select an indicator category from the list:
    Indicator category Description
    User Defined Match (by-default category) Uses user-defined indicators to evaluate the number of the data records that match a regular expression or a SQL pattern. The analysis results show the record matching count and the record total count.
    User Defined Frequency Uses user-defined indicators for each distinct data record to evaluate the record frequency that match a regular expression or a SQL pattern. The analysis results show the distinct count giving a label and a label-related count.
    User Defined Real Value Uses user-defined indicators which return real value to evaluate any real function of the data.
    User Defined Count Uses user-defined indicators that return a row count.
    If you change the indicator category, you can keep the existing indicator definition or remove the indicator definitions for all databases but the one for Java.
  5. Click Indicator Definition to open the view. Set the indicator definition for one or more databases using the [+] button.
    If the indicator is simple enough to be used in all databases, select Default in the list.
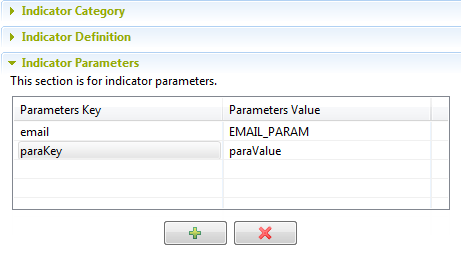
  6. Click Indicator Parameter and modify the indicator parameters as needed.
    Overview of the Indicator Parameters section.
  7. To add new default parameters, click the [+] button at the bottom of the table, click in the lines and define the parameter keys and values.
  8. Click the save icon on top of the editor to save your changes.

Did this page help you?

If you find any issues with this page or its content – a typo, a missing step, or a technical error – please let us know!