Skip to main content Skip to complementary content

Centralizing Couchbase metadata

Define the connection metadata to your Couchbase cluster in the Repository of Talend Studio.

You can then reuse this connection metadata in your Jobs running with Couchbase, without having to manually configure this connection in each Job.

Centralizing the connection metadata is recommended, as this allows you to easily manage the connections to your clusters.

Before you begin

The Couchbase cluster must have been created and started.

Procedure

  1. In the Repository tree view in the Integration perspective of Talend Studio, expand Metadata and right-click the Couchbase node under it to open the contextual menu.
  2. Click Create Couchbase Connection to open the related wizard.
  3. In the connection wizard, enter the general properties of the connection you need to create, such as Name, Purpose and Description.

    The information you fill in the Description field will appear as a tooltip when you move your mouse pointer over the connection.

    Once done, click Next to proceed to the next step.

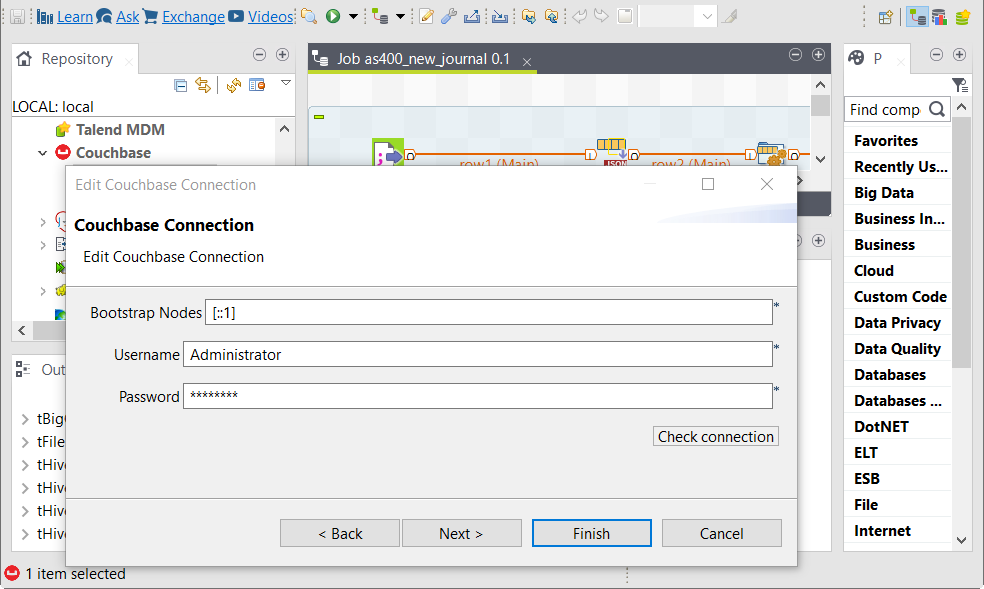
  4. Enter the properties required for the Couchbase connection.
    Property Description

    Bootstrap nodes

    Enter the name or IP of the node to be bootstrapped by Couchbase SDK. As Couchbase recommends to specify multiple nodes to bootstrap, enter the names or IPs of these nodes in this field, separating them using commas (,).

    For further information about Couchbase bootstrapping, see How Couchbase SDKs connect to the cluster.

    You can find the node names on the Servers page in your Couchbase Web Console. If you need further information, contact the administrator of your Couchbase cluster or consult your Couchbase documentation.

    Note that the Couchbase servers do not support proxies; for this reason, the Couchbase components from Talend do not support proxies either.

    Username and Password

    Provide the authentication credentials to your Couchbase cluster.

    To enter the password, click the [...] button next to the password field, and then in the pop-up dialog box enter the password between double quotes and click OK to save the settings.

    If you are using Couchbase V5.0 and onwards, enter the same value you put in the Bucket field as password, because since Couchbase V5.0, no password is associated with a bucket. However, on Couchbase, you need to create a user with appropriate role to access the buckets.

    For further information about the access control and other important requirements on the Couchbase side, see Couchbase release note of your version.

    Example

    Edit Couchbase Connection dialog box.
  5. Click Check connection to verify the configuration. If the configuration is correct, a dialog box appears to say the connection is successful.
  6. Click Finish to validate this configuration.
    This new Couchbase connection appears under the Couchbase node in the Repository tree view. You can now drop it onto your design workspace as a Couchbase component. But you can furthermore add the connection to a specific bucket in your Couchbase cluster. This helps you centralize and manage the connections to the datasets in your Couchbase cluster.
    1. Right-click this Couchbase connection to display the contextual menu.
    2. Click Create Couchbase Dataset to display the related wizard.
    3. Enter the general properties that describe the connection to the dataset, that is to say, the Couchbase bucket to be used.
    4. Click Next to pass to the second step and in the Bucket field, enter the name of the bucket to be connected.
    5. Click Finish to validate this connection.
      This new bucket connection appears under the Couchbase connection under the Couchbase node. When you drop it on the design workspace as a Couchbase component, the Couchbase connection fields and the Bucket field are pre-filled automatically.

Did this page help you?

If you find any issues with this page or its content – a typo, a missing step, or a technical error – please let us know!