Defining connection parameters
Procedure
-
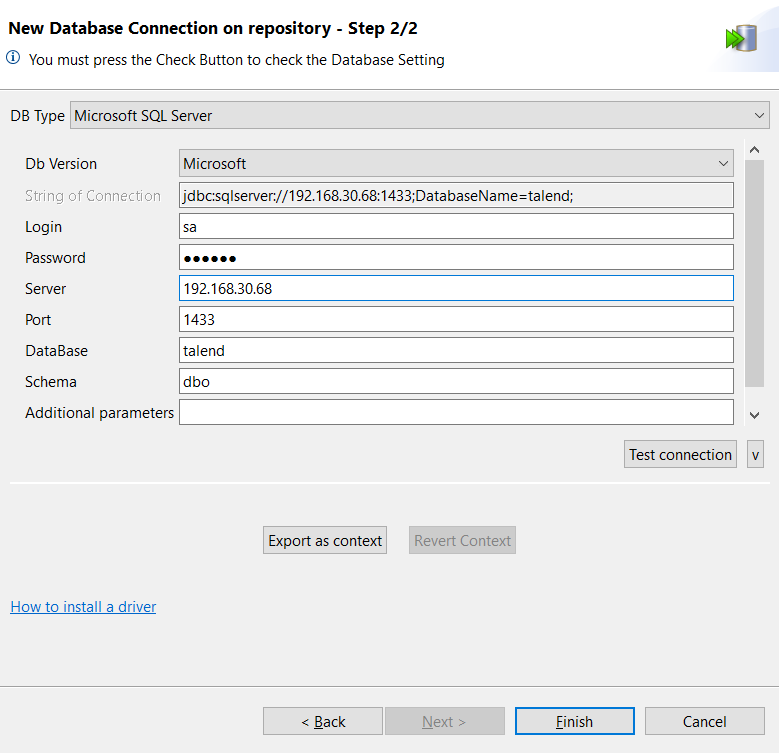
Fill in the connection details. The fields you need to fill vary with the database
type you select.

Due to limitations of Java 8, ODBC is no longer supported for Access database connections, and the only supported database driver type is JDBC.
For an MS SQL Server (JDBC) connection, when Microsoft is selected from the Db Version list, you need to download the Microsoft JDBC driver for SQL Server on Microsoft Download Center, unpack the downloaded zip file, choose a jar in the unzipped folder based on your JRE version, rename the jar to mssql-jdbc.jar and install it manually. For more information about choosing the jar, see the System Requirements information on Microsoft Download Center.
You can set up a connection to Oracle using the Wallet by selecting Oracle Custom from the DB Type drop-down list, then selecting the Use SSL Encryption check box and specifying the related properties, including the path to your TrustStore and KeyStore files and the password for each of them, and whether to disable the use of CBC (CipherBlock Chaining).
If you need to connect to Hive, we recommend using one of the Talend solutions with Big Data.
Information noteWarning: If you are creating an MSSQL connection, in order to be able to retrieve all table schemas in the database, be sure to:- enter dbo in the Schema field if you are connecting to MSSQL 2000,
- remove dbo from the Schema field if you are connecting to MSSQL 2005/2008.
- Optional: Specify additional connection properties through the Additional parameters field in the Database Settings area.
- Optional:
If you are creating a connection for Oracle 18 and above, select the
Support NLS (National Language Support) check box to add
globalization support.
For more information, see Oracle Globalization Support Guide.
-
Click Check to check your connection.
If the connection fails, a message box is displayed to indicate this failure and from that message box. From that message box, click the Details button to read further information.If a missing library or driver (.jar file) has provoked this failure, you can read that from the Details panel and then install the specified library or driver.
- If you are creating a Teradata connection, select Yes for the Use SQL Mode option at the bottom of the wizard to use the SQL queries to retrieve metadata. The JDBC driver is not recommended with this database because of possible bad performance.
-
If needed, click Export as context and follow the steps
in the wizard to export the database connection parameters as context variables
in a context group under the Contexts node of the
Repository and fill the database connection parameter fields with context
variables.
Information noteNote: The Schema field, if any, must be filled when using context mode.
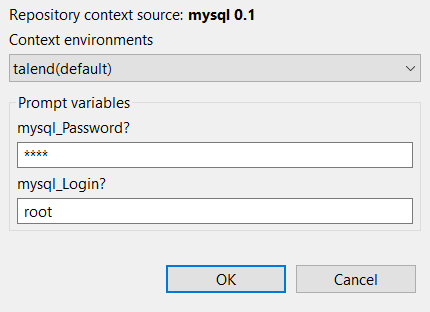
If the database connection parameter fields are filled with context variables and if there are multiple context groups defined for the database connection parameters, when you perform an operation that requires the database connection, a Choose context dialog box pops up and you must choose a context group before proceeding.
If you have enabled the prompt functionality on any variables, you must also fill the correct value of each variable in the Choose context dialog box before proceeding. For more information about how to enable the prompt functionality on context variables, see Defining context variables.

-
If needed, fill in the database properties information. That is all for the
first operation on database connection setup. Click
Finish to close the connection setup wizard.
The newly created database connection will be saved under the Db Connections node in the Repository tree view, and several folders for SQL queries and different types of schemas, such as Calculation View schemas (only for SAP HANA), Synonym schemas (for Oracle, IBM DB2 and MSSQL), Table schemas, and View schemas will be created under the database connection node.Now you can drag and drop the database connection onto the design workspace as a database component to reuse the defined database connection details in your Job.
Did this page help you?
If you find any issues with this page or its content – a typo, a missing step, or a technical error – please let us know!
