
Configuring Azure DevOps
Setting up your environment
- Make sure you have set up your Microsoft Azure DevOps account. Refer to the Azure DevOps documentation for installation and general setup.
- Download and extract the archive file azure-pipeline.zip, that contains these files: azure-pipeline.yml, maven_settings.xml and sample_pom.xml.
- Install Java JDK 17, Apache Maven superior or equal to 3.6.3, and set up a Git account on a compatible Azure DevOps version control system (Azure Repos, GitHub, Bitbucket Cloud).
- Depending on where you want to publish your artifacts, set up your artifact repositories (Nexus, Artifactory) and your Talend Cloud account.
| Operating system | CPU | RAM | SSD Disk size |
|---|---|---|---|
| Windows, Linux, Mac | 4 cores or equivalent | 4GB (minimum) | 50GB (minimum) |
Creating your Azure DevOps project
- If you do not have an organization yet on Azure DevOps, create one.
- Create a project and make it private.
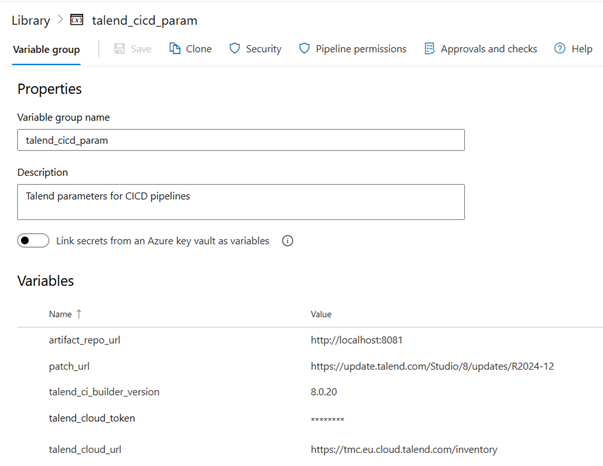
Creating a variable group
In Azure DevOps you can create a variable group to store values that you want to control (URLs, credentials, etc.) and reuse them in all your pipelines.
Information noteNote: Once you have created your
Azure pipeline, go back to this page to check the Pipeline
permissions to make sure the pipeline can use this variable group.
- On the page, go to the Variable groups tab.
- Add a new variable group and give it a name, for example talend_cicd_param (this identifier will be used in the Azure pipeline).
- Add the following variables and values to the group:
-
patch_url: URL of the folder where the cumulative patches
can be downloaded for Talend Studio.
Example: https://update.talend.com/Studio/8/updates/R2025-07
-
talend_ci_builder_version: The version of the Talend CI Builder Maven plugin used to generate POM files, code and
build.
Example: 8.0.20
-
talend_cloud_url (to publish artifacts to Talend Cloud): URL of the Talend Cloud service in which you want to deploy your artifacts.Depending on your region:
- AWS Singapore: https://tmc.sg.cloud.talend.com/inventory
- AWS US: https://tmc.us.cloud.talend.com/inventory
- AWS EU: https://tmc.eu.cloud.talend.com/inventory
- AWS APAC: https://tmc.ap.cloud.talend.com/inventory
- AWS Australia: https://tmc.au.cloud.talend.com/inventory
- Azure US West: https://tmc.us-west.cloud.talend.com/inventory
- talend_cloud_token (to publish artifacts to Talend Cloud): Personal access token necessary to authenticate to your Talend Cloud account.
- artifact_repo_url (to publish artifacts to an artifact repository): URL of the artifact repository (Nexus, Artifactory, etc.) in which you want to deploy your artifacts.
-
patch_url: URL of the folder where the cumulative patches
can be downloaded for Talend Studio.
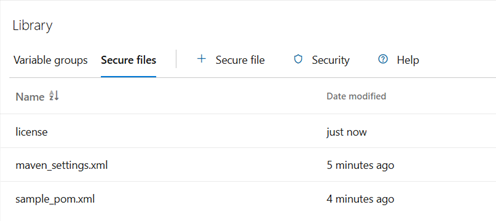
Storing your secure files
In Azure DevOps you can add your custom Maven files as well as your Talend product license or local patches as secure files and then use these files in the CI/CD pipelines.
Before you begin:
- Make sure you have extracted these files from the azure-pipeline.zip archive file: maven_settings.zip and sample_pom.zip.
- Adapt the maven_settings.xml file to your environment by replacing the parameter values (Nexus or Artifactory URLs, host names, ports, credentials, etc.) and save your changes.
- On the page, go to the Secure files tab.
- Click the plus sign to upload the maven_settings.xml.
- Click the plus sign to upload your license file. You must have received your Talend license file by email, it is also available in the Talend Studio installation folder that has already been setup.
- Click the plus sign to upload the sample_pom.xml file.
- Once you have created your Azure pipeline, go back to this page, click the uploaded files, select Pipeline permissions and make sure the Azure pipeline can use all secure files.