Skip to main content Skip to complementary content

Setting up a Dynamic Engine and a Dynamic Engine environment in Kubernetes

Provide one of your own Kubernetes clusters to deploy a Dynamic Engine and its environment or environments on it.

To complete the deployment, you need to:
  1. Create the logical entities for the engine and environments.
  2. Assign environments to the engine.
  3. Generate deployment files for the engine, environments, and their assignments.
  4. Apply those files to your cluster to set up the corresponding physical entities.
The diagram of a Dynamic Engine workflow, which is explained step by step in the following sections to set up a Dynamic Engine ecosystem.

Adding a Dynamic Engine

Add a Dynamic Engine logical entity to help deploy a Dynamic Engine in your Kubernetes cluster.

Before you begin

You must have the Infrastructure Administrator (containing the TMC_CLUSTER_MANAGEMENT permission) role in Talend Management Console.

Procedure

  1. Go to the Processing page.
  2. Open the Dynamic Engines tab.
  3. Click Add Dynamic Engine.
  4. Enter a name and a description.
    The name must contain only alphanumeric, -, . and _ characters. Spaces and other special characters are not allowed.
  5. Click Next.
  6. Optional: A list of available Dynamic Engine environments is displayed. Assign one or more environments from this list or do this later from the Dynamic Engines tab of the Processing page.
  7. Click Create to confirm the Dynamic Engine creation.
    The dialog for Dynamic Engine deployment displays.
  8. Select the deployment type and the engine version.
    By default, the Helm deployment type and the latest version are selected.

    Using Dynamic Engine Helm charts is an advanced approach for customizable deployments, while the Kubectl type uses standard manifest files for straightforward deployments.

    In this example, the default choices are kept.

    Example

    Dialog for selecting deployment type and Dynamic Engine version

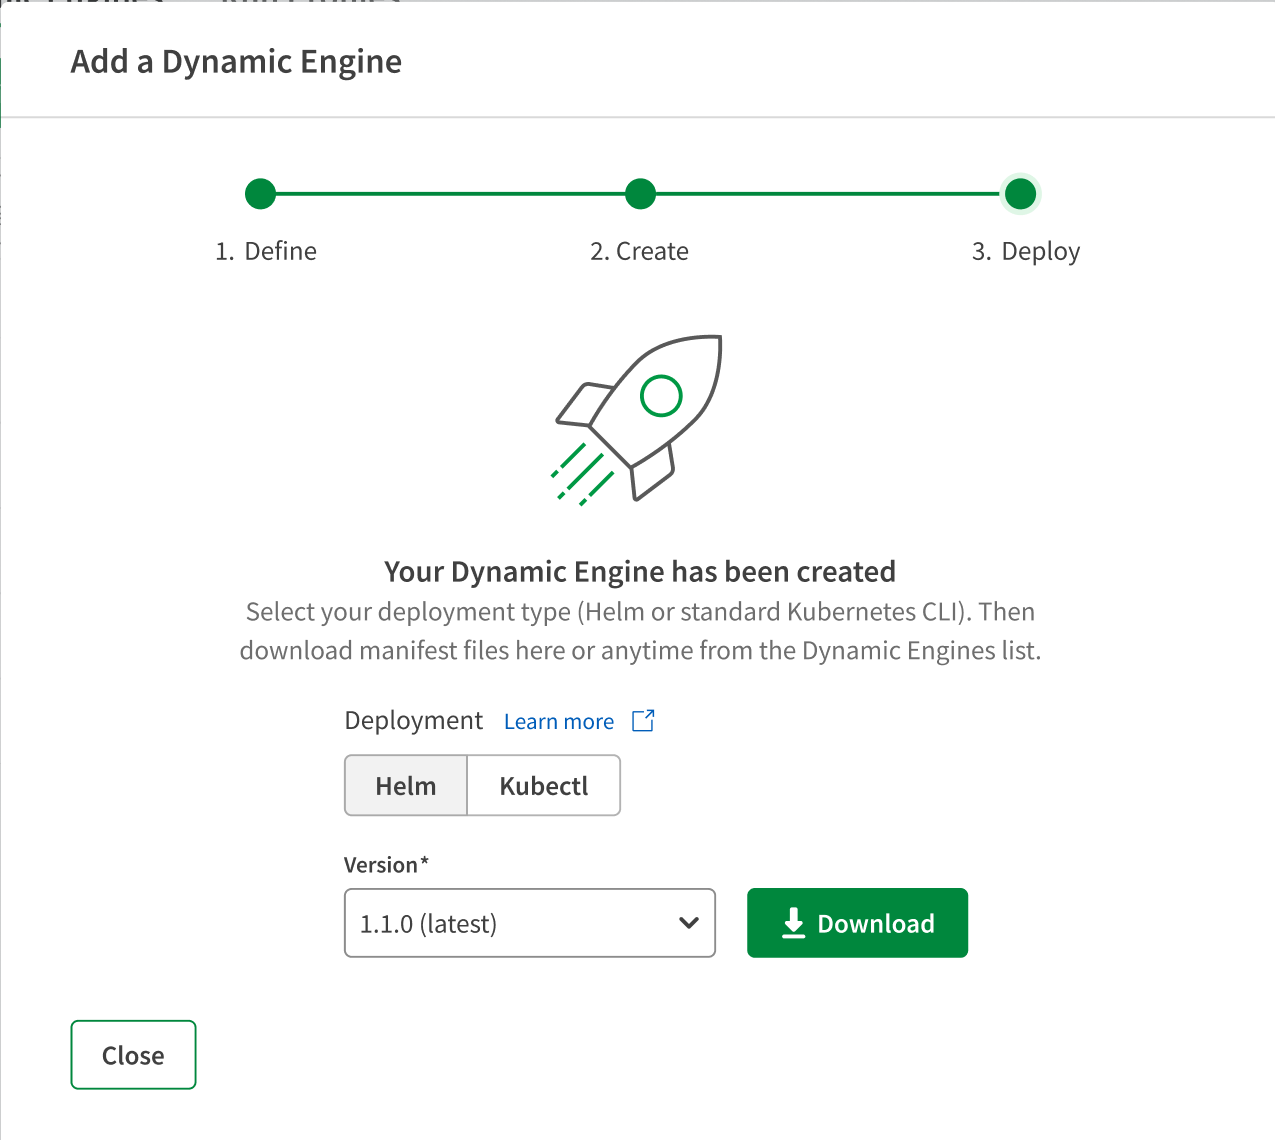
    A zip file containing deployment files is generated for you to apply to your Kubernetes cluster to deploy Dynamic Engine.

    In this example, you do not need to download this zip yet, because no Dynamic Engine environment has been created or assigned to the current Dynamic Engine.

    Instead, follow the following sections to create and assign Dynamic Engine environments first. This allows you to download all the required deployment files at once.

    In practice, if you have already assigned an existing environment to the Dynamic Engine instance during its creation, click Download to get the deployment zip file and see (Recommended) Helm deployment.

  9. Close the dialog box.

Results

The status of your Dynamic Engine is set to New.

Adding a Dynamic Engine environment

Create a new environment dedicated to a Dynamic Engine.

This environment can be used with Dynamic Engines only and can be assigned to a single Dynamic Engine at a time.

Before you begin

You must have the Environment Administrator role in Talend Management Console.

Procedure

  1. Go to the Environments page.
  2. Open the Dynamic Engine Environments tab.
  3. Click Add environment.
  4. Enter the name of the environment.
    The name must contain only alphanumeric, -, # and _ characters. Leading or trailing spaces and other special characters are not allowed.
  5. Enter the name of the first workspace in the new environment.
    The allowed characters are the same as the environment name.
  6. Optional: If you want another user to be the workspace owner, select their username from the drop-down list.
  7. Enter a description.
  8. Click Add to save your changes.

Results

The status of your Dynamic Engine environment is set to Not assigned.

The environment is created with the workspace you specified.

To share the workspace, click the environment name then click the Share workspace icon next to the workspace name from the Workspaces tab.

To add other workspaces to this new environment, click the environment name then Add workspace from the Workspaces tab.

What to do next

You are ready to assign your environment to a Dynamic Engine.

Assigning an environment to a Dynamic Engine

Assign one or more environments to a Dynamic Engine. The next task runs from the environments will occur in the Dynamic Engine.

Assigning an environment to a Dynamic Engine overrides the existing settings of engine and run profile for that environment.

You can assign one or more environments to a Dynamic Engine from the Dynamic Engines tab directly from the list or from the drawer. You can also do it when creating a Dynamic Engine.

Before you begin

  • You must have the Environment Administrator role in Talend Management Console.
  • You must have the Infrastructure Administrator role (TMC_CLUSTER_MANAGEMENT) to assign Dynamic Engine environments to a Dynamic Engine.

Procedure

  1. Go to the Processing page.
  2. Open the Dynamic Engines tab.
  3. Hover over the name of the Dynamic Engine to which you need to assign an environment.
  4. Click the Assign environments button to open the page for environment assignment.Assign environments button.
    You can also click the Dynamic Engine name to open the details panel, then click the Manage button.
  5. In the dialog, select one or more environments from the list.
    Selection of Dynamic Engine environments.
  6. Click Assign to navigate to the step for selecting deployment types and versions.
    In this example, the default deployment type Helm and the latest version are kept.

    The other deployment type, Kubectl, uses standard manifest files for straightforward deployments. Unlike Helm, it does not allow custom deployment configuration. For further information about how to use Kubectl manifest files for deployment, see Kubectl deployment.

    Environments assigned to the Dynamic Engine.
  7. Click Download to get the deployment zip file that contain Helm values files.
    A Helm values file contains the configuration information such as IDs and bootstrap keys specific to your Dynamic Engine instance and its associated environments.

    Example

    For example, assuming the Dynamic Engine ID is c-m-sjufu4qy and it has one associated environment with ID 67f7d562ffd7c3525a902542. Then the generated zip file is named c-m-sjufu4qy.zip and contains the following files:
    • For Dynamic Engine: c-m-sjufu4qy-helm-values/c-m-sjufu4qy-values.yaml
    • For Dynamic Engine environment: c-m-sjufu4qy-helm-values/67f7d562ffd7c3525a902542-values.yaml (One file for each environment, with the environment ID in the file name).
    Information noteNote: Use API to generate the Helm values files.

    Alternatively, after setting up your Dynamic Engine instance with its assigned environments in Talend Management Console, you can use the dedicated API endpoint to generate the same Helm values files.

    For the same Dynamic Engine c-m-sjufu4qy and its associated environment, run the following curl command:
    curl -X POST \ https://api.eu.cloud.talend.com/processing/runtimes/dynamic-engines/c-m-sjufu4qy/actions/generate-helm \
    -H "Authorization: Bearer your_personal_access_token" \ 
    -H "Content-Type: application/json" \ 
    -d "{\"generateNewPairingKey\": true}""
    For the first deployment, setting the generateNewPairingKey option is not required. This option generates new pairing keys for all Dynamic Engine environments assigned to the Dynamic Engine instance.
  8. Click Close.

Results

The engine and its associated environment are ready to be deployed.

What to do next

Follow (Recommended) Helm deployment to finalize the Dynamic Engine setup.

Did this page help you?

If you find any issues with this page or its content – a typo, a missing step, or a technical error – please let us know!