Deploying and installing the Qlik add-in for Microsoft Excel
Deploy and install the Qlik add-in for Microsoft Excel to allow users in your organization to create report templates. Upload report templates created with the add-in to the Qlik Cloud app to generate report output from report tasks.
The Qlik add-in can be deployed and installed for compatible web and desktop versions of Microsoft Excel within Microsoft 365.
The add-in is installed using a manifest file. This manifest file is required for the Microsoft 365 administrator (or possibly a user, in certain installation methods) to deploy and install the add-in for themselves or users in their organization. A manifest file allows installation of the add-in for a single Qlik Cloud tenant.
After you obtain the manifest file or URL, there are two different methods to deploy and install the add-in:
-
Centralized deployment: Centralized deployment, installation, and activation
-
Sideloading: Installing the add-in using sideloading or network sharing
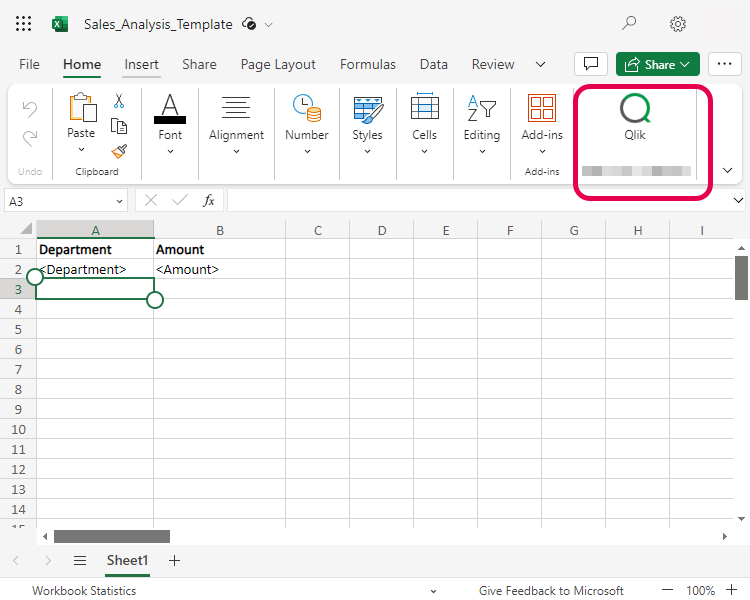
Qlik add-in button shown in a web version of Microsoft Excel
System and software requirements
To install the Qlik add-in, you must meet the following requirements.
Windows
-
Windows 10 v.1903 or higher
-
Microsoft Office 365 v.16.0.11629 or higher
macOS
-
macOS v.14 or higher
-
Microsoft Office 365 v.16.83 or higher
Microsoft Excel version requirements
To run the Qlik add-in, you must have a Microsoft Excel installation with ExcelAPI 1.9 or newer. To check if your Excel installation is compliant, refer to the official Microsoft documentation at Excel JavaScript API requirement sets.
If your ExcelAPI is lower than the minimum required version, an error is shown indicating that the Qlik add-in requires a newer version of Microsoft Excel.
Example of an error message during installation of the add-in

You may need to click on the white area on the right in Microsoft Excel and press F5 to update the page to see the error.
If you see this error, upgrade your Microsoft Excel installation.
Preparing and obtaining the add-in manifest
The Qlik Excel add-in is installed in the Microsoft environment using a manifest file. This is an XML file. For a centralized deployment, a URL to the manifest file will likely need to be provided by the Microsoft administrator.
A manifest file is specific to a single Qlik Cloud tenant.
An OAuth client configuration is required to install the add-in. After you have configured the OAuth client, obtain the manifest file link, as well as the manifest file itself, from the Administration activity center.
Do the following:
-
Create the OAuth client in the Qlik Cloud tenant using the required configuration. For full instructions, see Creating an OAuth client for the Qlik add-in for Microsoft Excel.
-
Navigate to the Administration activity center and generate the manifest link. You can also download the manifest file directly for alternative use cases. See Managing installation manifests for the Qlik add-in for Microsoft Excel.
Creating an OAuth client for the Qlik add-in for Microsoft Excel
An OAuth client configuration is required to install the Qlik add-in for Microsoft Excel. The add-in is used by report developers to prepare report templates which control output of tabular reports from the Qlik Sense app.
For OAuth to work in the add-in, the OAuth client needs to be configured with the exact configuration shown below.
Do the following:
-
In the Administration activity center, in Qlik Cloud, go to OAuth.
-
Click Create new.
-
In the Client type dropdown menu, select Single-page app. More fields will appear.
-
Insert a Name. The Description is optional.
-
At minimum, select the checkbox to include the user_default scope. You can include other scopes in the configuration, but without user_default, installation will not work.
See Creating an OAuth client for a full description of each available scope.
-
In the Add redirect URLs field, insert the URL of your tenant, followed by the fixed string: /office-add-ins/oAuthLoginSuccess.html
The result should look like this: https://YourServer/office-add-ins/oAuthLoginSuccess.html
-
Click Add.
-
In the Add allowed origins field, insert your tenant URL and click Add.
-
Click Create.
-
The Copy your Client ID window appears. You can choose to copy the Client ID to clipboard, or click Done to close the window.
After you have created the OAuth client, obtain the link to the updated manifest XML file from the Administration activity center. Go to the Settings page, and navigate to Sharing and reports > Excel add-in within the Administration activity center. Use this link to deploy and install the add-in.
Centralized deployment, installation, and activation
It is recommended that the Qlik add-in is made available with centralized deployment and installation. Centralized deployment requires intervention from a Microsoft 365 administrator in your organization.
With centralized deployment, the add-in manifest is loaded into your organization’s Microsoft 365 admin center and distributed to users as a pre-configured installation. Distribution can be restricted to members of specific security groups.
You should use centralized deployment when:
-
You want the add-in to be permanently installed for members of your organization
-
You want to manage distribution to your organization members
Follow the procedural sections below for the full workflow.
Centralized deployment and installation
Centralized deployment is completed by a Microsoft 365 system administrator.
Do the following:
-
Obtain the add-in manifest file or manifest URL after creating an OAuth client. See Preparing and obtaining the add-in manifest.
-
Distribute the add-in according to the official Microsoft documentation: Deploy and publish Office Add-ins. Note that distribution through centralized deployment is only possible by using the Microsoft 365 admin center.
With the above procedure, the add-in is installed for users who are given access to it. Users then activate the add-in in their Microsoft Excel version.
Activating the add-in after centralized deployment
After a Microsoft administrator has installed the Qlik add-in for your organization, you can activate and use it if you have been given access to it.
Depending on your version of Microsoft Excel, these steps might be slightly different. Refer to the official Microsoft documentation for full details.
Do the following:
-
Open the desktop or web version of Excel.
-
Go to Home > Add-ins > Get Add-ins.
-
In the ADMIN MANAGED tab of the dialog, select the Qlik add-in.
The Qlik add-in icon is added to your ribbon bar.
View, manage, and install add-ins for Microsoft 365 programs
Removing the add-in
If your installation uses a centralized deployment, you might not be able to uninstall the add-in. This depends on the policy used by your Microsoft 365 administrator.
Installing the add-in using sideloading or network sharing
Sideloading and network share installation are suitable ways to quickly obtain access to the add-in for testing or trial purposes. They are not suitable methods for deploying the add-in for production and enterprise-scale use cases.
Depending on your version of Excel and other factors, add-ins loaded with these methods might eventually be removed from your ribbon bar. When this happens, re-upload the manifest into Excel.
Option 1: Sideload the add-in on the web
To sideload the add-in using Excel 365 on the web, the user uploads the manifest file to their browser.
Sideloading is supported by web versions of Excel provided by Microsoft 365.
You should use sideloading when:
-
You need to access the add-in quickly.
-
You want to test add-in functionality in isolation.
-
You want to test the add-in without requiring intervention from a Microsoft 365 administrator.
Do the following:
-
Prepare and download the manifest file. See Preparing and obtaining the add-in manifest.
-
Open Microsoft Office on the web at https://office.live.com/.
-
Open a new Excel document.
-
Open the Insert tab on the ribbon and, in the Add-ins section, choose Office Add-ins.
-
On the Office Add-ins dialog, select the MY ADD-INS tab, choose Manage My Add-ins, and then Upload My Add-in.
-
Browse to the add-in manifest file, and then select Upload.
-
If required, sign into your Qlik Cloud account.
Removing a sideloaded add-in
To remove the sideloaded add-in, clear the cache of the web browser with which you are using the add-in.
Option 2: Install the add-in on desktop versions of Excel using a Windows network share
To install the add-in on a desktop version of Excel without centralized deployment, you can set up a network share and load the manifest into it. This can only be done on a Windows operating system.
Follow the guidelines below to sideload the add-in via network share. The instructions are adapted from the official Microsoft documentation. See Sideload Office Add-ins for testing from a network share or other Microsoft resources for more information.
Step 1: Create and share a folder
Do the following:
-
Create a folder to host the Qlik add-in. For example: C:\Qlik Excel add-in
-
In the Windows File Explorer, go to the parent folder, or drive letter, of the folder you want to use as your shared folder catalog. For example: C:\
-
Right-click the folder and select Properties.
-
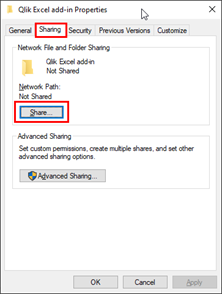
Open the Sharing tab and then click the Share... button.
Share... button
-
In the dialog window, add yourself and any other users and/or groups with whom you want to share your add-in. You will need at least Read/Write permission to the folder. After you have finished choosing people to share with, click Share.
-
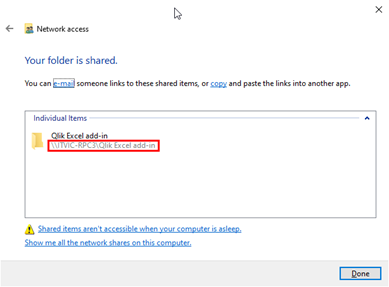
When you see confirmation that your folder has been shared, make note of the full network path that is displayed immediately following the folder name. Click Done to close the dialog window.
Confirmation of successfully shared folder with full network path
-
Click Close to close the Properties dialog window.
Step 2: Manually configure the shared folder as a trusted catalog
Do the following:
-
1. Open a new blank workbook in the desktop version of Excel.
-
Click the File tab, and then click Options in the bottom left corner.
-
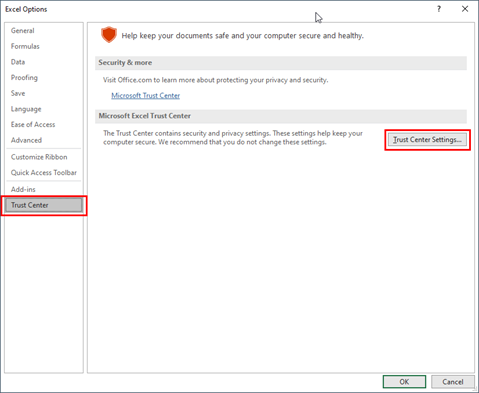
Click Trust Center, and then click the Trust Center Settings... button.
Trust Center Settings... button
-
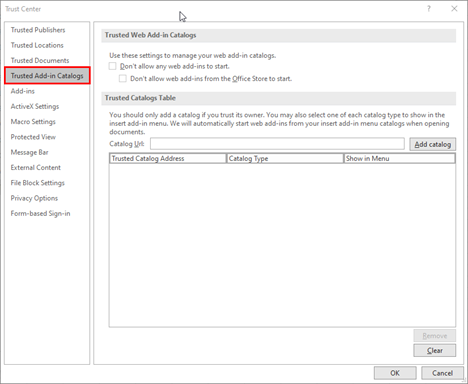
Click Trusted Add-in Catalogs.
Trusted Add-in Catalogs tab
-
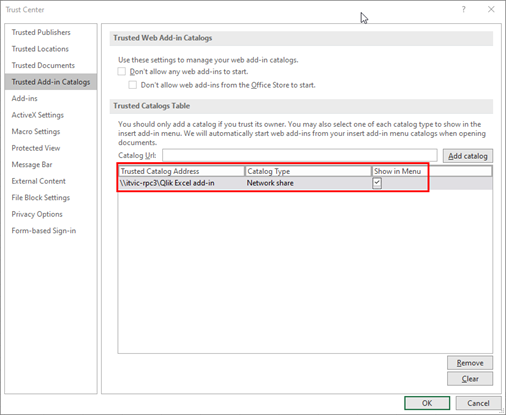
In the Catalog Url box, enter the full network path to the folder that you shared previously.
-
Click Add catalog.
-
Check the Show in Menu checkbox for the newly added item, and then click OK to close the Trust Center dialog window.
Trusted Add-in Catalogs tab in Trust Center dialog, with newly added catalog path
-
Click OK to close the dialog window.
-
Close and re-open Excel so your changes take effect.
Step 3: Sideload the add-in
Do the following:
-
Add the add-in manifest XML file to the shared folder.
-
In Excel, click on My Add-ins on the Insert tab of the ribbon.
-
Click SHARED FOLDER at the top of the Office Add-ins dialog box.
-
Select Qlik to insert the add-in.
-
You might see a dialog window that says something like the following: Qlik wants to display a new window. Click Allow.
Removing an add-in installed through network share
Do the following:
-
If you have Excel open, close it.
-
Delete the contents of this folder: %LOCALAPPDATA%\Microsoft\Office\16.0\Wef\
Option 3: Sideload the add-in on desktop versions of Excel for macOS
For macOS, the add-in can be installed on desktop versions of Excel on Microsoft 365. For the system and software requirements, see System and software requirements.
For full instructions, refer to the official Microsoft documentation: Sideload an add-in in Office on Mac
Do the following:
-
Open the Finder application on your computer.
-
Enter the following keyboard combination: Command+Shift+G
The Go to folder menu opens.
-
Enter the following path:
/Users/<username>/Library/Containers/com.microsoft.Excel/Data/Documents/wef
It could happen that the wef folder does not exist on your computer yet. If so, create it in this location.
-
In the wef folder, add a copy of the XML manifest file.
-
Open Microsoft Excel. If you already have it open, you will need to restart it.
-
In the ribbon bar, navigate to Home > Add-ins.
-
Select the Qlik add-in.
The Qlik add-in should now be available in your ribbon bar.
Removing a sideloaded add-in from desktop versions of Excel for macOS
To remove the Qlik add-in, you need to clear the Office cache on your computer. For more information, see:
Adding multiple Qlik add-ins to Microsoft Excel
Each Qlik add-in added allows use of the add-in for a single Qlik Cloud tenant. To work with multiple tenants, you'll need to deploy the add-in manifest for each individual tenant. Centralized deployment is only supported for one Qlik Cloud tenant.
Depending on your version of Microsoft Excel and the browser in use, when multiple add-ins are loaded, the ribbon bar might show icons for each of them, or only one icon holding the latest deployed instance.
Do the following:
-
If you are centrally deploying the add-in with the Microsoft 365 admin center, install the add-in for up to one Qlik Cloud tenant using the recommended workflow. See Centralized deployment, installation, and activation.
-
For the remaining tenants, use sideloading to install and deploy the add-ins. See Installing the add-in using sideloading or network sharing.
If any of the tenant add-ins is not showing in the ribbon bar, repeat the installation procedure for that particular tenant and refresh the browser page.
Troubleshooting
This section provides tips for resolving common deployment and installation issues.
For additional troubleshooting tips, see Troubleshooting - Tabular reporting.
Microsoft Excel: Blank dialog shown during authentication after deployment of the Qlik add-in
When a user tries to authenticate to the add-in, their authentication pop-up dialog might be blank. Alternatively, the user could instead see an error in the dialog (particularly, 12006).
Possible cause
For a user to work with the Qlik add-in for Microsoft Excel, the authentication flow requires a redirect between your tenant and the identity provider hosted in a different domain. Your identity provider is setting a Cross-Origin-Opener-Policy with restrictive settings. As a result, the cross-domain communication part of the authentication flow is blocked, preventing login information to be correctly returned to the add-in.
Proposed action
The following resolution should be performed by a network administrator who is responsible for setting up identity providers.
Do the following:
-
Set the response header from your IDP to your dialog to:
Cross-Origin-Opener-Policy: unsafe-none
For more information, refer to the official Microsoft documentation: Office dialog API - Rules and gotchas
