
Working with validation rules
A validation rule is a set of business requirements which helps you detect anomalies in datasets. It defines the values your data must comply with. A condition can be added to make the validation rule apply to some data only.
- Qlik Talend Cloud Enterprise
- Qlik Talend Cloud Premium
- Qlik Cloud Analytics Premium
- Qlik Cloud Analytics Enterprise
- Qlik Sense Enterprise SaaS
- You create the validation rule as a standalone object. When you are defining the rule, you can use variables and specific values.
As validation rules are generic, the variables let you adapt the rule to each dataset by associating variables to the fields of the dataset.
Specific values let you use the same value in all datasets to which you applied the rule.
- You apply the validation rule and adapt it to a field.
You associate the variables of the validation rule with the fields. You can apply a rule to a field to validate data from other fields.
- Before you apply the rule, a preview is displayed to show you how many values will be invalid. The invalid values are calculated from a sample of up to 100 records.
- The validation rule validates your data by categorizing the values:
- The values are valid. They fulfill all rule statements.
- The values are not applicable. They do not fulfill the condition and no alternative validation expression (else) has been defined.
- The values are invalid. Either:
- They fulfill the condition (if) but not the validation expression (then), and no alternative validation expression (else) has been defined.
- They fulfill neither the condition (if) nor the alternative validation expression (else).
- The values are not executable. The rule cannot be executed on those values. For example, a value is yes but the rule must validate that the value is greater than 18.
You can apply the same validation rule to as many fields as necessary, even in the same dataset.
The validation rules have effects on the quality of your dataset and the Qlik Trust Score™. For more information, see Assessing data quality and Qlik Trust Score™.
You can use the validation rules in Talend Studio. For more information, see tDQRules properties.
Creating a validation rule
You can create a rule from the Validation rules tab or when you apply a rule to a dataset. You can also create a rule from an AI-generated suggestion. For more information, see Applying a validation rule to a dataset.
After you created the rule, you can apply it to datasets.
In this use case, a worker from a blood center needs to check that all the persons are marked as potential givers if:
- Blood group is not empty and it ends with + or -.
- Age is greater or equal to 18 and less than 71.
- Open Data quality and select the Validation rules tab.
- If you have no validation rules, click Add. Otherwise, click Create validation rule.
- Enter the name BloodDonation.
- Select the space in which the rule must be stored.
- Select the Critical severity and the Validity category. These settings let you adjust the impact of a rule on the dataset quality. For more information, see Categories and levels of severity.
- Enter a description. This is optional but recommended to describe the purpose of the validation rule.
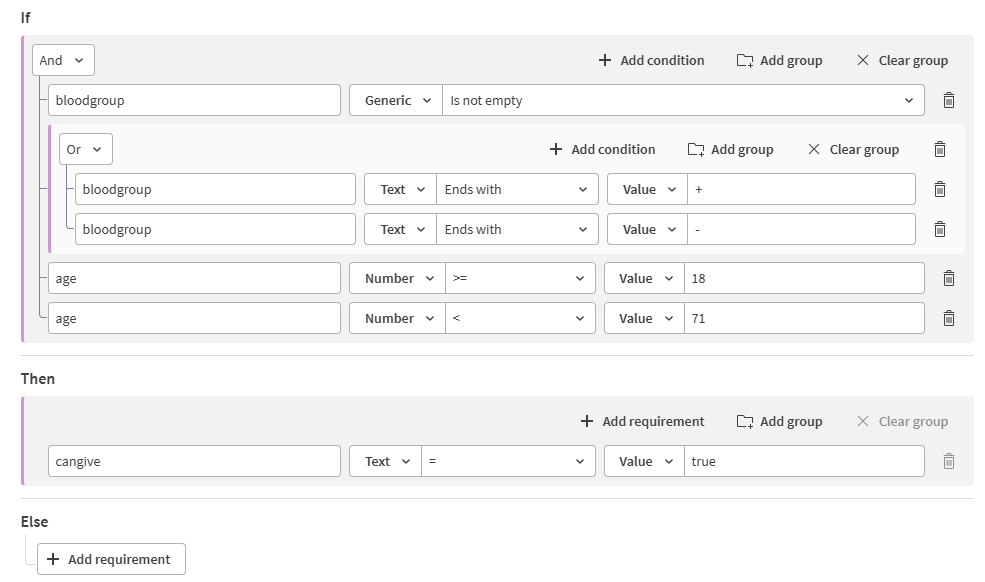
- To add conditions, toggle on Define conditions. The If and Else sections are active.
- In the If section:
- Enter the variable name bloodgroup. You will associate this variable to a dataset field later.
- Select the operator Generic > Is not empty.
- Click Add group.
- Select the logical operator Or for the group and And for all conditions, at the top of the If section.
- For the group, repeat the previous steps to add the conditions on the rhesus:
- bloodgroup Ends with +.
- bloodgroup Ends with -.
- Repeat the previous steps to add the conditions on the age:
- age >= 18.
- age < 71.
- In the Then section:
- Enter the variable name cangive. You will associate this variable to a dataset field later.
- Select the operator Text > = true.
The Text operator is case sensitive.
- Leave the Else section empty.
The rule configuration should be as follows:
- Click Create.
Applying a validation rule to a dataset
You can apply the same validation rule to different fields, even in the same dataset. You can also apply different rules to the same field.
- Open a dataset.
- Select the Data Preview tab.
- Click a field. The right panel is displayed.
- Click
 from the Validation rules section.
 - Select the check box of the rule you want to apply and click Next.
You can also create a rule from this window and apply it to the current dataset right away. You can also apply the rule to other datasets later.
- Apply or create validation rules as follows:
- To apply an existing rule: Select the check box of the rule you want to apply and click Next.
To create a rule using AI:
Information noteTo use AI data quality validation rule generation, you must opt in to cross-region inference. This allows Qlik Cloud to send inference requests outside your tenant region.
For details and the latest information about inference processing locations, see Enabling cross-region inference.
- Use Suggest rules if you have not yet generated suggestions for this dataset.
- Use View suggestions if rule suggestions have already been generated.
- Click Create New and select Suggest new rules to generate new rule suggestions. The suggestions are based on up to five values from the sample to generate suggestions consistent with your data.
The information is treated as customer data and will not be used to train Qlik Cloud or the GenAI model.
Warning noteThis feature uses generative artificial intelligence (“GenAI”). It is the user’s responsibility to review and verify any GenAI output before using or sharing it, and to evaluate whether the use of it is appropriate for any particular use case and whether it complies with applicable laws. - To create a rule manually: You can also create a rule directly from this window and apply it to the current dataset right away.
Information noteAny rule you directly create on a dataset will be available for you to apply to other datasets. You can find all the rules in Data quality > Validation rules. - Associate each variable to a field. In this use case:
- bloodgroup associated to BloodGroup.
- age associated to Age.
- cangive associated to Giver.
A preview of the rule results is displayed to let you know how many values of will be invalid. The invalid values are calculated from a sample of up to 100 records.
- To refresh the data quality automatically, select the Refresh quality check box.
- Click Apply.
- If you did not select Refresh quality, the rule is grayed out. Click Refresh above the right panel to apply your changes and refresh the data quality.
The rule is applied to the dataset and you can assess the quality of your dataset, and the quality of the fields to which a variable has been associated.
The icon ![]() is displayed in the column header of the fields to which a rule applies. Hover over the icon to see how many rules apply to the field.
is displayed in the column header of the fields to which a rule applies. Hover over the icon to see how many rules apply to the field.
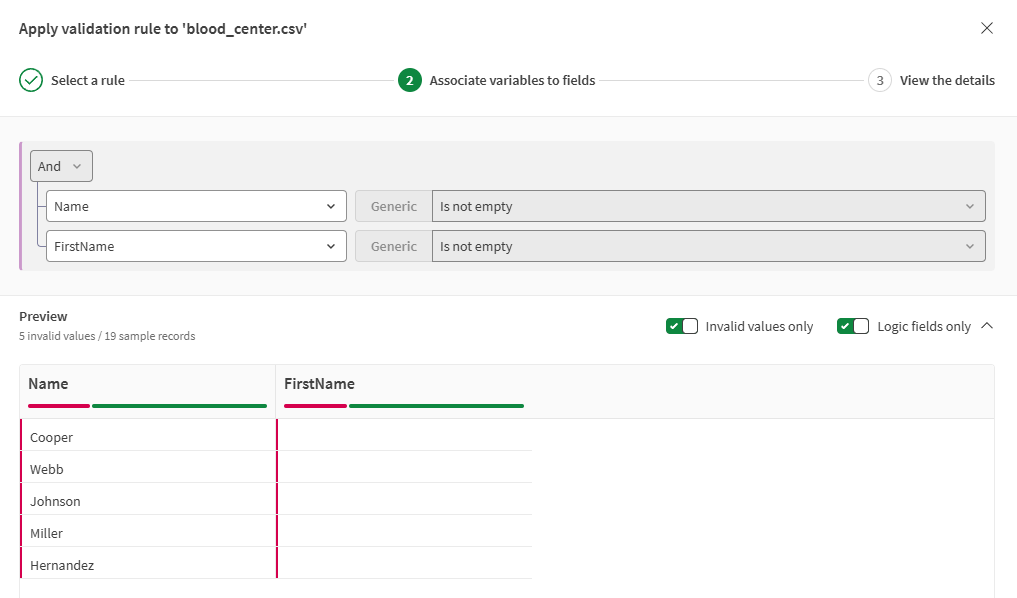
Preview of a rule
When you associate the variables to the fields, a preview of the rule results is displayed to let you test and adjust a rule before you apply it to your data. You can see how accurate and relevant the rule is.
This preview lets you know how many values will be invalid. The invalid values are calculated from a sample of up to 100 records and are displayed at the top of the results.
Using the toggles, you can filter the values you see:
- Invalid values only: You see only the values that are invalid against the rule.
- Logic fields only: You see only the fields that are used in the logic of the rule.
Assessing the quality of the dataset and a field
You can see the percentage of invalid, non-applicable, and valid values in the quality bars. The percentage is calculated on all the data of the field, not on the sample only.
Quality bar of the dataset
For more information on the quality of each field, do the following:
- Open the dataset.
- Select the Data Preview tab.
- To open the rigth panel, click a field to which a rule is applied.
- To display the percentage, hover over a color in the quality bar.
- You can see up to four colors:
- Light red: Not executable values. The rule cannot be executed on those values. For example, a value is yes but the rule must validate that the value is greater than 18.
- Red: Invalid values. Either:
- They fulfill the condition (if) but not the validation expression (then), and no alternative validation expression (else) has been defined.
- They fulfill neither the condition (if) nor the alternative validation expression (else).
- Light green: Not applicable values. The values do not fulfill the condition (if) and no alternative validation expression (else) has been defined.
- Green: Valid values. They fulfill all rule statements.
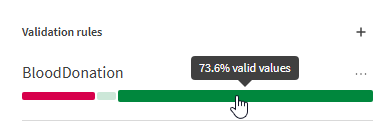
In this use case:
- 21,1% of the values are invalid. For example, a person is marked as a giver but the blood group is empty.
- 5,3% of the values are not applicable. The condition is not fulfilled and no alternative expression has been defined.
- 73,6% of the values are valid. The blood group is filled in, ends with + or - and the age is >= 18 < 71 and the person is marked as a giver.
Quality bar of a field
- Open the dataset.
- Select the Data Preview tab.
- To display the percentage, hover over a color in the quality bar.
- You can see up to three colors from left to right:
- Red: Invalid values. This includes not executable values from rules.
- Black: Empty or null values.
- Green: Valid values. This includes not applicable values from rules.
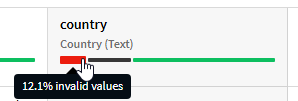
- For more details about each color, click it. The right panel opens and you can see the semantic type and the percentage for the validation rules.
The invalid values are marked with a red bar on the left.
For more details about the error, click the red bar. The error may come from a validation rule, the semantic type, or both.
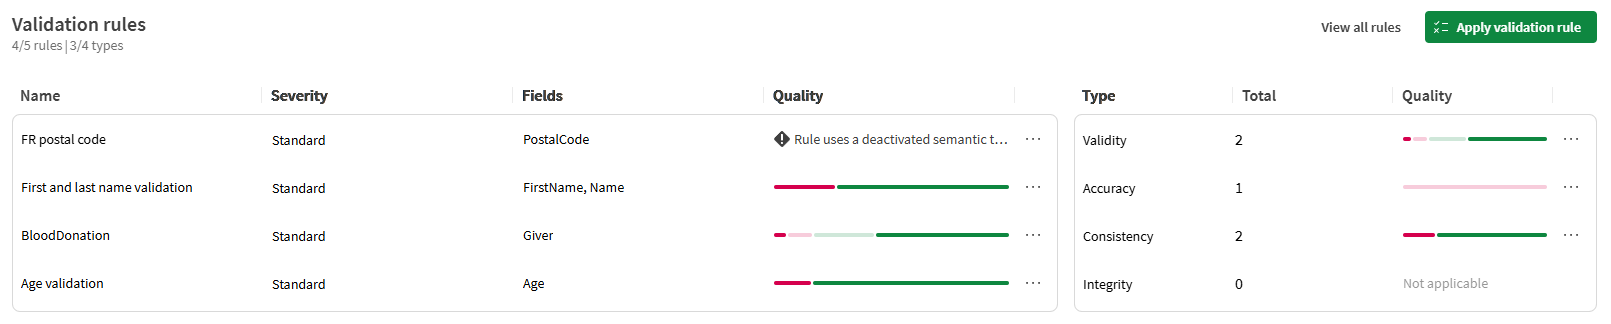
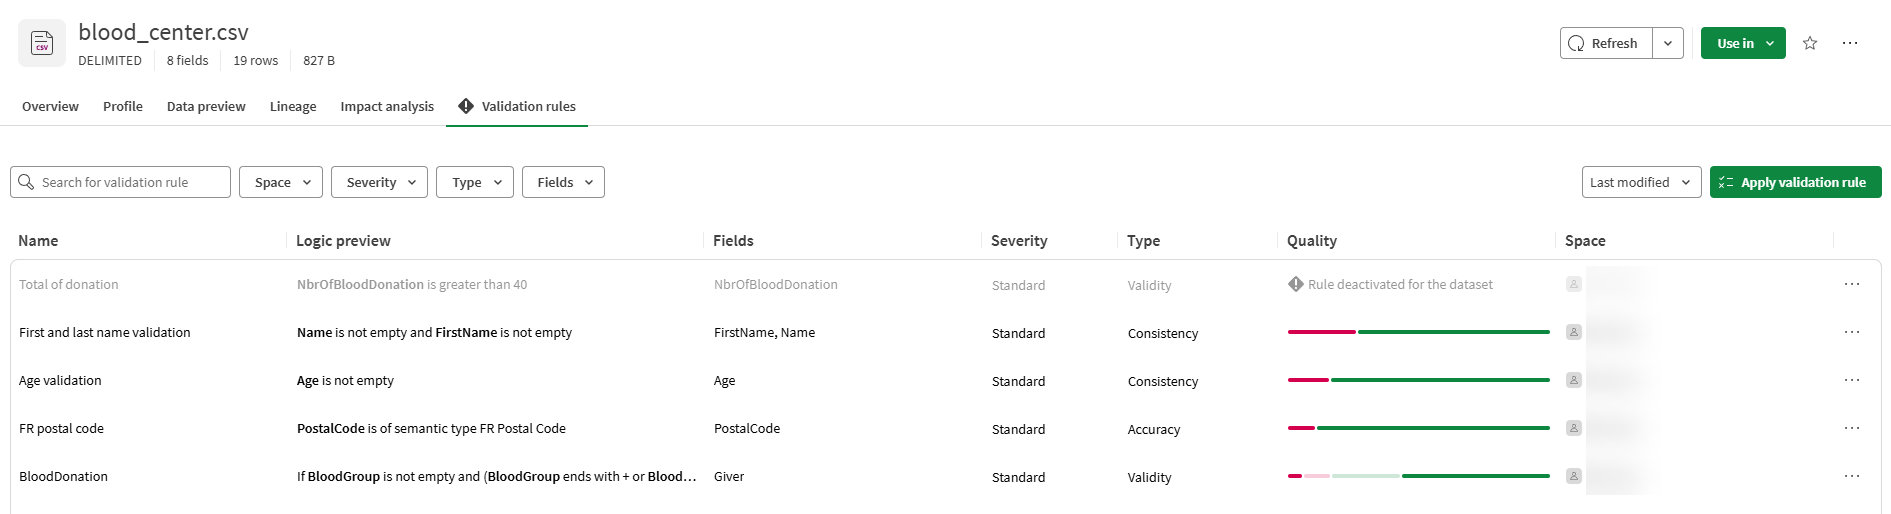
Overview of the validation rules
Once you have created and applied rules to a dataset, you can get an overview of the quality:
The rules might be different from one user to another as they depend on the space access.
Editing a validation rule from a dataset
This procedure lets you only edit a validation rule from a dataset and change the fields to which the rule apply.
To edit the definition of the rule, see Editing a validation rule.
- Open a dataset.
- Select the Data Preview tab.
- Click the field to which the rule applies.
- In the right panel, click from the Validation rules section.
- Edit the rule as needed.
- To apply your changes and refresh the data quality automatically, select the Refresh quality check box.
- Click Apply.
- If you did not select Refresh quality, click Refresh above the right panel to apply your changes and refresh the data quality.
Removing a validation rule from a dataset
This procedure lets you remove a rule from a dataset without deleting the rule from the space.
To delete the rule from the space, see Deleting a validation rule.
- Open the dataset.
- Select the Data Preview tab.
- Click the field from which you want to remove the rule.
- In the right panel, click
 > Remove.
 - Confirm the removal.
- Click Refresh above the right panel to apply your changes and refresh the data quality.
Activating/Deactivating a validation rule
Instead of deleting or removing a validation rule from a dataset, you can deactivate it from two menus:
- From the Validation rules tab:
- Hover over the rule.
- On the right, click > Deactivate.
This deactivates the rule in all datasets to which the rule applies.
- Refresh the data quality in the impacted datasets.
- From the dataset:
- Click the field to which the rule you want to deactivate applies.
- In the right panel, click > Deactivate.
- Click Refresh above the right panel to apply your changes and refresh the data quality.
The rule is grayed out and the icon
 is no longer displayed in the column header. You can activate it back at any time. If Activate is grayed out, it means that the rule is deactivated for all datasets.
The rule is only deactivated for this dataset and you can still apply it to other datasets.
To activate a rule, follow the same procedure but click Activate.
Editing a validation rule
This procedure lets you edit a validation rule and will impact all the datasets to which the rule applies.
To only edit the fields to which a rule applies, see Editing a validation rule from a dataset.
You can only edit the rules that are in a space to which you have access.
- Open Data quality and select the Validation rules tab.
- From the list, click the rule or > Edit.
- Edit the rule as needed.
Information noteWhen you change the category or the severity, it changes the impact of the rule on the dataset quality. For more information, see Categories and levels of severity.
- Click Save.
- When the rule applies to datasets, open each dataset and refresh the quality.
Deleting a validation rule
This procedure will impact all the datasets to which the rule applies.
To only remove a rule from a dataset, see Removing a validation rule from a dataset.
You can only delete the rules that are in a space to which you have access.
- Open Data quality and select the Validation rules tab.
- From the list, click > Delete.
- Confirm the deletion.
- When the rule applies to datasets, open each dataset and refresh the quality.
Categories and levels of severity
The category and the severity let you adjust the impact of a rule on the dataset quality and the Qlik Trust Score™. Some levels of severity have more impact than the others.
Categories
No category has more weight than another and all the categories impact the dataset quality and the Validity dimension of the Qlik Trust Score™.
When a rule is in the Accuracy category, it also impacts the Accuracy dimension.
For more information, see Assessing data quality and Qlik Trust Score™.
Severity
A rule with a lower weight will impact less the dataset quality and the Qlik Trust Score™ than a rule with a higher weight: Critical > Major > Standard > Minor.
Example: A dataset with 55 invalid records against a rule with the severity set to Severity: Minor will less decrease the scores compared to the same rule set to Severity: Major.
The operators
When you define the rule, you can select different operators to validate your data.
| Category | Operator | Description | Type | Example |
|---|---|---|---|---|
| Generic | is empty | Different from Text/is blank | All types | A null value and the value "" are considered empty, and therefore valid. |
| Generic | is not empty | Different from Text/is not blank | All types | A null value and the value "" are considered empty, and therefore invalid. |
| Text | is blank | Different from Generic/is empty | Text | A null value, the value "", and the value " " are considered blank, and therefore valid. |
| Text | is not blank | Different from Generic/is not empty | Text | A null value, the value "", and the value " " are considered blank, and therefore invalid. |
| Text | = | Equal to | Text | OrderID = ORD#10 |
| Text | != | Different from | Text | OrderID != ORD#10 |
| Text | Contains | N/A | Text | OrderID Contains ORD#10 |
| Text | Does not contain | N/A | Text | OrderID Does not contain ORD#10 |
| Text | Starts with | N/A | Text | OrderID Starts with ORD# |
| Text | Does not start with | N/A | Text | OrderID Does not start with ORD# |
| Text | Ends with | N/A | Text | OrderID Ends with _XX |
| Text | Does not end with | N/A | Text | OrderID Does not end with _XX |
| Text | Matches regex |
For more information, see the RE2/J documentation. |
Text | PostalCode Matches regex ^[0-9]{5}(-[0-9]{4})?$ |
| Text | Does not match regex |
For more information, see the RE2/J documentation. |
Text | PostalCode Does not match regex ^[0-9]{5}(-[0-9]{4})?$ |
| Text | Is one of |
Select this operator when you need to use a restricted list of values, instead of a semantic type. You can add up to 150 values, and each one can contain up to 200 characters. When you need more than 150 values, use a semantic type. |
Text | Country Is one of USA France Canada China |
| Text | Is not one of |
Select this operator when you need to use a restricted list of values, instead of a semantic type. You can add up to 150 values, and each one can contain up to 200 characters. When you need more than 150 values, use a semantic type. |
Text | Country Is not one of USA France Canada China |
| Number | = | Equal to | Number | Age = 21 |
| Number | != | Different from | Number | Age != 0 |
| Number | < | Less than | Number | Age < 21 |
| Number | <= | Less than or equal to | Number | Age <= 20 |
| Number | > | Greater than | Number | Age > 20 |
| Number | >= | Greater than or equal to | Number | Age >= 21 |
| Boolean | is true | N/A | Boolean | User deleted is true |
| Boolean | is false | N/A | Boolean | User activated is false |
| Boolean | = | Relationship between two boolean fields | Boolean | User deleted = Account deactivated |
| Boolean | != | Relationship between two boolean fields | Boolean | User activated != User deleted |
| Type | is of semantic type | The value is defined in the selected semantic type. | All types | Country is of semantic type Country Code ISO3 |
| Type | is not of semantic type | The value is not defined in the selected semantic type. | All types | Phone is not of semantic type US Phone |
| Date | Is in the last |
Enter a positive integer and select the unit. |
All types | Shipment Is in the last 4 Hours |
| Date | Is not in the last |
Enter a positive integer and select the unit. |
All types | Shipment Is not in the last 110 Minutes |
| Date | Is in the next |
Enter a positive integer and select the unit. |
All types | Shipment Is in the next 90 Seconds |
| Date | Is not in the next |
Enter a positive integer and select the unit. |
All types | Shipment Is not in the next 28 Days |
| Date | Is before |
Open the calendar and select the date and time. You must select a date/time using the UTC+00 time zone. |
All types | Birthdate Is before 1/1/2008 12:00 AM |
| Date | Is before or equal to |
Open the calendar and select the date and time. You must select a date/time using the UTC+00 time zone. |
All types | Birthdate Is before or equal to 1/1/2008 12:00 AM |
| Date | Is after |
Open the calendar and select the date and time. You must select a date/time using the UTC+00 time zone. |
All types | Birthdate Is after 1/1/2008 12:00 AM |
| Date | Is after or equal to |
Open the calendar and select the date and time. You must select a date/time using the UTC+00 time zone. |
All types | Birthdate Is after or equal to 1/1/2008 12:00 AM |
| Date | Is equal to |
Open the calendar and select the date and time. You must select a date/time using the UTC+00 time zone. |
All types | Birthdate Is equal to 1/1/2008 12:00 AM |
| Date | Is not equal to |
Open the calendar and select the date and time. You must select a date/time using the UTC+00 time zone. |
All types | Birthdate Is not equal to 1/1/2008 12:00 AM |
| Date | Is in the past |
N/A |
All types | Shipment Is in the past |
| Date | Is in the future |
N/A |
All types | Shipment Is in the future |