Installing Qlik Alerting in a multi-node environment
Qlik Alerting for Windows supports running as a multi-node environment from the September 2020 release. A multi-node setup is not applicable for every customer as it requires a little more knowledge on the part of the organization to setup and maintain. The key benefits are:
- Resilience - if one Qlik Alerting server node is offline the others in the cluster will take over the tasks and user interactions. Therefore there should be no loss of service due to downtime of a single machine.
- Scalability & Performance - If you have a very large number of users with very large volumes of alerts being processed you may wish to separate the load across multiple servers to ensure there is no loss of performance for the users and for the alert delivery.
What will you need to setup a multi-node architecture
- Access details for a resilient MongoDB instance (replica set, cluster, Atlas/cloud)
- Multiple Windows Servers to install the Qlik Alerting nodes
- An external load balancer to manage the user access to the different, accessible Qlik Alerting nodes
Multi-node architecture
Setting up Qlik Alerting for Windows in a multi-node environment is straightforward. The main complexity lies in configuring and maintaining a resilient MongoDB instance and an external load balancer to ensure front-end access for users.
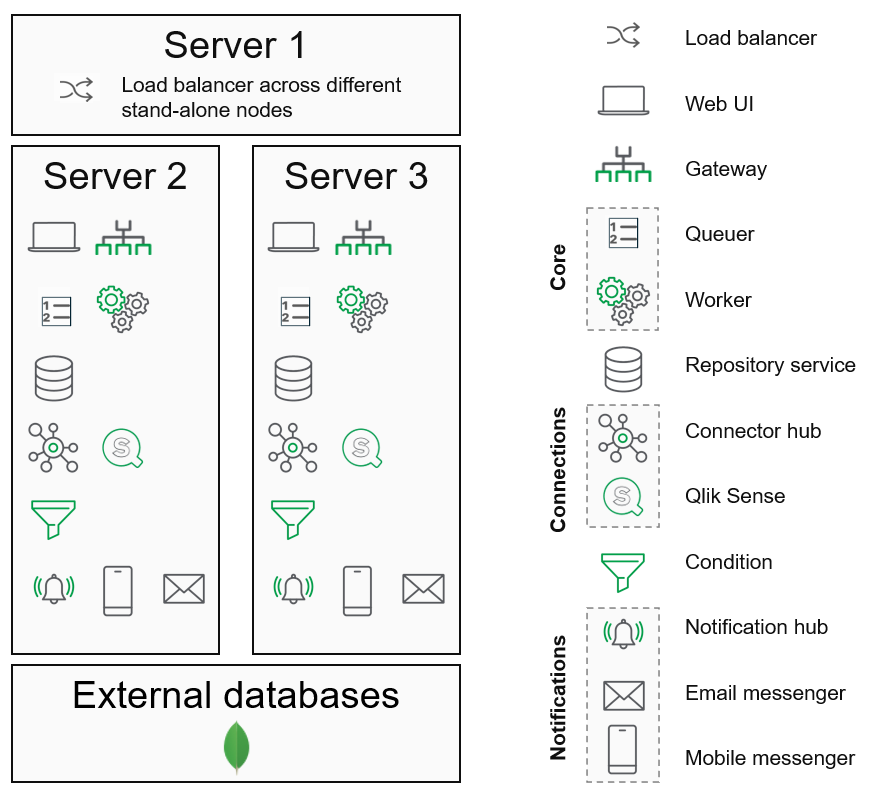
Architecture diagram

Components
- Server 1: Load balancer
The load balancer manages traffic and can be NGinx or any other load balancer your team is familiar with. The example below covers an NGinx deployment. -
Server 2, 3, ...: Qlik Alerting full stack installations
Install the Qlik Alerting stack on these servers using the provided installer.
Information noteYou do not need to install MongoDB on these servers but you will need to install NodeJS and then the Qlik Alerting installer. -
External databases
Set up and configure a resilient MongoDB instance externally.
Role of the load balancer
The load balancer directs access to the web UI, extensions, and API calls to the most available server. It acts as the single entry point to the cluster and would typically be configured to be resilient on its own.
Backend task allocation
Backend tasks, such as scans and notifications, are added to a queue in MongoDB. Each node processes tasks from the queue as needed. Once a task is picked by a node, it is removed from the queue to prevent duplication.
Setup a multi-node Qlik Alerting for Windows site
- Ensure you have your MongoDB connection details.
For MongoDB to be considered resilient you would need to setup and/or connect to a replica set, shared cluster or MongoDB Atlas (cloud SaaS).
- On the first Windows server you will install Qlik Alerting and run through the setup (assuming you have not transferred the MongoDB database from an existing install).
Install the latest NodeJS version. https://nodejs.org/en/download/ as per the installation pre-requisites. You do not need to install MongoDB
- Install Qlik Alerting for Windows as per the single node installation instructions but do not continue with the configuration steps. It will complete the install even though the databases are not locally installed so let it run through to the end of the process.
Update the MongoDB connection details
- on the server navigate to the C:\Program Files/qlik alerting/config/ folder
- open the default.json file with a text editor
- add the MongoDB connection details for your resilient server setup, if you are using a replica set, cluster or Atlas connection then you will likely use the connectionString option as you will be connecting to multiple nodes through the string.
For details on how to add these details see Install MongoDB
- save this file and restart the Qlik Alerting Repository and Qlik Alerting Queuer services
- Repeat step 2 for each additional node you wish to add to the cluster. You can add additional nodes at any time after the original setup by following these steps.
-
To setup the site you will need to run through the registration process from any one of the nodes you have setup. Follow the Qlik Sense connection configuration guide to configure the Qlik Sense data connection, the Qlik Alerting configuration, the email server and the administration users.
Information noteThe address you enter in the Qlik Alerting configuration should be the load balancer address as this is used to create the connection strings that are sent in the notifications.
For more information and a walk-through example, see Multi Node Install Example for Qlik Alerting for Windows using Nginx as a Load Balancer.
