Resolving conflicts in compare editors
About this task
-
Job Compare editor, if the conflicted project item is a Job, a Joblet, a Route, a Routelet, or a test case.
-
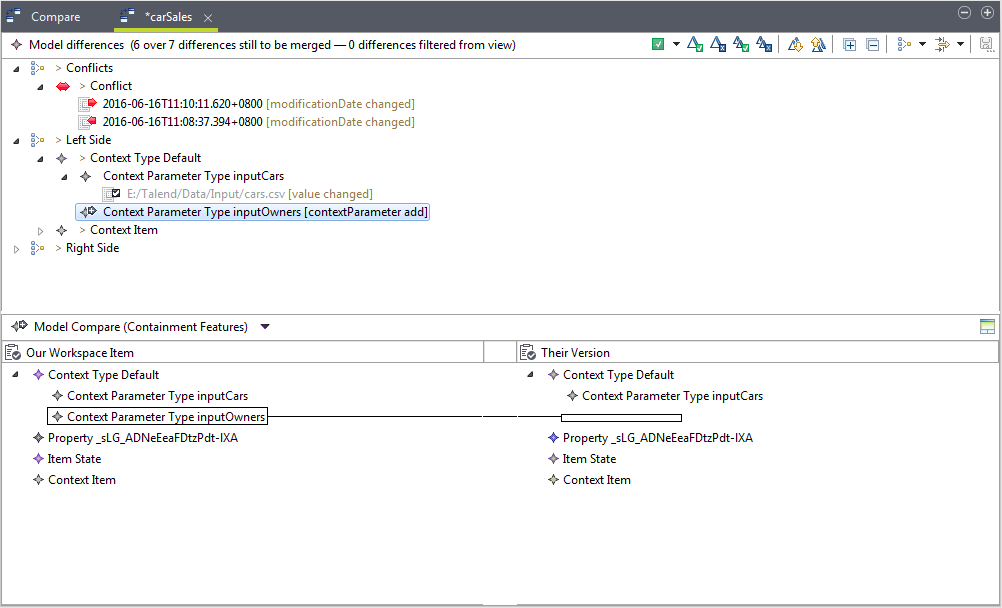
EMF Compare (Eclipse Modeling Framework) editor, if the conflicted item is a context group, a database connection, an item in project settings, or an analysis if your Talend Studio supports Data Profiling.
-
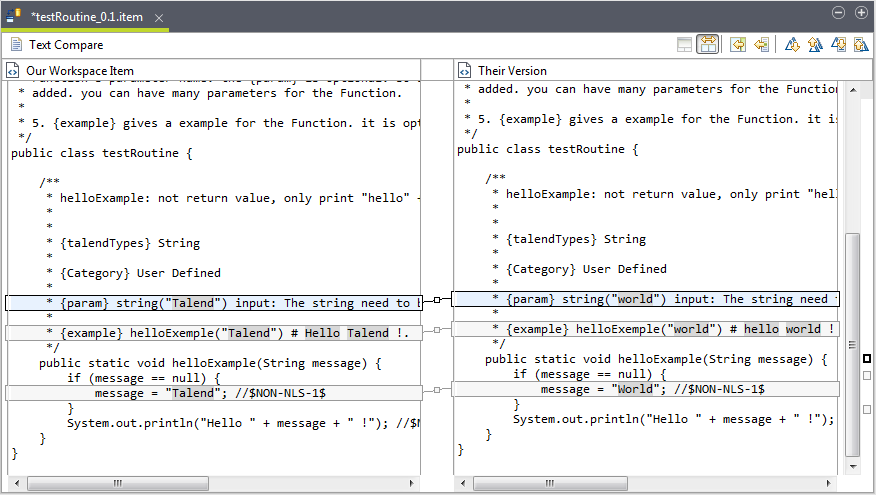
Text Compare editor, if the conflicted item is a general text file, a routine, a bean, a Job script, or a SQL script.
To open a compare editor, right-click a conflicted project item in the Conflicts Navigator tree view and select Resolve in editor from the contextual menu.
After fixing conflicts in an editor, mark the conflicts as resolved and close the editor to continue your previous branch operation.
Job Compare editor
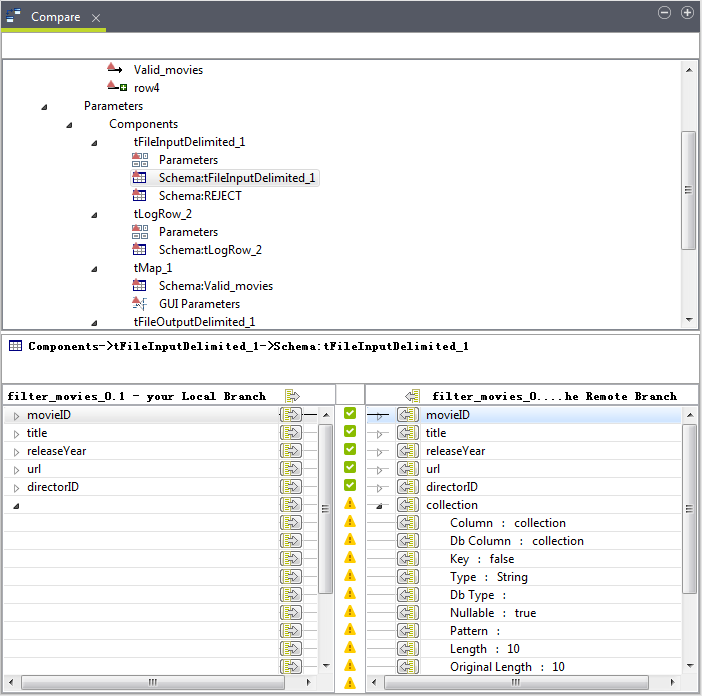
The upper part of the Job Compare editor displays a tree view that shows all the design and parameter items of the Job on which conflicts have occurred. A dark red conflict indicator is seen on the icon of each conflicted item.
In this tree view, you can expand each node and select the conflicted items to explore the details of the conflicts.
The lower part displays a comparison view that shows the details of the different versions of the selected item. In this comparison view:
- When a design item, such as a component or a connection, is selected in the upper tree view, the item is highlighted graphically.
- When a parameter item, such as the schema of a component, is selected in the upper tree view, a yellow warning sign indicates each conflicted parameter, such as a schema column, of that item.

In the Job Compare editor, you can resolve conflicts on the entire Job, all the design items, or all the parameter items in one go, or resolve conflicts on individual items, parameters, or parameter properties separately.
When fixing conflicts on the entire Job:
- To accept the version of the working branch, either right-click Job Designs
Unit in the upper tree view and select Accept
mine from the contextual menu, or select Job Designs
Unit in the upper tree view and click
in the comparison view.
- To accept the version of the other branch, either right-click Job Designs
Unit in the upper tree view and select Accept
theirs from the contextual menu, or select Job Designs
Unit in the upper tree view and click
in the comparison view.
When fixing conflicts on all the items under a node:
- To accept the version of the working branch, either right-click the node in the upper
tree view and select Accept mine from the contextual menu, or
select the node in the upper tree view and click
in the comparison view.
- To accept the version of the other branch, either right-click the node in the upper
tree view and select Accept theirs from the contextual menu,
or select the node in the upper tree view and click
in the comparison view.
When fixing conflicts on an item:
- To accept the version of the working branch, either right-click the conflicted item in
the upper tree view and select Accept mine from the
contextual menu, or select the item in the upper tree view and then click
in the comparison view.
- To accept the version of the other branch, either right-click the conflicted item in
the upper tree view and select Accept theirs from the
contextual menu, or select the item in the upper tree view and then click
in the comparison view.
When you try to accept the version of a connection from the other branch:
- If both the input and output components across the connection differ between the
working branch and the other branch, you will be prompted to accept the whole
Job design from the other branch.
This, however, is not mandatory - you can try to accept the components and the connection parameters individually first.
- If the input or output component of the connection cannot be redirected to the new
input or output component on the working branch, you will be prompted to accept
the whole Job design from the other branch.
This, however, is not mandatory - you can try to accept the component and the connection parameters individually first.
-
If the input or output component of the connection does not exist on the working branch, you will be prompted to accept the component first.
When fixing conflicts on a parameter or parameter property:
- To accept the version of the working branch, click
for that parameter or parameter property in the comparison view.
- To accept the version of the other branch, click
for that parameter or parameter property in the comparison view.
You can edit parameters and parameter properties manually for the working branch in the comparison view. To do so:
Procedure
Results
With the conflicts on an item fixed, the conflict indicator on the icon of the conflicted item in the upper view and the conflict signs in the comparison view become green.
After fixing conflicts in a conflicted editor, be sure to save your changes.
Note that if a centralized Repository item - a context group or a file or database connection defined in the Repository for example - is called in a Job, fixing conflicts for the Job in the Job Compare editor does not automatically update the corresponding Repository item. When you open the Job in the Integration perspective, you will be asked whether to update your Job.
EMF Compare editor
About this task
The upper part of the EMF Compare editor gives an overview of the differences detected between the two branches. The lower part is a comparison view that shows the different versions of the selected item between both branches.

- Click
 or
or  to navigate through the detected differences. The details about the selected
item are shown in the comparison view.
 - Click
 to accept the single, currently selected change, or
  to reject the single, currently selected change.
 - Click
 to accept all non conflicting changes at once, or
  to reject all non conflicting changes at once.
 - For a text feature, click the
 button on the top of the comparison view to copy all the shown changes, or
the
  button to copy the selected change, from right to left.
Accepted changes are presented by a  icon, and rejected changes are presented by a
  icon.
icon.
Note that if a centralized Repository item - a context group or a file or database connection defined in the Repository for example - is called in a Job, fixing conflicts for the Repository item in the EMF Compare editor does not automatically update the corresponding Job. When you open the Job in the Integration perspective, you will be asked whether to update your Job.
Text Compare editor
About this task
The Text Compare editor is a two-pane comparison view that displays the different versions of a text-based project item between both branches.

- Click
 to show the ancestry pane, which shows the ancestry version of the
compared versions if detected. This button is operable only for three-way
comparison.
 - Click
 to toggle between two-way (ignoring the ancestor version) and three-way
comparison.
 - Click the
 button to copy all the shown changes, or the
  button to copy the selected change, from right to left.
 - Click
 or
or  to navigate through the differences.
 - Click
 or
or  to navigate through the changes.
 - You can also edit text directly in the left pane to make changes to the version of the current branch.
Note that if a centralized Repository item - a routine, a bean, a Job script, or a SQL script defined in the Repository for example - is called in a Job, fixing conflicts for the Repository item in the Text Compare editor does not automatically update the corresponding Job. When you open the Job in the Integration perspective, you will be asked whether to update your Job.
