Skip to main content Skip to complementary content

Setting up the connection to your Big Data platform

Setting up the connection to a given Big Data platform in the Repository allows you to avoid configuring that connection each time when you need to use the same platform.

The Big Data platform to be used in this example is a Databricks V5.4 cluster, along with Azure Data Lake Storage Gen2.

Before you begin

  • Ensure that your Spark cluster in Databricks has been properly created.

    For further information, see Create Databricks workspace from Azure documentation.

  • You have an Azure account.
  • The storage account for Azure Data Lake Storage Gen2 has been properly created and you have the appropriate read and write permissions to it. For further information about how to create this kind of storage account, see Create a storage account with Azure Data Lake Storage Gen2 enabled from Azure documentation.
  • The Integration perspective is active.

About this task

You need firstly configure your Databricks cluster on the cluster side and then set up the connection metadata in the Studio.

Procedure

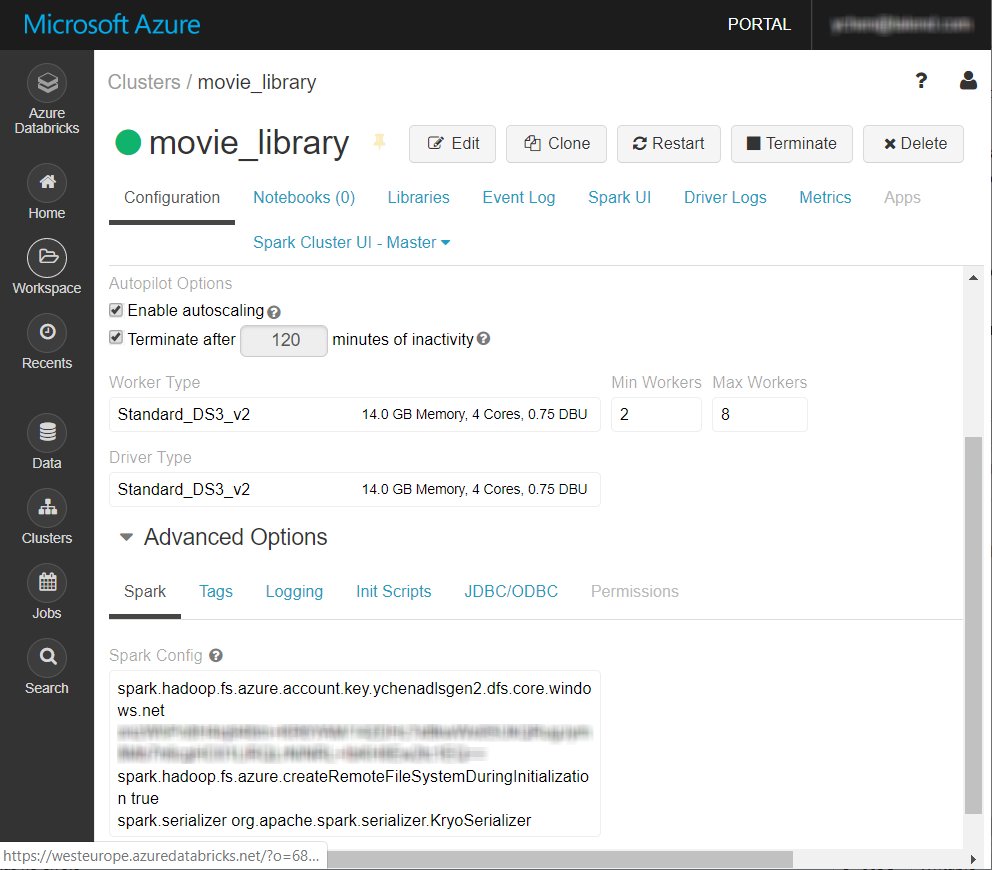
  1. On the Configuration tab of your Databricks cluster page, scroll down to the Spark tab at the bottom of the page.

    Example

  2. Click Edit to make the fields on this page editable.
  3. In this Spark tab, enter the Spark properties regarding the credentials to be used to access your Azure Storage system, each per line:
    • The parameter to provide account key:

      spark.hadoop.fs.azure.account.key.<storage_account>.dfs.core.windows.net <key>

      This key is associated with the storage account to be used. You can find it in the Access keys blade of this storage account. Two keys are available for each account and by default, either of them can be used for this access.

      Ensure that the account to be used has the appropriate read/write rights and permissions.

    • If the ADLS file system to be used does not exist yet, add the following parameter:

      spark.hadoop.fs.azure.createRemoteFileSystemDuringInitialization true
    • If you need to run Spark Streaming Jobs with Databricks, in the same Spark tab, add the following property to define a default Spark serializer. If you do not plan to run Spark Streaming Jobs, you can ignore this step.
      spark.serializer org.apache.spark.serializer.KryoSerializer
  4. Restart your Spark cluster.
  5. In the Spark UI tab of your Databricks cluster page, click Environment to display the list of properties and verify that each of the properties you added in the previous steps is present on that list.
  6. In the Repository tree view of your studio, expand Metadata and then right-click Hadoop cluster.
  7. Select Create Hadoop cluster from the contextual menu to open the Hadoop cluster connection wizard.
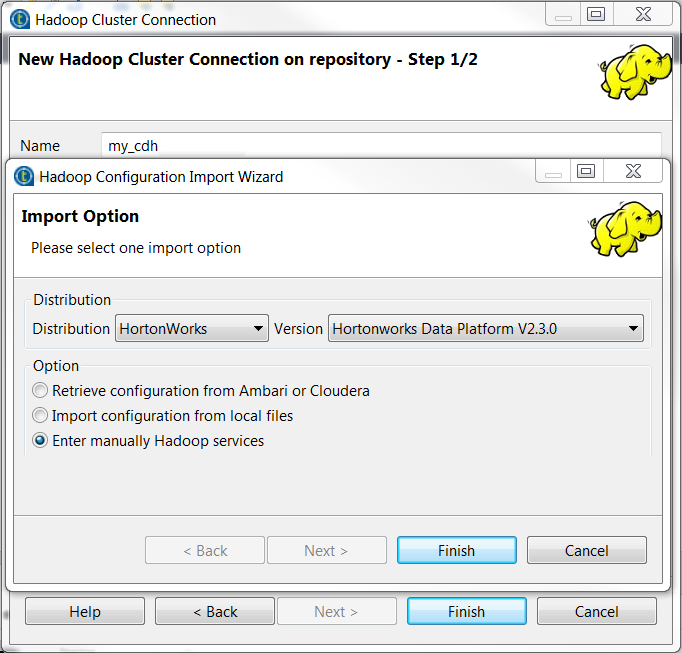
  8. Fill in generic information about this connection, such as its Name and Description and click Next to open the Hadoop configuration import wizard that helps you import the ready-for-use configuration if any.
  9. Select the Enter manually Hadoop services check box to manually enter the configuration information for the Databricks connection being created.
  10. Click Finish to close this import wizard.
  11. From the Distribution list, select Databricks and then from the Version list, select 5.4 (includes Apache Spark 2.4.3, Scala 2.11).
  12. In the Endpoint field, enter the URL address of your Azure Databricks workspace. This URL can be found in the Overview blade of your Databricks workspace page on your Azure portal. For example, this URL could look like https://adb-$workspaceId.$random.azuredatabricks.net.
  13. In the Cluster ID field, enter the ID of the Databricks cluster to be used. This ID is the value of the spark.databricks.clusterUsageTags.clusterId property of your Spark cluster. You can find this property on the properties list in the Environment tab in the Spark UI view of your cluster.
    You can also easily find this ID from the URL of your Databricks cluster. It is present immediately after cluster/ in this URL.
  14. Click the [...] button next to the Token field to enter the authentication token generated for your Databricks user account. You can generate or find this token on the User settings page of your Databricks workspace. For further information, see Personal access tokens from the Azure documentation.
  15. In the DBFS dependencies folder field, enter the directory that is used to store your Job related dependencies on Databricks Filesystem at runtime, putting a slash (/) at the end of this directory. For example, enter /jars/ to store the dependencies in a folder named jars. This folder is created on the fly if it does not exist then.
  16. Click Finish to validate your changes and close the wizard.

Results

The new connection, called movie_library in this example, is displayed under the Hadoop cluster folder in the Repository tree view.

Did this page help you?

If you find any issues with this page or its content – a typo, a missing step, or a technical error – please let us know!