
JSON Web Token (JWT) is an open standard for securely transmitting information between two parties as a JavaScript Object Notation (JSON) object. JWT is primarily used for authentication and authorization. JWT enables single sign-on (SSO), which minimizes the number of times a user needs to log in to cloud applications and websites.
JWT structure
A JWT consists of three parts, each separated by a period(.):
-
Header: Contains metadata about the token, such as the signing algorithm used.
-
Payload: Contains the claims or data.
-
Signature: A cryptographic signature to ensure the token hasn't been tampered with.
The format of a JWT looks like this:
header.payload.signatureFor example:
eyJhbGciOiJSUzI1NiIsInR5cCI6IkpXVCJ9.eyJ1c2VyX2lkIjoiam9obiIsImVtYWlsIjoiam9obi5kb2VAZXhhbXBsZS5jb20iLCJyb2xlcyI6WyJ1c2VyIiwiYWRtaW4iXX0.8G1cGV2RnxL08XLMOprldCVjGeuPbLfBlax2ySHwdfJ5cRzT3T3ZOk9mCmzyIW0ewEvjYskpz3g-sSZOz3fg0BBEl5pgyKZZc20t5u2jyb0Gr_yNkwEZcn3Tf4lwFYTIyRG9j4Q9F9YlhkttFyPT_hHLOg0xpkEkwq-IWmjggZkWwnUt9XaYg4K9d9Mb3vQ4oVOozdrI-L8Xw5OwdPrhL-jlbttg50bNofIZG7zOuwWNVq3vHbZ1Xr04QIBJSRVlTzDELRoUDGdHMGqdjw9z3c21W3Tnsjxg1rrdFc0wsf56vHR6Q4RQFPy4hM7cBd4HDlIYhVZPYwhLBdyZn8ceWmF99jSQbODyUbA6rjhwJ9zvZd4nk0aJZxQd0oNwFyKMmrlb7WGzKdtKz2Y88SCf79gdXyznVdq7IYtFwYwJ9cnF2Qd5tmYw
JWT header
The header defines the type of token and the signing algorithm. Typically, it includes the following fields:
-
typ: Specifies that the token is a JWT.
-
alg: The signing algorithm (for example, RS256).
Example header:
{
  "typ" header: "JWT",
  "alg": "RS256"
}
Supported signing algorithms
The following signing algorithms are supported:
-
RS256 - RSA signature with SHA256
-
RS384 - RSA signature with SHA384
-
RS512 - RSA signature with SHA512
These algorithms are used to sign and verify the JWT’s signature, ensuring that the token has not been tampered with.
JWT payload
The payload is a JSON object that contains claims about the user and any associated metadata. Claims might include:
-
User information (for example, user ID, name, email)
-
User roles and permissions
-
Expiration information
Example payload:
{
  "userid": "jde",
  "userdirectory": "qsefw",
  "name": "John Doe",
  "email": "jde@example.com",
  "groups": ["Administrators", "Sales", "Marketing"],
  "exp": 1635355629
}
Standard fields in JWT claims
The following fields can be used inside a JWT claim:
- Issuer (iss): Identifies the issuer of the token.
- Subject (sub): Identifies the subject of the token.
- Audience (aud): Identifies the recipients of the token.
- Expiration time (exp): Defines when the token expires.
- Not before (nbf): Defines when the token is valid from.
- Issued at (iat): Defines when the token was issued.
- JWT ID (jti): A unique identifier for the token.
JWT signature
The signature ensures the integrity of the token and verifies the sender's identity. It is created by encoding the header and payload, then signing them with a private key.
To authenticate with JWT, the signature is verified. If the signature is valid, access is granted to Qlik Sense.
X.509 certificates are typically used to generate and validate the signature. In a virtual proxy setup in the QMC, the certificate (including the public key) is configured to validate the signatures.
Creating a public/private key pair for signing JWTs
To generate a public/private key pair for signing JWTs, you can use OpenSSL. Run the following commands:
openssl genrsa -out privatekey.pem 4096
openssl req -new -x509 -key privatekey.pem -out publickey.cer -days 1825-
The private key is used to sign JWTs. Store it securely.
-
The public key is used for verification.
Configuring JWT authentication (virtual proxy setup)
To configure JWT authentication for a virtual proxy in Qlik Sense Enterprise on Windows, follow these steps:
-
Log in to the Qlik Management Console (QMC):
-
Open a browser and go to https://<server_hostname>/qmc.
-
-
Create a new virtual proxy:
-
Navigate to Configure system > Virtual proxies.
-
Click Create new.
-
-
Configure identification settings:
-
In the right-hand menu, select Identification.
Virtual proxy identification settings.

-
Enter a unique description, prefix, and session cookie header name.
-
Example: Enter "jwt" for the Description and Prefix, and append this to the session cookie header name.
-
Ensure that all three values are unique within the Qlik Sense instance, as virtual proxies cannot share prefixes or session cookies.
-
-
-
Configure authentication settings:
-
In the right-hand menu, select Authentication.
Virtual proxy authentication settings.

-
Set the following values:
-
Anonymous access mode: No anonymous user
-
Authentication method: JWT
-
-
Additional settings:
-
JWT certificate: Copy and paste the entire content of the public key file.
-
JWT attribute for UserID: The key used to retrieve the user ID.
-
JWT attribute for UserDirectory: The key used to retrieve the user directory.
-
Intended audience: Must match the audience (aud) in the JWT.
-
Information noteIt’s possible to map attributes from a JWT to Qlik Sense attributes. For more information, see Creating a virtual proxy.
-
-
Configure load balancing:
-
In the right-hand menu, select Load Balancing.
Virtual proxy load balancing settings.

-
Select a load balancing node (for example, the Central node).
-
-
Configure advanced settings:
-
Click Advanced.
Virtual proxy advanced settings.

-
Clear Has secure attribute and set SameSite attribute to No Attribute.
Information noteThis step is only for testing. Ensure that the configuration is secure in production environments. For more information on the secure and SameSite attributes, see Editing a virtual proxy.
-
-
Update the host allow list:
-
In the Advanced section, locate the Host allow list.
Virtual proxy host allow list settings.

-
If you are accessing the Qlik Sense server via a domain or IP address (instead of its machine name), add it to the allow list.
-
Example: If connecting via an IP address, add that IP to the allow list.
-
-
-
Apply changes and link the proxy:
-
Click Apply.
-
In the right-hand menu, select Proxies.
Virtual proxy associated proxies settings.

-
Click Link to associate the virtual proxy with an existing proxy (for example, the Central proxy).
-
Generating and using JWTs
To generate a JWT, create a token.js script. This script uses the jsonwebtoken library and a private key to generate the token. Once generated, copy the JWT and include it as a Bearer token in your API requests.
Structure of the token.js File
The token.js file defines:
-
A payload containing user details and claims.
-
Signing options such as algorithm, expiration, and audience.
-
A private key to sign the token securely.
Dependencies
You will need the jsonwebtoken and fs (File System) modules.
const jsonWebToken = require('jsonwebtoken');
const fs = require('fs');
-
jsonwebtoken is used to create the JWT.
-
fs is a built-in Node.js module used to read the private key (stored as a .pem file) for signing the JWT.
Reading the private key
You need to provide the path to your private key (a .pem file) to sign the JWT:
const jwtEncryptionKey = fs.readFileSync('<path to the private key pem file>');
-
Replace '<path to the private key pem file>' with the actual file path to the private key.
Defining signing options
Signing options define how the JWT will be signed. In most cases, you will use RS256 as the algorithm and define other parameters like expiration time and audience. Ensure these match your IdP configuration.
Example signing options:
const signingOptions = {
  algorithm: 'RS256',   // The algorithm used to sign the token
  expiresIn: '365d',    // Token expires in 365 days
  audience: 'example-audience',  // The audience
};
Creating the payload
The payload contains the claims or user data that will be encoded into the JWT. This can include user information like userid, email, and groups.
Example payload:
const payload = {
  userid: 'jde',               // Unique identifier for the user
  userdirectory: 'qsefw',        // Directory the user belongs to
  name: 'John.Doe',        // User's full name
  email: 'jde@example.com',    // User's email address
  groups: ['Administrators', 'Sales', 'Marketing'], // User's roles/groups
};
Signing the JWT
Use the jsonwebtoken library to create the JWT by signing the payload with the private key and the specified options:
const token = jsonWebToken.sign(payload, jwtEncryptionKey, signingOptions);
console.log(token);
-
jsonWebToken.sign() generates the signed JWT, which is printed to the console.
Example token.js code
const jsonWebToken = require('jsonwebtoken');
const fs = require('fs');

// This is the private key to encrypt the JWT. This example uses certificates
// generated by the Qlik Sense Enterprise on Windows server.
// Replace with the actual path to your private key
const jwtEncryptionKey = fs.readFileSync('/path/to/your/private-key.pem');

// Signing options (ensure these match your IdP configuration)
const signingOptions = {
  algorithm: 'RS256',
  expiresIn: '365d',
  audience: 'example-audience',
};

// Example payload with user information
const payload = {
  userid: 'jde',
  userdirectory: 'qsefw',
  name: 'John.Doe',
  email: 'jde@example.com',
  groups: ['Administrators', 'Sales', 'Marketing'],
};

// Create the token
const token = jsonWebToken.sign(payload, jwtEncryptionKey, signingOptions);

// Output the signed JWT to the console
console.log(token);
Generating the JWT
To generate the JWT, run the token.js script:
-
Open a terminal and navigate to the directory where token.js is located.
-
Run the script with:
node token.js
The signed JWT will appear in the console window and can be used as a bearer token for accessing Qlik Sense Enterprise on Windows.
Using the JWT as a bearer token
To use the generated JWT as a bearer token, copy the JWT output from the terminal and include it in the Authorization header of your HTTP request.
Example:
## Bearer token
eyJhbGciOiJSUzI1NiIsInR5cCI6IkpXVCJ9.eyJ1c2VyaWQiOiJoYXJyeSIsInVzZXJkaXJlY3RvcnkiOiJxc2VmdyIsIm5hbWUiOiJIYXJkY29yZSBIYXJyeSIsImVtYWlsIjoiaGFycnlAZXhhbXBsZS5jb20iLCJncm91cHMiOlsiQWRtaW5zdHJhdG9ycyIsIlNhbGVzIiwiTWFya2V0aW5nIl0sImlhdCI6MTYwMzgxOTYyOSwiZXhwIjoxNjM1MzU1NjI5LCJhdWQiOiIxMTJhZGFtcyJ9.gDWFqJ8fZbo9QpF52CnlhKCMsHal2AcobIVwhVCpnbLfpmc-Z_k4uUWGh2TxaSucjQ5-k5I9s9sNgIPskqaVQN2JanFXxIJKRFow9LbuSbImZs74RsQ6TqsoJTu7_5eKLv2VRAqoh6Tqabl5vma1JdhHbsTKGixt8yGZI7Q2QNjObQq8hAh6VveNWcUVkB60LEMOPiipij7VTKQ7IQg-rG4XA8xgYxbOb6i3Q6miY4kGSGujbsjtYLevEJQlEZtij2JMMDeH_nwH2MWhWhOBL1TpAAUKkCOxPFDjGacxGvkObAOFjL-Ztx0LdVwF2BXxVerQ1xKyl0YpLErS4d576Q
Example: Accessing Qlik Sense with a signed JWT
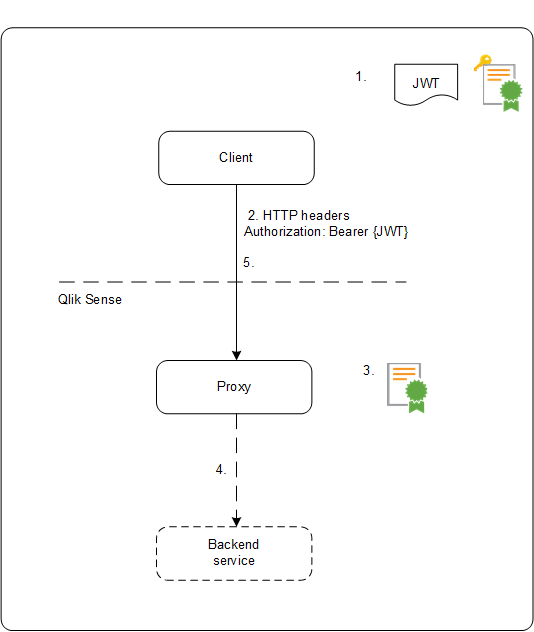
Once the JWT is configured and the proxy is set up, the client can use the signed JWT for authentication. The process works as follows:
-
A JWT is generated and signed with the private key.
-
The client sends a request to the proxy with the JWT in the HTTP Authorization header.
-
The proxy validates the JWT signature using the configured public key.
-
The proxy injects the Qlik Sense headers and forwards the request to the backend service.
-
The client receives a session and can make further requests without a JWT.
-
If the user in the JWT differs from the user associated with the current session, a new session is created for the user.
-
If an invalid JWT is sent, access is denied.
-
Limitations
-
Encrypted JWTs are not supported.
Information noteWhen using HTTPS, all traffic, including JWTs, is encrypted during transport.
-
Only the following signing algorithms are supported:
-
RS256 - RSA signature with SHA256
-
RS384 - RSA signature with SHA384
-
RS512 - RSA signature with SHA512
-