
Setting the login authentication method
By default, Enterprise Manager uses Single Sign-on through Windows Authentication to authenticate users. This allows users to open the Enterprise Manager Console without providing additional authentication. To require users to authenticate themselves at login, you can change the authentication method to Form or SAML. Setting the authentication method is done using the Enterprise Manager CLI, as described below.
To see the current authentication settings, run the command described in Showing the connectivity and login settings.
-
All commands in this section should be "Run as administrator" from the Enterprise Manager bin directory. The default location is C:\Program Files\Attunity\Enterprise Manager\bin.
- When the Enterprise Manager data folder is in a non-default location (such as in a cluster installation), make sure to include the --d data_folder parameter in all commands, where data_folder is the location of the data folder. The parameter should immediately follow the name of the Enterprise Manager executable file (e.g. aemctl --d f:\mydatafolder {command} {parameters})
- Changes to the authentication method will take affect only after you restart the Enterprise Manager service.
-
If Form authentication is used, all Login/Logout operations are reported to the Audit Trail.
Setting Single Sign-on authentication
This is the default authentication method, which uses Windows authentication.
To set the authentication method to single sign-on, run:
aemctl.exe configuration set --authentication_method sso
Abbreviated form of --sso: -w
Setting Single Sign-on authentication with Kerberos
Kerberos is an enterprise authentication protocol that uses the concept of tickets and three-way authentication to enable users and computers to identify themselves and secure access to resources.
Using Kerberos SSO, users can seamlessly log into Enterprise Manager and administrators can completely externalize and centrally manage users or group memberships using their existing Kerberos infrastructure.
To set the authentication method to single sign-on with Kerberos, run:
aemctl.exe configuration set --authentication_method sso-kerberos
If the Kerberos protocol fails, Enterprise Manager will try to log in using NTLM authentication. If NTLM authentication is not enabled in the system, an error will be returned.
Setting form authentication
As opposed to Single Sign-on through Windows Authentication, this method requires users to provide a user name and password at login.
To set the authentication method to Form, run:
aemctl.exe configuration set --authentication_method form
Abbreviated parameter: -f
Setting a user timeout
Parameter: --user_timeout
Abbreviated form: -u
When setting --form authentication, you can use this parameter to override the default user idle timeout period (5 minutes) or to disable user idle timeout entirely.
When a user idle timeout value is specified, Enterprise Manager will automatically log out users that have been inactive for the specified time period (or longer).
To set a user timeout when using Form authentication, run:
aemctl.exe configuration set --authentication_method form --user_timeout timeout
Where timeout is the length of time in minutes after which users will be logged out. The minimum permitted value is 1 minute.
For example, to set a user-idle timeout period of two minutes, run:
aemctl.exe configuration set --authentication_method form --user_timeout 2
To disable the user-idle timeout entirely, run:
aemctl.exe configuration set --authentication_method form --user_timeout -1
Specifying an Active Directory domain
Parameter: --domain
Abbreviated form: -m
When setting --form authentication, you can use this parameter to specify an Active Directory domain name that will be used when a user logs in with a user name only (i.e. without a domain name).
To set a user timeout when using Form authentication, run:
aemctl.exe configuration set --authentication_method form --domain DomainName
Where DomainName is the name of the domain.
For example, to set the domain to ad2_acme, run:
aemctl.exe configuration set --authentication_method form --domain ad2_acme
By default, when only a user name is provided in the login form, the domain of the server is used. If the server does not belong to any domain the server machine name will be used instead.
A user who logs in as "doe" will be assumed to identify as "ad2_acme\doe". If a user specifies a fully qualified domain name when logging in, this parameter is ignored.
Setting up SAML authentication
This method requires you to log in via your organization's SAML Identity Provider. The command parameters for setting SAML authentication are the same regardless of your SAML provider, although the parameter values are slightly different.
The setup procedure consists of the following steps:
- Step 1: Set up SAML on Enterprise Manager
- Step 2: Set Up an Enterprise Manager Superuser
- Step 3: Log in to Enterprise Manager and create SAML users
Before running the commands, you must have already configured Enterprise Manager as an application in your SAML Identity Provider.
When Enterprise Manager is not installed in a Cluster, the Enterprise Manager Assertion Consumer Service (ACS) URL is:
https://{host_name}/attunityenterprisemanager/rest/?action=login_saml
When Enterprise Manager is installed in a Cluster, make sure to fulfill the following prerequisites:
- Finish the cluster install on all nodes before configuring SAML.
- In order to propagate the configuration changes, make sure to include the -d data_folder parameter in the SAML configuration commands described below, where data_folder is the location of the cluster's shared data folder.
-
The Assertion Consumer Service (ACS) URL which the IDP should call when redirecting SAML calls should be the cluster wide DNS name (as opposed to a specific machine name).
This is how it should look:
https://{em-cluster-fqdn}/attunityenterprisemanager/?action=login_saml
For more information about setting up Enterprise Manager in a cluster, see Installing Qlik Enterprise Manager in a Windows cluster.
Step 1: Set up SAML on Enterprise Manager
To set the Enterprise Manager authentication method to SAML, run:
Syntax:
aemctl [--d data_folder] configuration set --authentication_method SAML --idp_url SsoUrl --idp_issuer issuer_name --idp_certificate_file CertificateFile [--idp_user_displayname_attribute displayname] [--idp_username_attribute username] [--idp_user_groups_attribute groups]
Example: Using Microsoft Azure as the SAML IdP
aemctl configuration set --authentication_method SAML --idp_url https://login.microsoftonline.com/12854727-3c42-4866-ab29-0c418b8310a1/saml2 --idp_issuer aemdevtest --idp_certificate_file AEMDevTest.pem
Where:
-
SsoUrl is the URL of the SAML IdP (Identity Provider) that handles sign-in requests.
When using Okta, this is the Okta Single Sign-On URL.
When using Microsoft Azure, this is the Azure AD SAML single sign-on URL.
Enterprise Manager will direct users to this URL to complete the SAML login operation.
-
issuer_name is a unique name that the identity provider uses for SAML 2.0.
When using Okta, this should be a URL.
When using Azure, this should be a string.
-
CertificateFile - The certificate is used by the IdP to sign the SAML assertions sent to Enterprise Manager. The certificate file can be anywhere on the Enterprise Manager machine, but only needs to be specified with a path when it does not reside in the Enterprise Manager bin directory.
When using Okta, the certificate must be in .cert format.
When using Microsoft Azure, the certificate must be in .pem format.
- data_folder - The location of the data folder when it is not the default location such as when Enterprise Manager is installed in a Windows cluster.
Optional Parameters:
The following parameters are optional and should only be used if required by your SAML IdP:
- --idp_user_displayname_attribute - The user display name attribute.
- --idp_username_attribute - By default, with SSO, the SAML Assertion’s “Subject” attribute is used to define the username. Using the subject is the right solution in most situations, but in extreme cases (such as the subject being a transient ID) it may be necessary to provide the username in some other form.
- --idp_user_groups_attribute - The user group attribute.
Once you have set up SAML, you need to restart the Qlik Enterprise Manager service for the settings to take effect.
Step 2: Set Up an Enterprise Manager Superuser
The first time you log in to Enterprise Manager using SAML, you must log in as an Enterprise Manager superuser. This is because none of the existing (or default) Enterprise Manager users are authorized SAML users.
The instructions below assume that you have already changed the default Master User key. For instruction on how to do this, see Configuring Enterprise Manager using the CLI and Configuring Enterprise Manager using the CLI respectively.
To set up a superuser, run the following command:
aemctl authorization setsuperuser -s username -e ExpirationTimeoutInMinutes -m MasterUserKey
Where:
- username is the superuser user name. The user must be an existing SAML user and can contain any Unicode character up to 255 characters.
- ExpirationTimeInMinutes is the expiration time for the specified user. The maximum is 60 minutes.
- MasterUserKey is your Master User Key.
Step 3: Log in to Enterprise Manager and create SAML users
After setting up SAML authentication, you will be presented with the following page when you try to open the Qlik Enterprise Manager console:
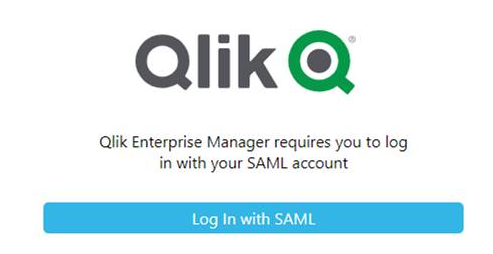
-
Click Log In with SAML.
You will be redirected to Okta or Microsoft Azure to provide your SAML login credentials.
-
Authenticate yourself with SAML.
After successful authentication, you will be redirected back to the Enterprise Manager Console.
-
Add authorized SAML users and groups, as described in Managing user permissions.
For information about other CLI options, see Configuring Enterprise Manager using the CLI.
Switching between SAML and SSO/Form authentication
If you wish to switch from SAML to SSO/Form authentication (or vice versa), you may need to clear the existing users from Enterprise Manager. When switching from SAML to SSO/Form authentication, you will not be able to change user permissions or add users unless you clear the existing SAML users. However, when switching from SSO/Form authentication to SAML, you do not need to clear the existing users in order to add/delete users or edit user permissions. You may still want to do this however if you find the presence of non-SAML users distracts you from managing the SAML users.
Before clearing the users, it is strongly recommended to export them as this will save time (by importing them) should you later need to revert the authentication type.
To export all users to a JSON file, run the following command:
aemctl repository export_acl -f [fullpath\]filename
where filename is the name of the file to which the users will be exported. By default, the file will be exported to the Enterprise Manager bin directory. If you wish the file to be exported to a custom path, include [fullpath\] in the command.
Example:
aemctl repository import_acl -f C:\temp\Enterprise ManagerUsers
To clear all users, run the following command:
aemctl repository clear_acl
To import users from the exported JSON file, run the following command:
aemctl repository import_acl -f [fullpath\]filename
where filename is the name of the file to import. Unless you specified a custom export path, the file will be located in the Enterprise Manager bin directory. If you wish the file to be imported from a custom path, include [fullpath\] in the command.
Example:
aemctl repository import_acl -f C:\temp\Enterprise ManagerUsers
Setting up Personal Access Token authentication for the API
Personal Access Token authentication is only supported with the Enterprise Manager API.
The high-level flow consists of the following steps:
- Step 1: In Okta, create an app integration that uses OpenID Connect
-
Step 2: In Enterprise Manager, enable Enterprise Manager to communicate with Okta
- Step 3: In Enterprise Manager, generate a Personal Access Token
- Step 4: Configure the Enterprise Manager API to log in using the Personal Access Token
Step 1: In Okta, create an app integration that uses OpenID Connect
Enterprise Manager uses OpenID Connect to log in with the API. Therefore, before you can use OpenID Connect with Enterprise Manager, you must create a web integration in Okta.
To create a web integration in Okta for use with Enterprise Manager:
- Log in to your Okta account.
- Navigate to Applications>Applications and click Create App Integration.
- In the Create a new app integration dialog, select OIDC - Open IDConnect.
- Select Web Application as the Application type and click Next.
- In the New Web Integration page, configure the following fields:
- App Integration Name: The name of your App integration. For example, QEM OpenID Connect.
- Select Refresh Token.
In the Sign-in redirect URIs field, enter the following:
https://EnterpriseManagerMachine/attunityenterprisemanager/rest/login_openid
Where EnterpriseManagerMachine is the host name or IP address of your Enterprise Manager machine.
- Clear the Enable immediate access with Federation Broker Mode option, and then click Save.
- Copy your Client ID and Client secret. You will need to provide these parameters in the next stage.
-
Assign the app integration to the users or groups that you want to allow to use the Personal Access Token.
For details, see Assign app integrations.
Step 2: In Enterprise Manager, enable Enterprise Manager to communicate with Okta
To enable Enterprise Manager to communicate with Okta, open a CMD prompt as admin and change the working directory to <Enterprise Manager-INSTALL-DIR>\bin.
Then run the following command:
Syntax
aemctl.exe configuration set --open_id_authority your-openid-connect-authority --open_id_client_id your-client-id --open_id_client_secret your-secret
Example using Okta
aemctl.exe configuration set --open_id_authority "https://dev-13465054.okta.com" --open_id_client_id "0oa8ohkl5ftweZNWTT5d7" --open_id_client_secret "FJxXqWOpJsROGrthsaVzfUIcNthG6JLA1-nAJH0"
Where:
- --open_id_authority is your Okta URL. For example, https://dev-13465054.okta.com
- --open_id_client_id is the client ID generated in Step 1: Create an app integration that uses OpenID Connect above.
- --open_id_id_client_secret is the client secret generated in Step 1: Create an app integration that uses OpenID Connect above.
Optional Parameters:
The following parameters are optional and should only be used if required by Okta:
- --open_id_additional_scopes - Additional scopes that are added to the scope list when an OpenId Connect login occurs. The default is "groups"
- --api_token_daily_maintenance_time - Determines when the API token maintenance background process runs each day. This should be formatted as HH:mm. The default is "00:30"
- --api_token_lifetime - The number of days a Personal Access Token is valid. The default is "180"
- --open_id_refresh_token_lifetime - The number of days a refresh token is valid. The default is "0" meaning it is valid forever.
- --open_id_user_name_field - The field name for the OpenID Connect user name. The default is "preferred_username".
- --open_id_display_name_field - The field name for the OpenID Connect user display name. The default is "name".
- --open_id_group_field - The field name for an OpenID Connect group. The default is "groups".
After you have run the OpenID Connect command, you need to restart the Qlik Enterprise Manager service for the settings to take effect.
Step 3: In Enterprise Manager, generate a Personal Access Token
-
Log in to Enterprise Manager as a SAML user. This must be one of the users/groups that was assigned to the app integration in Step 1: In Okta, create an app integration that uses OpenID Connect above.
For information on setting up SAML, see Setting up SAML authentication above.
-
In the top right of Enterprise Manager, click the inverted triangle to the right of the user name and select Generate Personal Access Token.
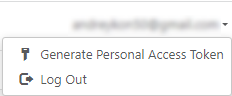
The Generate Personal Access Token dialog opens.
In the Generate Personal Access Token dialog, you will see one of the following:
- You do not have a Personal Access Token. This is shown if you have not previously generated a Personal Access Token:
- Your Personal Access Token expired on <Date>. This is shown if your Personal Access Token has expired.
- Your Personal Access Token expires on <Date>. This is shown if you already have a Personal Access Token.Information noteWhen regenerating a token, you will need to confirm that you want to regenerate the token. This is because API login with the original token will stop working as soon as you generate a new token.
-
Click Generate token.
The Copy Personal Access Token dialog is displayed.
-
Copy your personal access token. You will need this to log in with the Enterprise Manager API.
See also: Managing Personal Access Tokens
Step 4: Configure the Enterprise Manager API to log in using the Personal Access Token
For instructions, see:
- REST API: Login
- .NET API: Getting started - Login
- Python API: Getting started - Login