
Creating and managing relationships
Similar to a foreign key, a relationship "attribute" is a special type of attribute that points to another entity in the same model. Typically, the relationship replaces the key attributes that connect an entity to a related entity. You can add, edit and delete relationships as required.
Possible reason for creating relationships are as follows:
- If your model is derived from the landing zone (as opposed to the source database(s)), the model will be created without any relationships
- Ensure data integrity between related entities
You can create relationship from the Manage Model window or from the Display Model window. Both of these methods are described below.
When converting existing columns in a table with a relationship to another table, historical values may be lost and need to be loaded again or reinserted manually.
Adding relationships via the Manage Model window
-
Click the Manage button in the bottom left of the Model panel.
The Manage Model window opens.
- Select an Entity in the Entities list.
-
Click the Add Relationship button in the Attributes toolbar.
The Add Relationship From: Name window opens.
- From the Add Relationship to Entity drop-down list, select the entity to which you want to create a relationship.
-
If the originating entity contains attributes that were foreign keys in the source database, you can replace these attributes with Business Key attributes of the associated entity.
To do this:
-
Select the Replace Existing Attribute(s) check box.
The left column shows the Business Key Attributes of the Associated Entity.
- From the Attributes of Originating Entity drop-down list on the right, select an attribute from the originating entity that was meant to be a foreign key.
-
- If you want the relationship attribute to be a Business Key, select the Business Key check box. This option will only be displayed if the entity target can be designated as a Business Key.
-
Set the History Type.
Information noteSince the history type for Business Keys must be type 1, the option to change the history type is unavailable when the Business Key check box is selected.
-
Set a Satellite Number.
Information noteSince the satellite number for Business Keys must be "0", the option to change the satellite number is unavailable when the Business Key check box is selected.
- Optionally, specify a prefix.
- Optionally, enter a description.
- Click OK to save your settings.
Adding relationships via the Display Model window
-
Click the Display button in the bottom left of the Model panel. The Display Model window opens.
-
Select one of the following methods:
-
Method 1: Right-click an entity and select Add Relationship.
The Add Relationship From: Name window opens.
- Method 2: Right-click an entity and select Set as Relationship Source. This method is useful if you need to search your model for the relationship target entity (since the source entity remains selected while you search).
-
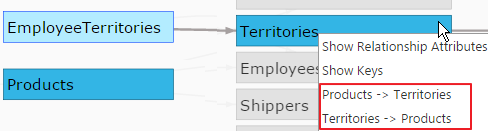
Method 3: Select two entities by clicking them while holding down the [Ctrl] key. Then, right-click one of the entities and select the desired relationship from the context menu (according to the entity that you want to be the relationship source), as shown in the following example:
-
- If you selected Method 2, continue below. If you selected Method 1, continue from Step 4 in Adding Relationships via the Manage Model window above. If you selected Method 3, continue from Step 5 in Adding Relationships via the Manage Model window above.
-
Right-click the relationship target entity and select Relationship Target for Relationship Source Name.
The Add Relationship: Name window opens with the relationship target entity already selected.
-
If the originating entity contains attributes that were foreign keys in the source database, you can replace these attributes with Business Key attributes of the associated entity.
To do this:
-
Select the Replace Existing Attribute(s) check box.
The left column shows the Business Key Attributes of the Associated Entity.
- From the Attributes of Originating Entity drop-down list on the right, select an attribute from the originating entity that was meant to be a foreign key.
-
- If you want the relationship attribute to be a Business Key, select the Business Key check box. This option will only be displayed if the entity target can be designated as a Business Key.
-
Set the History Type.
Information noteSince the history type for Business Keys must be type 1, the option to change the history type is unavailable when the Business Key check box is selected.
-
Set a Satellite Number.
Information noteSince the satellite number for Business Keys must be "0", the option to change the satellite number is unavailable when the Business Key check box is selected.
- Optionally, specify a prefix.
- Optionally, enter a description.
- Click OK to save your settings.
Preventing naming conflicts
When a relationship from entity A to entity B is created, Compose implicitly adds entity B’s primary key columns to table A. This means that if there are two or more relationships from entity A to entity B, a column naming conflict will arise (as entity B’s primary key columns will be added to table A multiple times). Such conflicts can easily be avoided by adding a meaningful prefix to the relationship attributes in entity A, which will result in the prefix being added to the physical columns as well.
Example:
The Orders entity contains two attributes that are related to the People entity: the Customer and Seller attributes. Therefore, Mike wants to create two relationships from the Orders entity to the People entity. The primary key of the People table consists of the FirstName and LastName attributes. As there are two relationships, the primary key columns of the People entity will be added twice to the Orders entity. To prevent duplication errors, Mike adds the Customer_ and Seller_ prefixes to the relationship attributes in the Orders entity, which results in the physical columns Customer_FirstName, Seller_FirstName, Customer_LastName, and Seller_LastName.
Deleting relationships
-
Click the Manage button in the bottom left of the Model panel.
The Manage Model window opens.
-
Select the relationship attribute you want to delete.
- Click the Delete button in the Attributes toolbar.
- To restore an attribute that was replaced when the relationship was created, select the Restore original attribute(s) check box. For more information about replacing attributes, see Step 5 in Adding relationships via the Manage Model window above.
- Click Yes to delete the relationship attribute.
The Delete Relationship window opens.