Skip to main content Skip to complementary content

Connecting Talend Studio to Talend Cloud

Talend Studio automatically connects to Talend Cloud if it has already connected to a remote project hosted there. If you have only set up local projects, follow this procedure to establish the cloud connection. Otherwise, ignore this section.

To allow web users in your organization to work with Artifacts you design in Talend Studio, you must publish them to Talend Cloud. Once the connection is established, any update in your scenario from Talend Studio can be pushed to the cloud right away.

Procedure

  1. In the Talend Studio menu bar, select Window > Preferences.
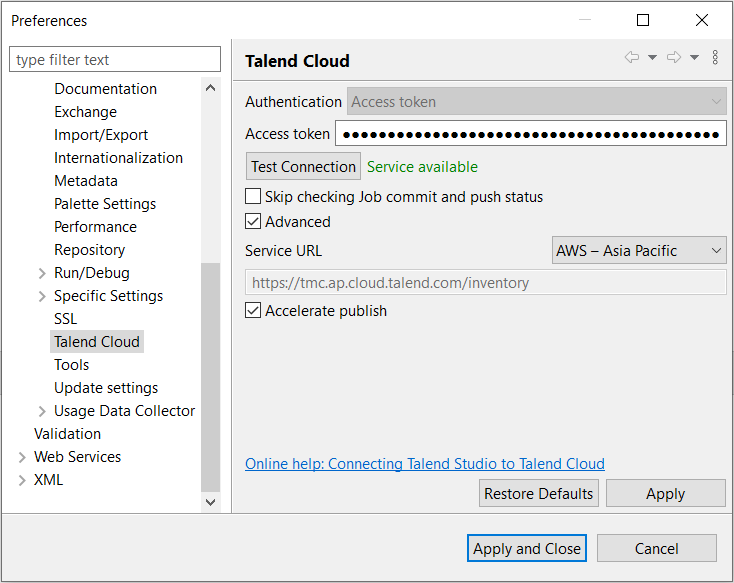
  2. From the preferences list, select Talend > Talend Cloud .
  3. Enter your access token.
    You can generate an access token from your profile preferences in Talend Cloud. For more information, see Generating a Personal Access Token.

    The Talend Cloud URL is https://<env>.cloud.talend.com where <env> is the name of your Cloud region. If you do not know what your region name is, see Talend Cloud regions and URLs.

  4. Select the Stop checking issues when publishing to Talend Cloud check box when you want to stop checking the following issues in a Job, Route, or Data Service when publishing it to Talend Cloud.
    • The Job, Route, or Data Service contains changes not pushed to the remote Git repository.
    • The Job or Route contains a context variable of any numeric data type, whose value does not match its type.

    By default, the check box is cleared. If there are any above issues in a Job, Route, or Data Service, a dialog box pops up to give a warning message when publishing it to Talend Cloud. For more information, see Publishing to Talend Cloud.

    Note that Talend Studio only checks the Git commit and push status of the Job, Route, or Data Service itself when publishing it to Talend Cloud.

  5. Select the Advanced check box and choose your data center from the Service URL drop-down list.

    Example

    Preferences dialog box with Talend Cloud tab opened.

    The Accelerate publish check box is selected by default for optimal performance when publishing artifacts to the cloud.

  6. Click Test Connection to test the connection to the Talend Management Console web application.
  7. Click Apply to save your settings.
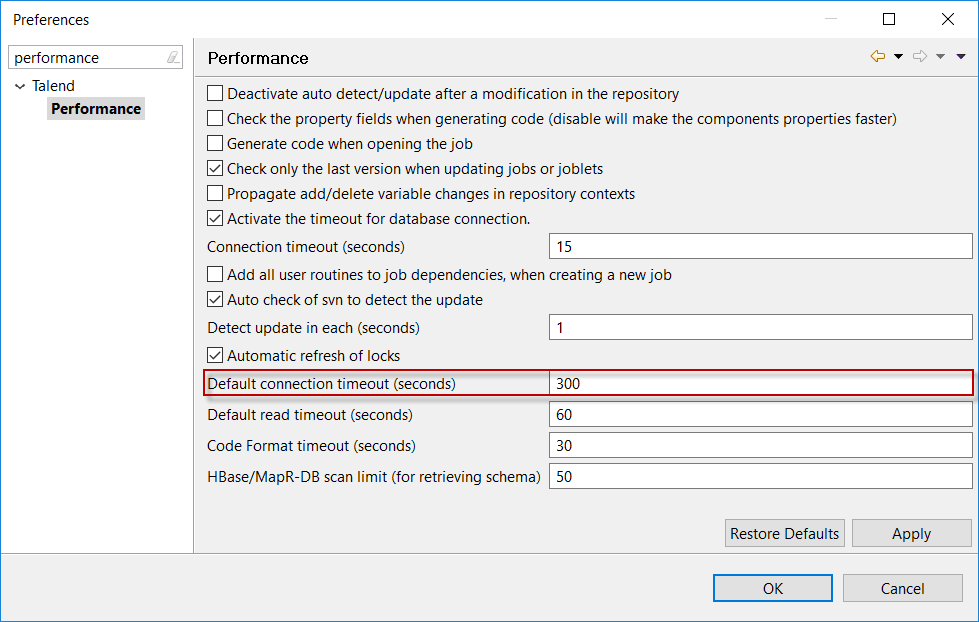
  8. From the preferences list, select Talend > Performance.
  9. Adjust the Default connection timeout (seconds).
    The timeout value is set to 5 seconds by default. However, on a slower network that may not be enough. It is recommended to set the value to 300 seconds.
    Preferences dialog box with Performance tab opened
  10. Click Apply to save your settings and close the Preferences window.
    The connection has been established and you are now able to publish Artifact to Talend Management Console.

Did this page help you?

If you find any issues with this page or its content – a typo, a missing step, or a technical error – please let us know!