This section shows you how to set up a centralized SAP connection using the SAP
metadata wizard.
To successfully establish the connection between Talend Studio
and SAP, ensure that you have the proper authorization rights to access the SAP
systems. For more information, see SAP.
Procedure
In the Repository tree view, expand the
Metadata node and check that the SAP
Connections node is present. If the SAP
Connections node is present, go to the next step.
Otherwise:
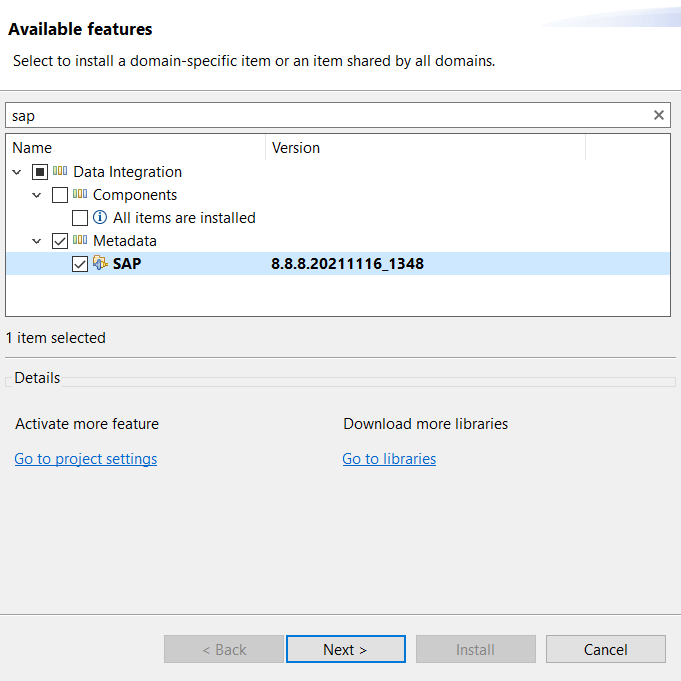
Open the Feature Manager window by selecting
Help > Feature
Manager.
Type sap in the search field, check
SAP in the search result section, and click
Next.
Proceed as prompted to install the SAP module and restart Talend Studio.
Right-click the SAP Connections node and select
Create SAP connection from the contextual menu. The
SAP Connection wizard opens up.
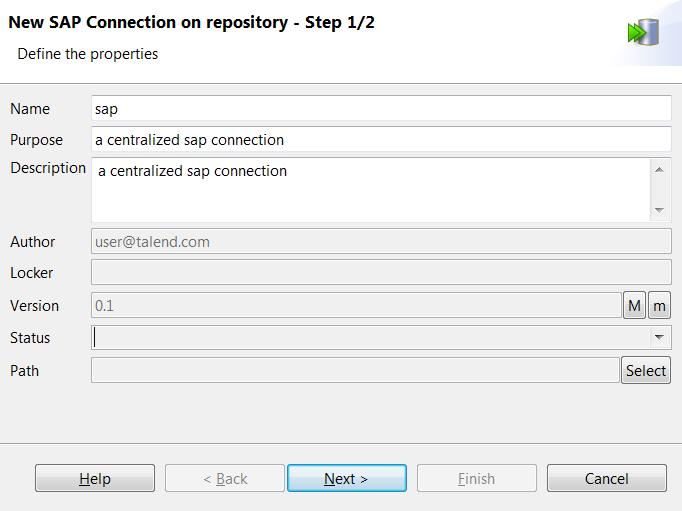
Fill in the generic properties such as Name,
Purpose (optional), and
Description (optional). The information you fill in
the Description field will appear as a tooltip when you
move your mouse pointer over the connection.
If needed, set the connection version and status in the
Version and Status fields
respectively. You can also manage the version and status of a repository item in
the Project Settings dialog box. For more information, see
Upgrading the version of project items and Status management respectively.
Click Next to fill in the SAP system connection
details.
The following table describes the fields listed in the dialog box.
Property
Description
Client
The SAP system client ID.
Host
The name or IP address of the host on which the SAP server is
running.
User and Password
The user connection ID and password.
System Number
The SAP system number.
Language
The language of the SAP system.
Additional Properties
Complete this table with the property or properties to be
customized if you need to use custom configuration for the SAP system
being used.
For example, if you need to retrieve data from tables
with more than 512 bytes per row using this connection later, click
the [+] button below the
Additional Properties table to add a
property api.use_z_talend_read_table and set
its value to true. For more information,
click Help to open the dialog box that shows
the instruction.
Note that additional properties are optional
if you are creating metadata for connecting an SAP Application
Server through RFC; however, if you are creating metadata for
connecting an SAP Message Server through RFC, the following
properties are required and need to be set in this table.
jco.client.r3name
jco.client.mshost
jco.client.group
Click Check to validate the SAP connection
details.
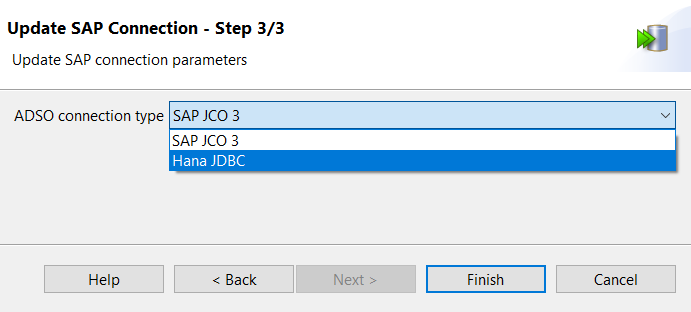
Click Next to specify the type of the SAP connection you
want to create from the ADSO connection type drop-down
list.
Select SAP JCO3 to create a connection using
SAP JCO3.
Select Hana JDBC to create a connection to the
SAP HANA database.
Information noteNote: The SAP Connection - Update SAP Connection - Step 3/3
dialog box is available only when you have installed the R2021-12 Talend Studio
Monthly update or a later one delivered by Talend. For more information, check with your administrator.
Do the following according to your selection in the previous step.
If you select HANA JDBC in the previous step and click
Next, specify the SAP HANA database connection
parameters if you need to retrieve the metadata of Advanced Data Store Objects
using this centralized connection later. You can optionally click
Check to validate the SAP HANA database connection details.
The following table describes the fields listed in the dialog box.
Property
Description
Db Host
The IP address or hostname of the database.
Db Port
The listening port number of the database.
Db Schema
The table schema name.
Db Username and Db
Password
The database user authentication data.
Db Additional Parameters
The additional parameters for connecting the SAP HANA
database.
Select SAP JCO 3 from the ADSO SAP
Connection drop-down list if you want to create the
connection using SAP JCO3.
Click Finish to save the settings.
The newly created SAP connection metadata will be saved under the Metadata > SAP Connections node in the Repository tree view. Now
you can drag and drop the SAP connection node onto your Job design workspace
as an SAP component, with the connection details automatically
filled.
If you need to further edit an SAP connection, right-click the
connection node and select Edit SAP Connection from
the contextual menu to open this wizard again and make your
modifications.
Did this page help you?
If you find any issues with this page or its content – a typo, a missing step, or a technical error – please let us know!

 Information noteNote: The SAP Connection - Update SAP Connection - Step 3/3 dialog box is available only when you have installed the R2021-12 Talend Studio Monthly update or a later one delivered by Talend. For more information, check with your administrator.