Selecting the trigger and type of validation
- Big Data
- Big Data Platform
- Cloud API Services Platform
- Cloud Big Data
- Cloud Big Data Platform
- Cloud Data Fabric
- Cloud Data Integration
- Cloud Data Management Platform
- Data Fabric
- Data Integration
- Data Management Platform
- Data Services Platform
- MDM Platform
- Real-Time Big Data Platform
Procedure
-
In this step, you can select the action that will trigger the rule:
- On select
- On insert
- On update
- On delete
Information noteNote: Some of the rule trigger options can be disabled according to the type of metadata you checked. For example if the metadata is a file, on update and on delete triggers are not applicable.Refer to the following table for a complete list of supported (enabled) options:Metadata item On select On insert On update On delete Database Table Supported Supported Supported Supported Database View Supported Not supported Not supported Not supported Database Synonym Supported Not supported Not supported Not supported SAP Supported Not supported Not supported Not supported File Delimited Supported Supported Not supported Not supported File Positional Supported Supported Not supported Not supported File RegEx Supported Supported Not supported Not supported File XML Supported Supported Not supported Not supported File Excel Supported Supported Not supported Not supported File LDIF Supported Supported Not supported Not supported LDAP Supported Supported Supported Supported Salesforce Supported Supported Supported Supported Generic Schema Not supported Not supported Not supported Not supported HL7 Supported Not supported Not supported Not supported Talend MDM- Available in:
- Big Data
- Big Data Platform
- Data Fabric
- Data Integration
- Data Management Platform
- Data Services Platform
- ESB
- MDM Platform
- Real-Time Big Data Platform
Supported- Available in:
- Big Data
- Big Data Platform
- Data Fabric
- Data Integration
- Data Management Platform
- Data Services Platform
- ESB
- MDM Platform
- Real-Time Big Data Platform
Supported- Available in:
- Big Data
- Big Data Platform
- Data Fabric
- Data Integration
- Data Management Platform
- Data Services Platform
- ESB
- MDM Platform
- Real-Time Big Data Platform
Supported- Available in:
- Big Data
- Big Data Platform
- Data Fabric
- Data Integration
- Data Management Platform
- Data Services Platform
- ESB
- MDM Platform
- Real-Time Big Data Platform
Supported- Available in:
- Big Data
- Big Data Platform
- Data Fabric
- Data Integration
- Data Management Platform
- Data Services Platform
- ESB
- MDM Platform
- Real-Time Big Data Platform
WSDL Supported Not supported Not supported Not supported Validation rules are not supported for any other metadata that does not display in the above list.When you select the On select trigger, the validation rule should be applied to the input components of the Job Designs and when you select the On insert, On update and On delete triggers, the validation rule should be applied to output components.You can select the type of validation you want to perform:-
a referential integrity validation rule that will check your data against a reference data,
-
a basic restriction validation rule that will check the validity of the values of the selected field(s) with basic criteria,
-
a custom code validation rule allowing you to specify your own Java or SQL based criteria.
-
Choose to create a referential rule, a basic rule, or a custom rule.
Referential rule: to create a referential integrity check validation rule:

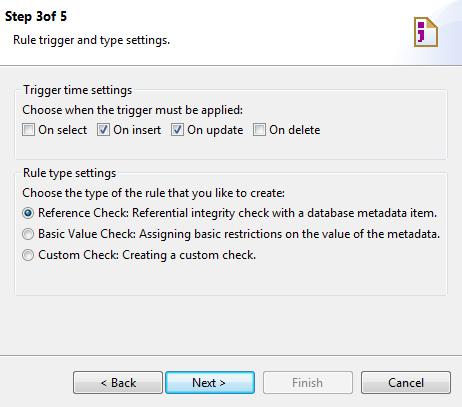
- In the Trigger time settings area, select the option corresponding to the action that will trigger the validation. As On insert and On update options are selected here, data will be checked when insert or update action will be performed.
- In the Rule type settings area, select the type of validation you want to apply between Reference, Basic Value and Custom check. To check data by reference, select Reference Check.
- Click Next.
- In this step, select the database schema that will be used as reference.
- Click Next.
- In the Source Column list, select the column name you want to check and drag it to the Target column against which you want to compare it.
- Click Next to define how to handle rejected data.
Basic rule: To create a basic check validation rule:
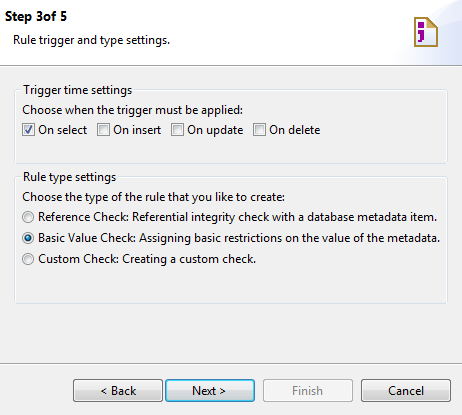
- In the Trigger time settings area, select the option corresponding to the action that will trigger the validation. As On Select option is selected here, the check will be performed when data are read.
- In the Rule type settings area, select the type of validation you want to apply between Reference, Basic Value and Custom check. To make a basic check of data, select Basic Value Check.
- Click Next to go to the next step.
- Click the plus button at the bottom of the Conditions table to add as many conditions as required and select between And and Or to combine them. Here, you want to ignore empty Phone number fields, so you added two conditions: retrieve data that are not empty and data that are not null.
- Click Next to define how to handle rejected data.
Custom rule: to create a custom validation rule:
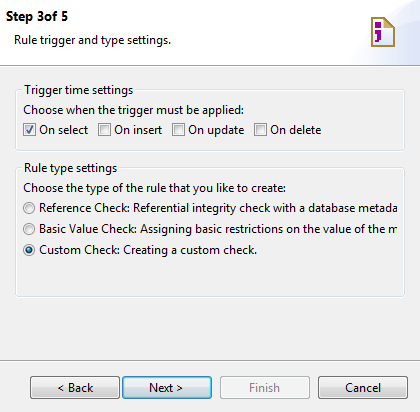
- In the Trigger time settings area, select the option corresponding to the action that will trigger the validation. As On Select option is selected here, the check will be performed when data are read.
- In the Rule type settings area, select the type of validation you want to apply between Reference, Basic Value and Custom check. To make a custom check of data, select Custom Check.
- Click Next.
- In this step, type in your Java condition directly in the text box or click Expression Editor to open the Expression Builder that will help you create your Java condition. Use input_row.columnname, where columnname is the name of the column of your schema, to match the input column. In the previous capture, the data will be passed if the value of the idState column is bigger than 0 and smaller than 51. For more information about the Expression Builder, see Working with expressions.
- Click Next to define how to handle rejected data.
Did this page help you?
If you find any issues with this page or its content – a typo, a missing step, or a technical error – please let us know!
