Skip to main content Skip to complementary content

Defining project references

A project reference is a property that you can set for a project so that all or some of the project items can be referenced by another project.

When one project references another, the items (Jobs, Metadata and so on) in the referenced project are available for reuse.

When one project is stored on Git, its items are structured in main and branches so that the reference can be established at either levels to provide more flexibility in project usability.

Information noteNote:
  • You can establish references between projects only if the type of the project to be used as a reference is subordinate to the type of the referencing project. For example, a Data Management project can be used as a reference for a Master Data Management project and not vice versa.
  • You need to have read-write access to the projects only for migration purposes upon migrating to a new version or applying a patch.
  • You cannot:
    • define two or more branches of a project as references to another project.
    • create a cycle of references between two projects.
    • have project items (Jobs, Contexts, Metadata, etc.), except Joblets, with the same name in both a project and its reference.

The procedure below describes how to define a project reference in Talend Studio. You can also create and manage project references in Talend CommandLine using the addReference and deleteReference commands. For more information on these commands, check the help <commandName> command.

For more information about working with referenced projects, see Working with referenced projects.

Before you begin

Check that you are working on a remote project.

Procedure

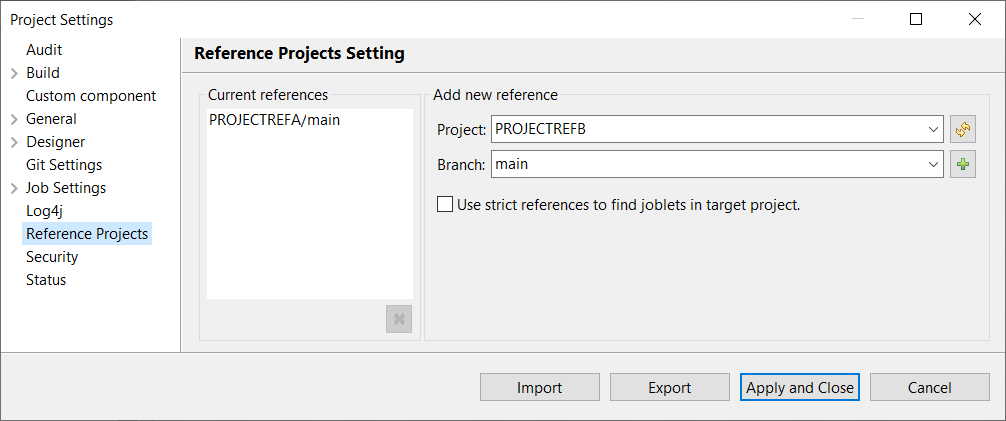
  1. Right-click the Referenced project node in the Repository tree view and select Reference Projects Setting from the contextual menu to open the Reference Projects Setting view.
    Alternatively, you can click Edit on the Talend Studio toolbar, or select File > Edit Project Properties from the menu bar, and then select Reference Projects on the left panel of the dialog box to open the Reference Projects Setting view on the right.

    Example

    Reference Projects Setting view.
  2. In the Add new reference area, click the Refresh button to retrieve the projects you can set as referenced projects.
  3. From the Project list, select the project you want to add as a referenced project.
  4. From the Branch list, select a branch on which the project is established.
  5. Depending on how you want Joblets to be searched when building a Job:
    • Select the Use strict references to find joblets in target project check box to find a Joblet only in the project from which the Joblet was added to the Job during the Job design.
    • Clear the Use strict references to find joblets in target project check box to find a Joblet in other projects if the Joblet is not found in the project from which it was added to the Job during the Job design. By default, this check box is cleared.
  6. Click the Add button to add the selected project to the Current references area.
    In the Current references area, you can delete a referenced project by selecting it and clicking the Delete button.
  7. Click OK to validate the project reference settings and close the dialog box.
    Talend Studio will log in to the main or referencing project again to apply the project reference settings.

Results

The defined referenced project is displayed in the Repository tree view.

Did this page help you?

If you find any issues with this page or its content – a typo, a missing step, or a technical error – please let us know!