Configuring Jenkins
Setting up your environment
- Refer to the Jenkins documentation for installation and general setup.
- Download and extract the archive file jenkins_pipeline.zip, that contains these files: Talend_Simple_Pipeline.jenkins, maven_settings.xml and sample_pom.xml.
- Install Java JDK 17, Apache Maven superior or equal to 3.6.3, and Git bash.
- Depending on where you want to publish your artifacts, set up your artifact repositories (Nexus, Artifactory) and your Talend Cloud account.
| Operating system | CPU | RAM | SSD Disk size |
|---|---|---|---|
| Windows, Linux, Mac | 4 cores or equivalent | 4GB (minimum) | 50GB (minimum) |
Installing Jenkins plugins
Add the additional plugins necessary to execute your pipelines in the Jenkins server.
- In Jenkins, navigate to .
- Click the Available plugins tab to see the available plugins.
- Type in the following plugin names in the search bar and select them:
- Config File Provider (to add your customized maven settings file to Jenkins)
- Maven Integration
- Pipeline (set of tools for modeling scripted Continuous Deployment Pipelines in Jenkins)
- Pipeline Maven IntegrationInformation noteNote: Several plugins like the Git plugins are installed and activated by default.
- Click Install to install all plugins at once without restarting the Jenkins server.
Configuring paths to Git and Maven tools
- Navigate to .
- In the JDK installations area, add the JDK. Name it JDK17, and set JAVA_HOME to the path of your JDK17 installation directory.
- In the Git installations area, check that Git is installed with the name Default and the path to the Git executable.
- In the Maven installations area, add the M3 Maven tool. Name it Maven3, and set MAVEN_HOME to the path of your Maven installation directory.
- Click Save to take the changes into account.
Storing your global variables in Jenkins
- Navigate to .
- In Global properties, select Environment
variables and add the following variables with your corresponding values:
- The artifact repository (Nexus/Artifactory)
Example: Name = REPO_URL; Value = http://localhost:8081
- The Talend Cloud publication URLName it TMC_URL (this identifier will be used in the Jenkins pipeline), and add the value depending on your region:
- AWS Singapore: https://tmc.sg.cloud.talend.com/inventory
- AWS US: https://tmc.us.cloud.talend.com/inventory
- AWS EU: https://tmc.eu.cloud.talend.com/inventory
- AWS APAC: https://tmc.ap.cloud.talend.com/inventory
- AWS Australia: https://tmc.au.cloud.talend.com/inventory
- Azure US West: https://tmc.us-west.cloud.talend.com/inventory
- The artifact repository (Nexus/Artifactory)
- Save your changes.
Storing your credentials in Jenkins
- Navigate to .
- Click and add the credentials:
- Git credentials: they are used to access the repository where your project
items (Jobs, Routes, Tests, etc.) are stored.
If you are using Git personal access tokens, select Username with password. If you are using SSH, select SSH username with private key in the list.
Name its ID git_talend (this identifier will be used in the Jenkins pipeline), and add a comment, for example 'Git credentials for Talend repositories'.
Click Create to take the changes into account.
- Artifact repository credentials (Nexus or Artifactory): they are used to
access the repositories where your libraries, plugins, and artifacts are
stored.
Name its ID artifact_repo, and add a comment, for example 'Artifact repository credentials for Talend repositories'.
Click Create to take the changes into account.
- Talend Management Console personal access token: it is used to access your Talend Cloud account.
Select the Secret text option, and set the Talend Management Console token of the user responsible of the publication in Talend Cloud.
Name its ID tmc_token, and add a comment, for example 'TMC token'.
Click Create to take the changes into account.
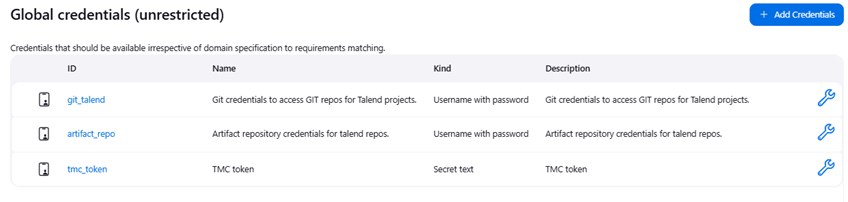
- Git credentials: they are used to access the repository where your project
items (Jobs, Routes, Tests, etc.) are stored.
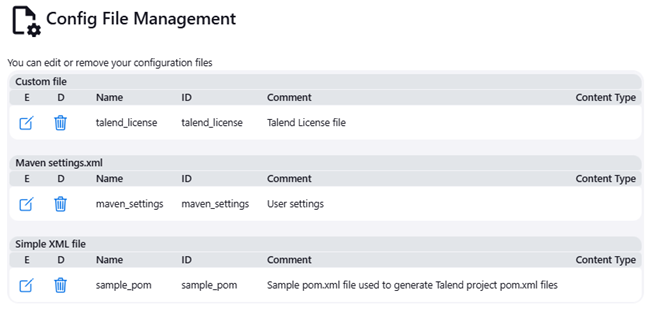
Storing your configuration files in Jenkins
Before storing your configuration files in Jenkins, make sure you have extracted these files from the jenkins_pipeline.zip archive file: sample_pom.xml and maven_settings.xml.
These files will be referenced in the configuration of your Jenkins pipeline.
- In Jenkins, navigate to .
- Click Add a new Config and select Simple XML file to add the sample POM file.
- Give it a name and an ID, sample_pom, and click Next. This identifier will later be used in the Jenkins pipeline.
- In the Content editor, set the name to sample_pom as well and paste the content of the sample_pom.xml file you have previously downloaded.
- Click Submit.
- In Jenkins, navigate to .
- Click Add a new Config again and select Maven settings to add the Maven configuration file.
- Edit the maven_settings.xml file with your specific values
for the <username>,
<password>, and <url>
parameters.Information noteTip: In Jenkins, you can replace the hard-coded values of username, password and artifact repository URL with Jenkins parameters like ${my_parameter}.
- Give it a name and an ID, maven_settings. This identifier will later be used in the Jenkins pipeline.
- In the Content editor, paste the content of the edited maven_settings.xml file.
- Click Submit.
- Get your Talend license file received by email or available in a Talend Studio installation folder that has already been setup.
- In Jenkins, navigate to .
- Click Add a new Config and select Custom file to add the Talend license file.
- Give it a name and an ID, talend_license, and click Next. This identifier will later be used in the Jenkins pipeline.
- In the Content editor, paste the content of the Groovy file and click Submit.
- Click Add a new Config and select Custom file to add your Talend license file.
- In the Content editor, set the name to talend_license as well and paste the content of the license file.
- Click Submit.