cMQTT certification with AWS IoT Gateway
This article explains how to use cMQTT and cMQConnectionFactory to communicate with MQTT Topics of AWS IoT.
Together with cMQConnectionFactory, the cMQTT component can be used not only to connect to normal MQTT servers, for example, Apache ActiveMQ with MQTT transport enabled, but also to communicate with MQTT Topics created on AWS IoT using SSL.
This article is applicable to all Talend products with ESB capability.
Creating resources (Thing, Policy, Certificate) on AWS IoTThe AWS IoT resources (Thing, Policy, Certificate) can be created from the AWS IoT console or the AWS CLI commands. The following procedure will show you how to create resources using the AWS IoT console.
Before creating the resources, make sure you have an AWS account which is authorized to access AWS IoT. Login to the AWS console with this account and go to the AWS Services > AWS IoT page to create the resources.
Creating a thing-
On the AWS IoT page, click .

- In the Create a Thing area, give a name to the Thing in the Name field.
- Click Create to create the thing.
You can find the host name and MQTT Topic information on the right panel, which will be used to configure the cMQTT and the cMQConnectionFactory components later.

- On the AWS IoT page, click .

- In the Create a Policy area:
- give a name to the policy in the Name field
- add a statement with action iot:* and resource *
- select the Allow check box to allow any iot operations on any iot Things.
- Click Create to create the policy.
- On the AWS IoT page, click .

- In the Create a Certificate area, click 1-Click certificate create to download the private key (xxxx-private.pem.key) and the certificate (xxxx-certificate.pem.crt).
- Select the certificate, and click to activate the certificate.
- Click , and enter the name of the Thing that is just created to attach the Thing to the Certificate.
- Click and enter the name of the newly created Policy to attach it to the Certificate too.
Before creating the JKS keystore, make sure you have the OpenSSL installed on your system.
To create the JKS keystore, proceed as follows:
- Download the ATS certificate from https://docs.aws.amazon.com/iot/latest/developerguide/x509-client-certs.html and save it to rootCA.pem .
- Export a pkcs12 file using the AWS IoT certificate, private key
and the rootCA as input using the following command:
openssl pkcs12 -export -in e11ef15bb1-certificate.pem.crt -inkey e11ef15bb1-private.pem.key -out server.p12 -name awsiotkey
Give a password to the pkcs12 when prompted, for example, abcd.
- Convert the pkcs12 to JKS keystore using the following command:
keytool -importkeystore -deststorepass password -destkeypass password -destkeystore keystore.jks -srckeystore server.p12 -srcstoretype PKCS12 -srcstorepass abcd
Make sure you provide the same password for -deststorepass and -destkeypass .
- Import the AWS rootCA into the JKS keystore using the following command:
keytool -import -trustcacerts -keystore keystore.jks -storepass importkey -alias rootCA -file rootCA.pem -noprompt
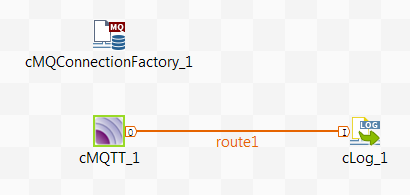
To make it simple, create a Route with a cMQTT, a cMQConnectionFactory, and a cLog as shown below to consume messages from the MQTT Topic of AWS IoT. For more information about how to create a Route, see Creating a Route.

- In the Basic settings view of the cMQConnectionFactory component:
- Select MQTT in the MQ Server list.
- In the Host Name field, enter the host name of the MQTT Topic on AWS IoT.
- In the Port field, enter the default MQTT port number 8883.
- Select the Use SSL check box and provide the JKS keystore and the password in the relevant fields.
If needed, increase the value in the Connection Wait In Seconds depending on your network connection.

- In the Basic settings view of the cMQTT component view:
- select the cMQConnectionFactory component in the Connection Factory field.
- In the Topic Name field, enter the name of the MQTT Topic on AWS IoT.

- Keep the default settings of the cLog component to monitor the message exchanges and run the Route. There is no message exchange at this time.
- Go to AWS IoT console and click MQTT Client.
- In the MQTT Client Actions area, select Device
Gateway connection, click Generate client ID,
and then click Connect.

- Click Publish to topic. Enter the name of the MQTT Topic in
the Publish topic field, and enter the message payload in the
Payload area, for example, "Hello
message".

- Click Publish.
The message is published to the specified Topic.
There are also other ways to publish messages into the MQTT Topic of AWS IoT. For example, you can download and install Mosquitto from http://mosquitto.org/ and publish a message "Hello message" using the command:
mosquitto_pub --cert e11ef15bb1-certificate.pem.crt --key e11ef15bb1-private.pem.key --cafile rootCA.pem -h <YourHostName>.iot.us-east-1.amazonaws.com -p 8883 -q 1 -d -t $aws/things/MyTestThing/shadow/update -m "Hello message"
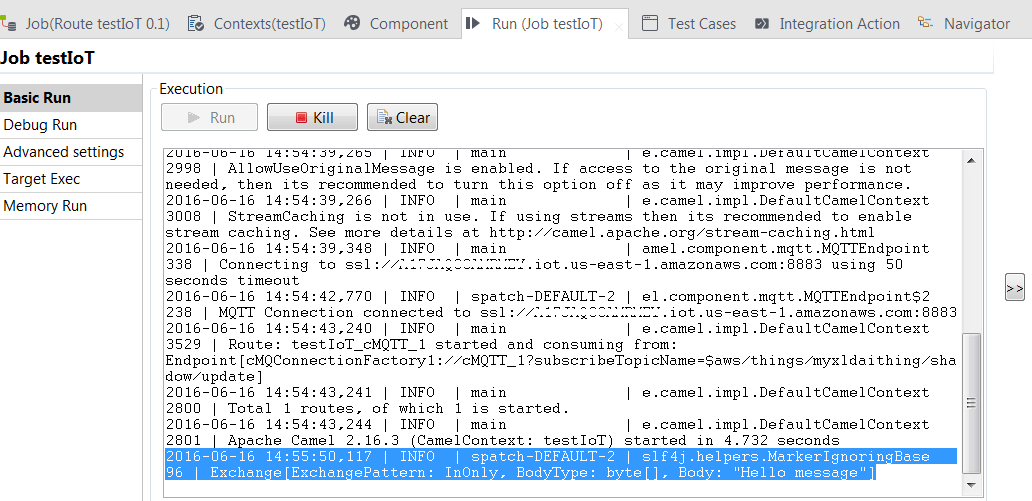
In Talend Studio, the message is received and shown in the Route execution console:

