Skip to main content Skip to complementary content

Running a preparation

When you are finished cleansing your dataset, you may want to send the result of your preparation to a new or existing dataset.

You can check the status of the run or click the link to your destination dataset in the Run history page. For more information, see The run history page.

This feature comes with the following limitations:

  • You can only run the current version of a preparation. It is currently impossible to run a specific preparation version.
  • When running a preparation into a database dataset, updating more than 100,000 new rows can lead to performance issues.

Selecting a destination

Before running a preparation, you need to configure the run. The first step requires you to select or add the destination dataset.

Before you begin

This feature is available only with a Remote Engine Gen2 version R2024-06 or greater, or the Cloud Engine for Design. Make sure you restart your Engine first to enable the latest updates.

A current limitation makes it not possible to run a preparation to datasets based on the following types of connections:

  • Amazon DynamoDB (Database)
  • Apache Kudu (Database)
  • Azure Synapse (Database)
  • REST (Web services)
  • FTP (File systems)
  • Azure Event Hubs (Messaging)
  • RabbitMQ (Messaging)

Procedure

  1. Click the Run button on the top right of the screen to open the parameters panel.
  2. Select a destination type from the following options:
    • Existing dataset. Select the dataset you want to export the result of the preparation to from the list.
    • New dataset. Give a name to the new dataset and specify the connection it will be based on.
    • Source dataset. The dataset used as source for the preparation will be updated with the prepared data.

      Here is a list of the connections you can use when selecting Source dataset as the destination:

      • Amazon Aurora (Databases)
      • Azure Cosmos DB (Databases)
      • Delta Lake (Databases)
      • Google BigQuery (Databases)
      • MariaDB (Databases)
      • Microsoft Dynamics 365 (Business applications)
      • MongoDB (Databases)
      • MySQL (Databases)
      • NetSuite (Business applications)
      • Oracle (Databases)
      • PostgreSQL (Databases)
      • Salesforce (Business applications)
      • SingleStore (Databases)
      • Snowflake (Databases)
    • Direct download: The prepared data is exported to a local file.
    Destination types highlighted.
  3. Click Next.
  4. Configure the additional parameters if needed.
    The parameters displayed depend on the type of dataset selected. For more information about connectors, see Talend Cloud Apps Connectors Guide.
  5. Click Next to continue the run configuration.

Mapping the preparation and destination columns

The mapping step allows you to map columns before writing to a defined destination.

Relationships are represented by lines between the selected preparation and destination columns.

Information noteImportant: The Data Mapping step is not available for HTTP-based and file-based datasets.

To start mapping, you can either:

  • Drag and drop a preparation column on a destination column.
  • Select a preparation column directly from the selection drop-down list or type the column name in the selection area.
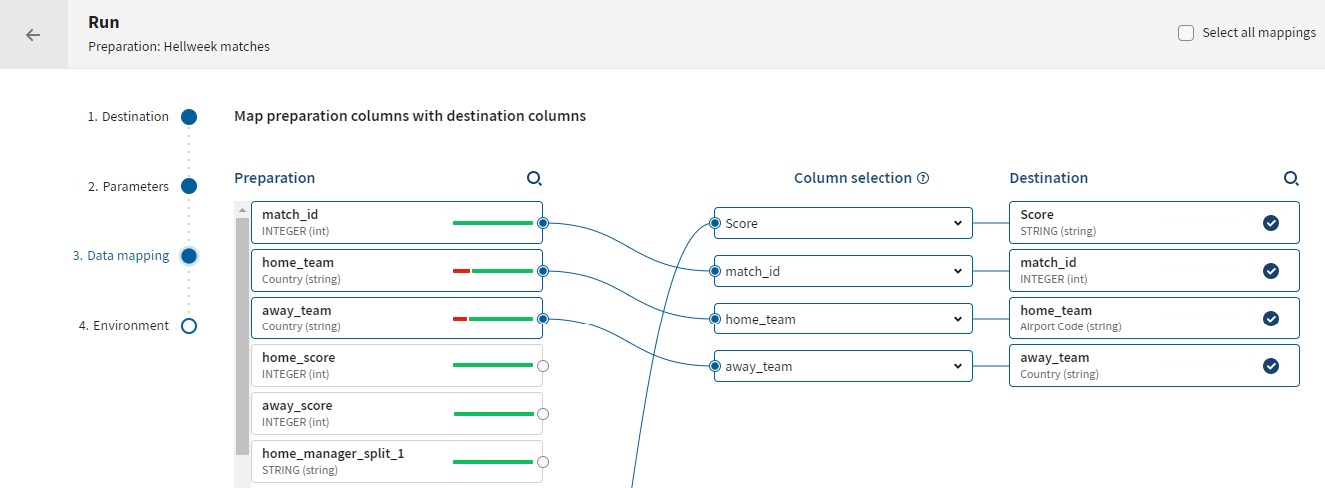
Visual mapping between preparation columns and destination columns.

The following rules apply when mapping columns together:

  • (Beta) Automapping occurs when starting the second step of the run configuration.
  • Unmapped preparation columns are ignored and will not appear in the destination columns.

    Example: Your preparation dataset contains these columns: first_name, last_name, email and phone and your destination dataset contains these columns: firstname, lastname, address and phone.

    If you map first_name with firstname, last_name with lastname and phone with phone, your destination dataset will contain these columns: firstname, lastname, address and phone. The unmapped email column will be ignored. The address destination column will be empty.

  • A mandatory destination column which is not mapped will most likely result in an error. It is still possible to run the preparation, but you may experience data loss or more errors, it is recommended to correct the mapping beforehand.
  • If the destination dataset is a JDBC dataset: the values of the mapped preparation columns will be added to their corresponding destination columns according to the operation set for your database (insert, update, upsert, delete) during the first step of the run configuration.

    Example: If you selected the Insert action and your preparation column firstname contains the values Alice and John, and is mapped with the destination column first_name that contains the values Will and Alima, the preparation column will contain all these values after the mapping: Alice, John, Will and Alima, which corresponds to an insert.

  • There is no schema modification when mapping columns, which means the name of the mapped destination column will be kept over the name of the preparation column when a preparation column is mapped with it.

    Example: If you map the preparation column firstname with the destination column first_name, the mapped destination column will be named first_name.

Configuring the run environment

The last step of the run configuration is the environment configuration.

Procedure

  1. Optional: Toggle the Keep row order button to keep the same row order in your destination dataset as in your source dataset. This can increase the preparation running time. If the preparation contains order-sensitive functions, this option is enabled by default and cannot be changed. Run menu opened.
  2. Select an existing run profile to run the configured preparation.

    Run profiles are created by users with specific roles on Talend Management Console.

    A run profile contains the set of configurations for executing pipelines on a Remote Engine Gen2 or on a Cloud Engine for Design, according to your license type. You can define the right resource allocation and advanced properties used at runtime in the run profiles. Based on your license and engine type, different run profile types are available.

    By default, the run profile selected will be the one based on the first available engine in the list.

    For more information on run profiles, see Managing run profiles.

  3. Click Run.

Results

The preparation starts running. Depending on the dataset size and step number, it may take a few seconds or minutes to finish. You can find information about the run status in the Run history page.

For more information about the Run history, check the run history page.

Did this page help you?

If you find any issues with this page or its content – a typo, a missing step, or a technical error – please let us know!