Skip to main content Skip to complementary content

Step 2: Mapping and transformations

We will now enrich our Job to include on-the-fly transformations. To implement these transformation, we need to add a tMap component to our Job.

This component is multiple and can handle:

  • multiple inputs and outputs
  • search for reference (simple, cartesian product, first, last match...)
  • join (inner, outer)
  • transformations
  • rejections
  • and more...

Procedure

  1. Remove the link that binds together the job's two components via a right-click the link, then Delete option. Then place the tMap of the Processing component group in between before linking the input component to the tMap as we did it previously.
  2. Eventually to link the tMap to the standard output, right-click the tMap component, select Row > *New Output* (Main) and click the tLogRow component. Type in out1 in the dialog box to implement the link. Logically, a message box shows up (for the back-propagation of schemas), ignore it by clicking on No.
  3. Double-click the tMap to access its interface.
    To the left, you can see the schema (description) of your input file (row1). To the right, your output is for the time being still empty (out1).
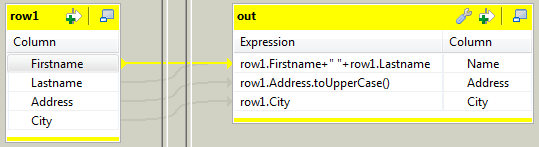
  4. Drop the Firstname and Lastname columns to the right, onto the Name column as shown on the screen below. Then drop the other columns Address and City to their respective line.
  5. Carry out the following transformations on each column:
    • Change the Expression of the Name column to row1.Firstname + " " + row1.LastName. This concatenates the Firstname column with the Lastname column, in order for the columns to display together in one column.
    • Change the Expression of the Address column to row1.Address.toUpperCase(), which will thus change the address case to upper case.
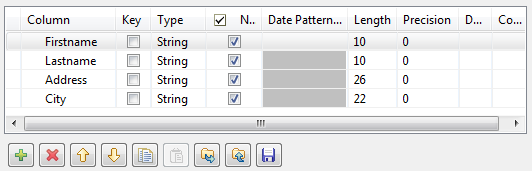
  6. Remove the Lastname column from the out1 table and increase the length of the remaining columns. To do so, go to the Schema Editor located at the bottom of the Map editor and proceed as follows:
    1. Select the column to be removed from the schema, and click the cross icon.

    2. Select the column of which you need increase the length size.

    3. Type in the length size you intend in the length column. In this example, change the length of every remaining column to 40.

    Information noteNote: As the first name and the last name of a client are concatenated, it is necessary to increase the length of the name columns in order to match the full name size. No transformation is made onto the City column.
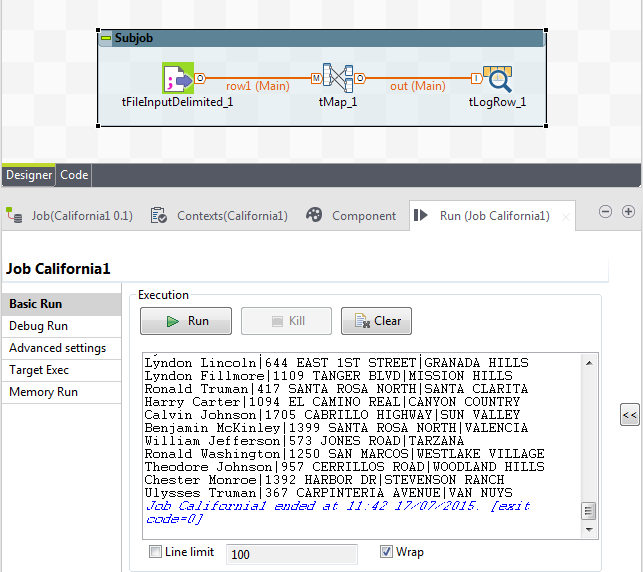
  7. Click OK to validate the changes and close the Map editor interface.
  8. Run your Job.

Results

The addresses are displayed in upper case and the first names and last names are gathered together in the same column.

Did this page help you?

If you find any issues with this page or its content – a typo, a missing step, or a technical error – please let us know!