You can assign colors to your master items. Colors assigned to master dimensions and master measures persist across all instances of those master items in all visualizations.
If you change the color used for the master item, the color will be updated across all instances of that master item. Optionally, master item colors can be disabled for individual visualizations.
Visualizations use master dimension colors when Single color is selected in the Colors and legend section of the visualization properties panel. Master measure colors are used when Single color or Multicolored are selected in the Colors and legend section of the visualization properties panel.
By default, if a visualization's default Auto settings use the Single or Multicolored, master item colors will be applied automatically. If they do not, you must switch to Custom and select a supported setting. Master item colors can be disabled in individual visualizations.
In a visualization with colors specified for both master dimension and master measure, Qlik Sense defaults to the master dimension color. Master measure colors can be applied using the Use library colors drop-down and selecting Measure in the Colors and legend section of the visualization properties panel. In visualization with a mix of master measures with assigned colors and measures without assigned colors, the other measures will use the default palette colors.
Master dimensions can have colors assigned to their distinct values. For more information, see Assigning colors to master dimension values.
Master measures can have custom color gradients applied to their values in visualizations. For more information, see Assigning colors to master measure values.
When assigning colors to your master items, you have the following options:
- Choose a color from the default palette
- Type a hexadecimal color code
- Choose a color using advanced color options
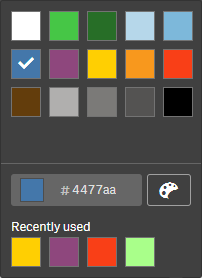
Assigning a color from the default color palette
Do the following:
- In sheet view, click
 Edit sheet in the toolbar.
 - Click
 to display the master items.
 - Select a master item from your library.
- Click .
- Click
 in the color drop-down.
 - Select one of the colors in the palette.
- Click outside the dialog.
- Click Save.
Assigning a color using a hexadecimal color code
Do the following:
- In sheet view, click Edit sheet in the toolbar.
- Click to display the master items.
- Select a master item from your library.
- Click .
- Click in the color drop-down.
- Type a 6 character color code in the input field: #.
- Click outside the dialog or press Enter.
- Click Save.
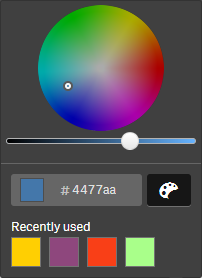
Assigning a color using advanced color options
Do the following:
- In sheet view, click Edit sheet in the toolbar.
- Click to display the master items.
- Select a master item from your library.
- Click .
- Click in the color drop-down.
-
Click
 at the bottom of the dialog.
 The dialog displays the advanced options.
-
Select a color in the color wheel.
The selected color changes and the Hex color code updates accordingly.
-
Optionally, adjust the color saturation using the slider.
The saturation changes and the Hex color code updates accordingly.
- Click outside the dialog.
- Click Save.