
A crosstab is a common type of table featuring a matrix of values between two orthogonal lists of header data.
It is usually not the optimal data format if you want to associate the data to other data tables. This topic describes how you can unpivot data loaded in crosstab format, that is, transpose parts of it into rows using the data manager.
What's a crosstab?
A crosstab contains a number of qualifying columns, which should be read in a straightforward way, and a matrix of values. In this case there is one qualifying column, Year, and a matrix of sales data per month.
| Year | Jan | Feb | Mar | Apr | May | Jun |
|---|---|---|---|---|---|---|
| 2008 | 45 | 65 | 78 | 12 | 78 | 22 |
| 2009 | 11 | 23 | 22 | 22 | 45 | 85 |
| 2010 | 65 | 56 | 22 | 79 | 12 | 56 |
| 2011 | 45 | 24 | 32 | 78 | 55 | 15 |
| 2012 | 45 | 56 | 35 | 78 | 68 | 82 |
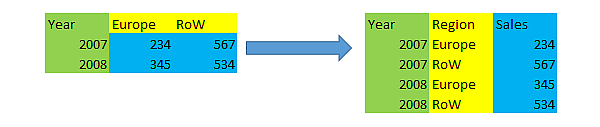
If this table is simply loaded into Qlik Sense, the result will be one field for Year and one field for each of the months. This is generally not what you would like to have. You would probably prefer to have three fields generated:
- The qualifying field, in this case Year, marked with green in the table above.
- The attribute field, in this case represented by the month names Jan - Jun marked with yellow. This field can suitably be named Month.
- The data field, marked with blue. In this case they represent sales data, so this can suitably be named Sales.
This can be achieved by using the Unpivot option in the data manager table editor, and selecting the fields Jan - Jun. This creates the following table:
| Year | Month | Sales |
|---|---|---|
| 2008 | Jan | 45 |
| 2008 | Feb | 65 |
| 2008 | Mar | 78 |
| 2008 | Apr | 12 |
| 2008 | May | 78 |
| 2008 | Jun | 22 |
| 2009 | Jan | 11 |
| 2009 | Feb | 23 |
| ... | ... | ... |
Unpivoting a crosstab table into a flat table
Do the following:
- Add a data file in crosstab format to your app.
- Click
 on the table in the data manager to open the table editor.
 - Click Unpivot.
-
Select the fields you want to transpose into rows. You need to have at least one qualifying field that is not unpivoted. There are two ways to make the selections.
- Click on the field headers of the fields you want to transpose. Do not select the fields you want to keep as qualifying fields.
- Click on the field headers of the fields you want to keep as qualifying fields, and then select Invert selections from the field menu. This is the easiest way to do it if you have a large number of fields to transpose.
-
Click Apply unpivoting
The selected data is now transposed to rows with two fields, Tablename.Attribute field and Tablename.Data field.
- Rename Attribute field to something meaningful, in the example above, Month.
- Rename Data field to something meaningful, in the example above, Sales.
You have now unpivoted the crosstable to a flat format, which will make it easier when you want to associate it to other data in the app.
Reverting to the original crosstab table
You can revert to the original crosstab format of your data source by clicking Undo unpivot in the table editor. If you created any associations to other data in the app, the associations will be deleted.