
Creating and managing custom ETLs
In addition to the Mappings ETL, you can define custom ETLs as required. User-defined ETLs can perform a number of useful operations such as defining specific transformations, gathering statistics, performing cleansing, and filtering data.
To create a custom ETL:
-
Click the Manage button in the bottom left of the Data Warehouse panel. The Manage Data Warehouse Tasks window opens.
-
Select one of the following tabs according to your needs:
- Pre Loading ETL - to define an ETL that will manipulate the data before it is loaded from the landing tables to the data warehouse staging tables. When enabled, the Pre-loading ETL will be run even if there are no mappings or Replicate-generated source data associated with it, which is particularly useful for customer wanting to perform transformations on data generated by third-party tools.
- Multi Table ETL - to define an ETL for multiple tables.
- Single Table ETL - to define an ETL for a single table.
- Post Loading ETL - to define an ETL that will be executed after the data has been loaded from the staging tables to the data warehouse.
- If you selected Single Table ETL, select an entity in the Entity column and then click the New button above the Entity list. For Multi Table and Post Loading ETLs, just click the New button.
-
Specify a name for your ETL and then click OK.
If you selected Single Table ETL, the ETL is added as a link to the User Defined ETL column. If you selected Multi Table ETL or Post Loading ETL, the ETL is added as a link in their respective tabs.
- Click the link to open the Edit ETL Instructions window.
-
If you selected Single Table ETL, select a column and click the arrow to the right of the selected column to add it to the ETL.
If you selected Multi Table ETL or Post Loading ETL, select a table and a column and then click the arrow to the right of the selected table/column to add it to the ETL. Repeat as necessary.
- Use the Select, Delete, Insert and Update toolbar buttons at the top of the window to add SQL statements to your ETL.
- To run the ETL as a stored procedure (that already exists in the data warehouse):
- Select the Execute as Stored Procedure check box.
- Click the Stored Procedure toolbar button.
- Replace STORED_PROCEDURE with the name of your stored procedure and replace(PARAM1, PARAM2) with any parameters that it needs. Note that parameters must be separated by a comma. If no parameters are required, use empty parenthesis or drop them altogether.
- Use the Undo, Redo and Reset buttons at the bottom of the window if needed.
- Optionally, specify a description in the Description box at the bottom of the window.
- To save your ETL, click OK.
Single table example
The following example, based on the Data warehouse project tutorial in Getting started with Data Warehouse projects , demonstrates how to concatenate two columns called "First Name" and "Last Name" into a single column called "FullName".
-
Click the Manage button in the Model panel. The Manage Model window opens.
- Select Employees from the Entities list on the left.
-
Click the + (plus) toolbar button to add a new Attribute. A new row is added to the Attributes table.
-
Type any letter in the Column Name column to bring up the "Add New" option. Click the "Add New" option when it appears.
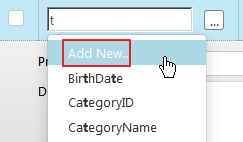
The New Attribute Domain window opens.
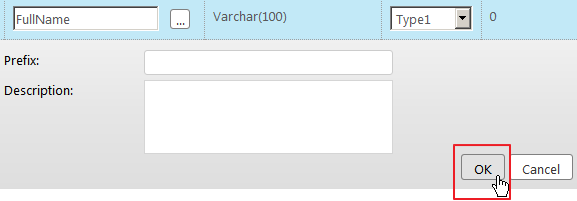
- In the Name field, type FullName. From the Type drop-down list, select Varchar. In the Length field, enter 100.
- In the History column, select Type 1 from the drop-down list.
- Click OK to close the New Attribute Domain window and add the attribute to the Attributes table.
-
Then click OK again (below the newly added attribute) to exit edit mode.
- Close the Edit Model window.
- In the Data Warehouse panel, click the Create button.
- After the Data Warehouse tables have been created, close the Creating Data Warehouse window.
-
Click the Manage button in the bottom left corner of the Data Warehouse panel. The Manage Data Warehouse Tasks window opens.
-
To view the current mappings between the source columns and data warehouse columns, click the Map_Employees_1 link in the Mappings column. A "Processing" icon is displayed while the mappings are generated. After the mappings are generated, the Edit Mappings - Map_Employees_1 window opens automatically.
Note that the FullName column has been added to the data warehouse columns, but is currently not mapped to the source columns.

- The next stage is to define an ETL that will map the First Name and Last Name source columns to the Full Name data warehouse column.
- Close the Edit Mappings - Map_Employees_1 window and then select the Single Table ETL tab on the left.
-
Select Employees in the Entity column and then click the New button above the column. The Add New Single Table ETL window opens.
- Specify a name or leave the default name and then click OK.
-
Click the Edit button (represented by a pencil icon) at the end of the Employees row. The Edit Single Table ETL: <Name> window opens.
-
In the editing pane on the right, enter the following instruction:
UPDATE dbo.TSTG_EMPLOYEES set
FullName = LASTNAME + FIRSTNAME
-
Click OK to save the ETL and close the window.
Information noteAfter Compose has finished populating the Data Warehouse, you can open the table in Microsoft SQL Server Management Studio and verify that the new column has been added with the correct data.
Updating custom ETLs
Compose CLI requires Administrator permission. To grant Administrator permission, select "Run as administrator" when opening the command prompt. All commands should be run from the Compose bin directory (C:\Program Files\Qlik\Compose with a default installation).
You can update custom ETLs using the Compose CLI. This functionality can be incorporated into a script to easily update Custom ETLs.
Syntax:
composecli update_custom_etls --project name --infolder path
Where:
- project is the name of the project with the custom ETLs you want to update
- infolder is the full path to the folder containing the custom ETL files
Example:
composecli update_custom_etls --project my-project --infolder c:\Compose\CustomETLs