
Data warehouse project tutorial
This short tutorial will walk you through each of the stages required to create a data warehouse project. For simplicity’s sake, we will be using Microsoft SQL Server as both the source database server and the target Data Warehouse. You can of course use any of the supported source or target databases, but instructions for doing so are outside the scope of this tutorial.
What you need:
- Qlik Compose installed according to the instructions in Qlik Compose installation and setup.
-
The Northwind.MDF sample database attached to Microsoft SQL Server.
An easy-to-follow set of instructions for downloading and installing Northwind.MDF can be found at the following website:
- Define an empty database on Microsoft SQL Server (e.g. northwind_dwh) and make a note of its name. This will serve as the target Data Warehouse for the Northwind.MDF source tables.
- Microsoft SQL Server Native Client 11.0 installed on the Compose machine.
To set up a Compose project:
- Define and run a replication task in Qlik Replicate as described in Defining a Qlik Replicate task.
- Open Qlik Compose.
- Add a data warehouse project as described in steps 1-3 of Adding data warehouse projects.
-
In the Databases panel, perform the following steps to define your data warehouse:
-
Click Manage. The Manage Databases window opens.
-
Click the Add New Database link or the New toolbar button. The New Data Warehouse window opens.
-
In the New Data Warehouse window:
- In the Name field, specify a display name for your data warehouse.
- From the Type drop-down list, select Microsoft SQL Server.
-
In the Server Name field, specify the Microsoft SQL Server name using the following format:
-
To connect to a named Microsoft SQL Server instance: computer_name\db_server_name
-
To connect to the default Microsoft SQL Server instance: computer_name
-
- In the User Name and Password fields, enter your credentials for logging in to the server specified in the Server Name field.
- In the Database Name field, specify the name of the database specified in the target endpoint of the Qlik Replicate task.
- In the Data Warehouse Schema field, specify dbo or your preferred schema.
-
In the Data Mart Schema field, specify dbo or your preferred schema.
Information noteYou can specify different schemas for the data warehouse and data mart tables, but for the purpose of this quick start, we’ll use the same schema.
- Click Test Connection to verify that Compose is able to establish a connection to the specified database and then click OK to save your settings.
-
Click New. The New Data Source window opens.
-
In the New Data Source window:
- In the Name field, specify a display name for your data source.
- From the Content Type drop-down list, choose Full Load and Change Processing.
- From the Designate By drop-down list, choose Schema.
- In the Schema name field, enter the schema name that you specified in the Target Metadata tab of the Replicate task. For more information, see Defining a Qlik Replicate task.
- In the Error mart schema name field, specify the schema where you want the data mart exception tables to be created. Data that is rejected by data quality rules will be copied to tables in the specified schema.
- Select the Source database connection check box and then provide the details for connecting to the source database. For the purpose of this tutorial, except for the Schema, these should be the same as the data warehouse connection details.
- Click Test Connection to verify that Compose is able to establish a connection to the specified database and then click OK to save your settings.
- Click OK to save your settings.
-
-
In the Model panel, perform the following steps to create the model for data warehouse generation:
-
From the drop-down menu in the top right corner of the Model panel, select Discover. The Discover window opens.
-
Select the source database (i.e. the database without the "_landing" suffix). This is the source endpoint in the Qlik Replicate task. The Source Table/View Selection - <Data_Source_Name>_Landing window opens.
-
In the Source Table/View Selection window:
- Select the Tables option.
- Click the Search button.
-
From the Results list, select which tables to discover and then click OK. The Generating Model from <db_name> window opens.
-
Wait for the model generation to complete and then click Close.
-
-
In the Data Warehouse panel, perform the following steps to populate the Data Warehouse with the source data:
-
Click Create. The Creating Data Warehouse window opens. Wait for the Data Warehouse to be created and then click Close.
-
Click Manage. The Manage Data Warehouse Tasks window opens.
-
Click Generate. The Generating Statements for Task: <Name> window opens. Wait for the ETL instruction set to be generated and then click Close.
-
Click Run. The Manage Data Warehouse Tasks window switches to Monitor view and Qlik Compose starts to populate the Data Warehouse with data (this may take a few seconds).
- Wait for the Data Warehouse to be populated and then close the Manage Data Warehouse Tasks window.
-
-
In the Data Mart panel, perform the following steps to create a data mart with a star schema:
-
Click New. The New Data Mart window opens. Leave the default name.
-
Make sure the Start New Star Schema Wizard check box is selected, and click OK.The New Star Schema wizard opens. Leave the default name.
- Select Transactional as the star schema type and then click Next.
- In the Facts screen, select Order Details. Then click Next.
-
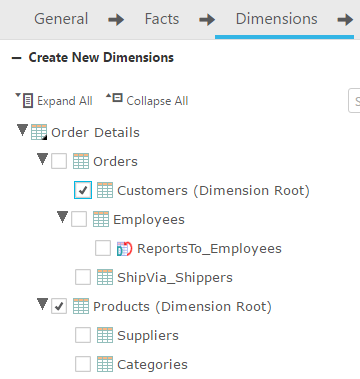
In the Dimensions screen, clear all the check boxes and then select Customers and Products only, as shown below.
- Then click Next.
-
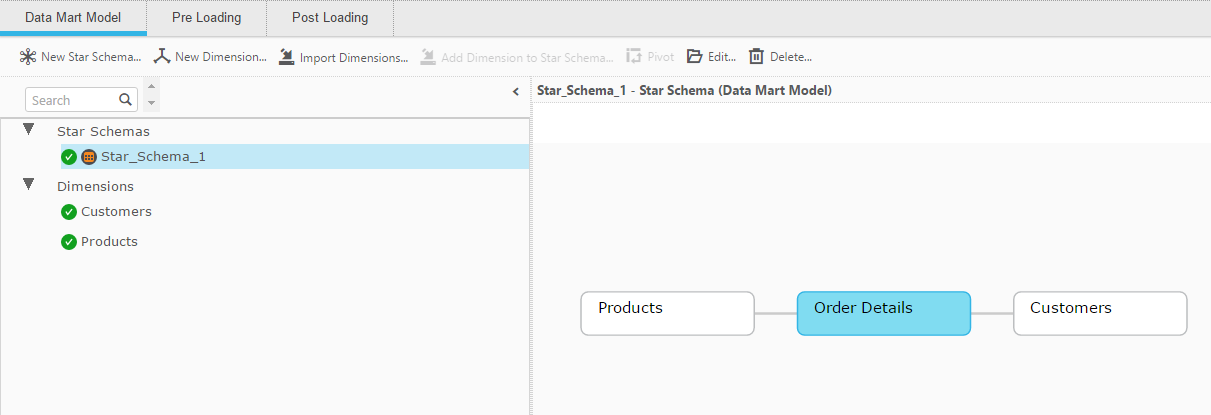
In the Transaction Date screen, select OrderDate and then click Finish. The star schema is displayed on the right of the Manage Data Marts window.
-
Click Create Tables. The Creating Data Mart: <Data Mart Name> window opens. Wait for the Data Mart tables to be created and then close the window.
-
Click Generate. The Generating Statements for Data Mart: <Data Mart Name> window opens. Wait for the generation of the task statements to complete and then close the window.
-
Click Run.
The Manage Data Marts window switches to Monitor view and Qlik Compose populates the Data Mart with data. Leave the Manage Data Marts window open in Monitor view for now (The two buttons at the top right of the window allow you to switch between Designer and Monitor views).
-
-
To display the data in a pivot table:
-
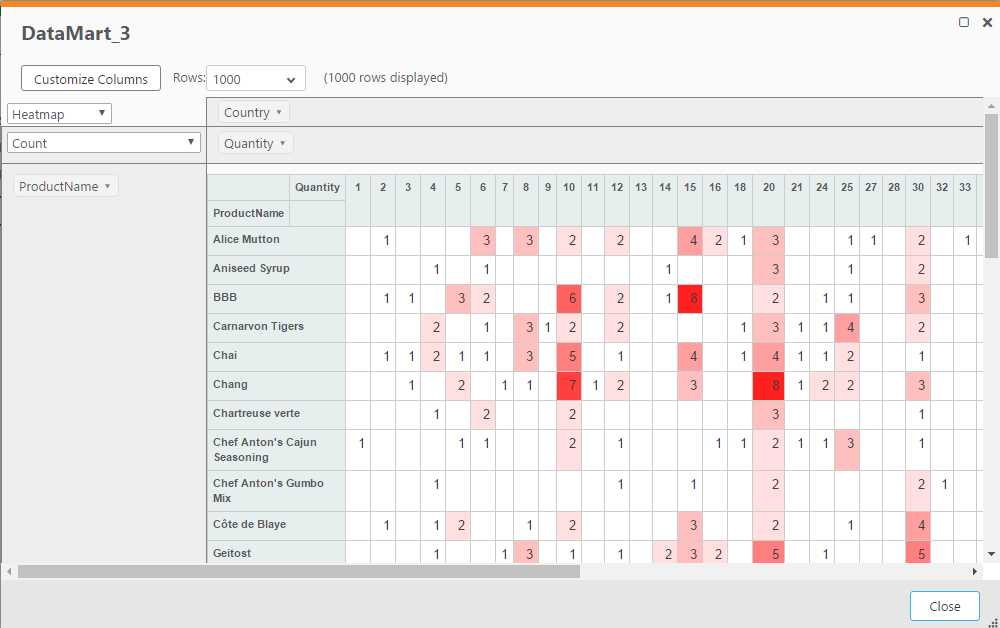
Click the Pivot toolbar button. The Select Columns for Pivot Table window opens.
-
From the drop-down list at the top of the window, select the Pivot Table columns as follows:
- In the 1Fct_Order Details table, select Quantity.
- In the 1Dim_Customers table, select Country.
- In the 1Dim_Products table, select ProductName.
-
Click OK. A Pivot Table is created with your selected columns.
-
Drag the Quantity box to the space above the table and the ProductName box to the space on the left.
-
Select Heatmap from the drop-down list below the Customize Columns button.
Your pivot table should now look like this:
-