Navigating the user interface
Qlik Automate provides an easy-to-use user interface to create and test automations, to store data connections, and to keep track of your automation history.
You can access Qlik Automate from Automations in the Analytics or Qlik Talend Data Integration activity centers.
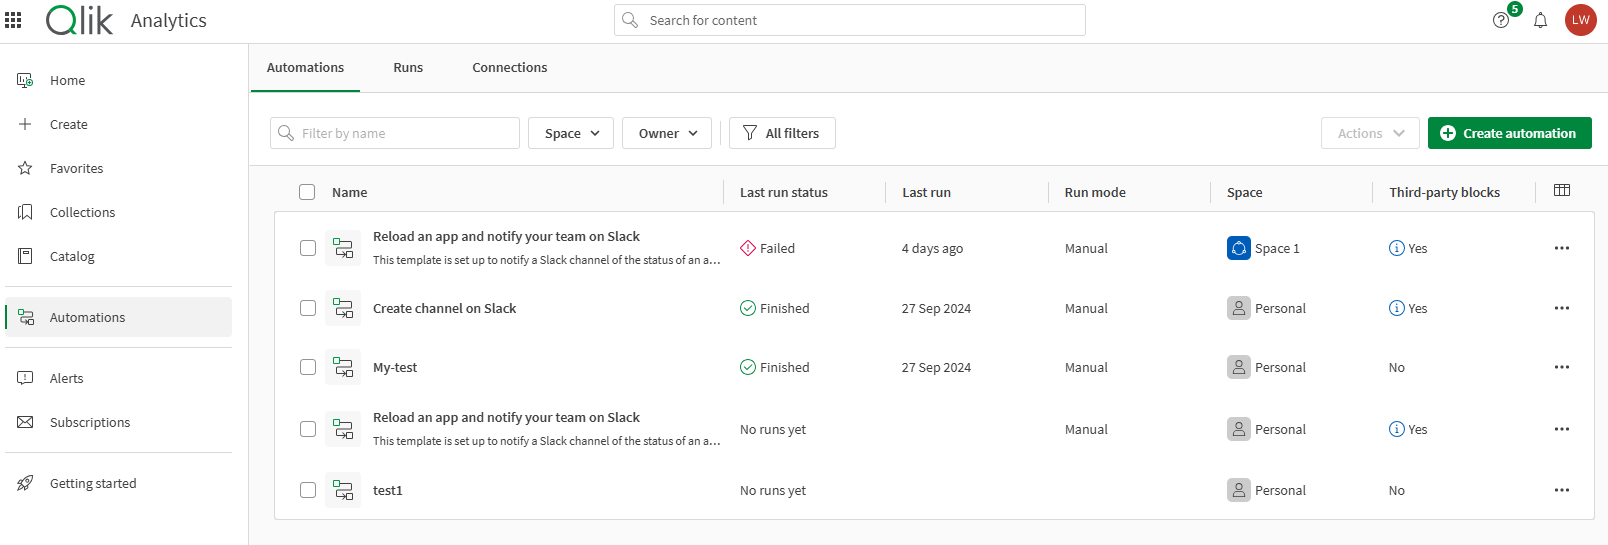
Automations Overview
The Automations Overview section is where you find a list of all your automations including details of the latest run. Use the search bar to find a specific automation, or use the filters to narrow down your results.
When you load the Automations Overview section, only a selection of filters are available. To enable all the filters, first select a Space.
To create new automations, edit existing ones, and to enable or disable, do the following:
-
Click on the Create new automation button to create a new automation.
-
Click on the More menu
 and then on the Edit button to open the automation canvas edit view to add and configure block settings.
 -
Click on the More menu
and then on Enable or Disable. For more information, see Enabling and disabling automations.
For more information on creating automations and working with templates, see Creating and saving automations.
You can access the Overview section at any time through Automations in the Analytics or Qlik Talend Data Integration activity centers.
Edit
The Edit view of the automation canvas is where you build and test automations. From this section, you have access to all of the automation blocks and connectors, as well as the history and automation settings. On the left side of the automation canvas is the Block Library pane. From this pane you can drag automation blocks to the canvas to build and edit your automation. You can hide the block library by clicking on the minimize button on the upper-left corner of the pane.
On the right side of the automation canvas is the Block Configuration pane. When a block is selected on the automation canvas, the block configuration options are shown on this pane. You can hide the block configuration options by clicking on the minimize button on the upper-right corner of the pane
To undo an action click ![]() , and to redo something you've undone click
, and to redo something you've undone click ![]() . You can also zoom in and zoom out of the canvas to view more or less detail. Click the zoom percentage to reset the zoom level to 100%. Click on
. You can also zoom in and zoom out of the canvas to view more or less detail. Click the zoom percentage to reset the zoom level to 100%. Click on ![]() to recenter your position on the canvas.
to recenter your position on the canvas.
You can select multiple blocks at once to perform bulk actions. To select multiple blocks, hold Ctrl (Cmd on macOS) and click on each block you want to select.
When multiple blocks are selected, the right pane changes to Multiple blocks selected. From this pane, you can perform the following bulk actions:
-
Copy: Copy the selected blocks. You can paste them elsewhere in the current automation or in a different automation. Use Ctrl + C (Cmd + C on MacOS) or select Copy from the pane.
-
Paste: Paste previously copied blocks. Use Ctrl + V (Cmd + V on MacOS) or select Paste from the pane. The paste option is always available and persists across automations.
-
Remove: Delete the selected blocks from the automation. Use Delete or select Remove from the pane.
-
To view the details of a specific block, click on the block name in the pane.
To start a new run of the automation, use Ctrl + Enter (Cmd + Enter on MacOS).
When you are done creating or editing your automation, click on the Save button ![]() or use Ctrl + S to save it (Cmd + S on MacOS).
or use Ctrl + S to save it (Cmd + S on MacOS).
To run the automation, click on the Run button ![]() . When the automation starts running, the view will change to the History tab. If there are any issues with any of the blocks, an Invalid Block message will appear with suggestions for fixing the problem before you can continue.
. When the automation starts running, the view will change to the History tab. If there are any issues with any of the blocks, an Invalid Block message will appear with suggestions for fixing the problem before you can continue.
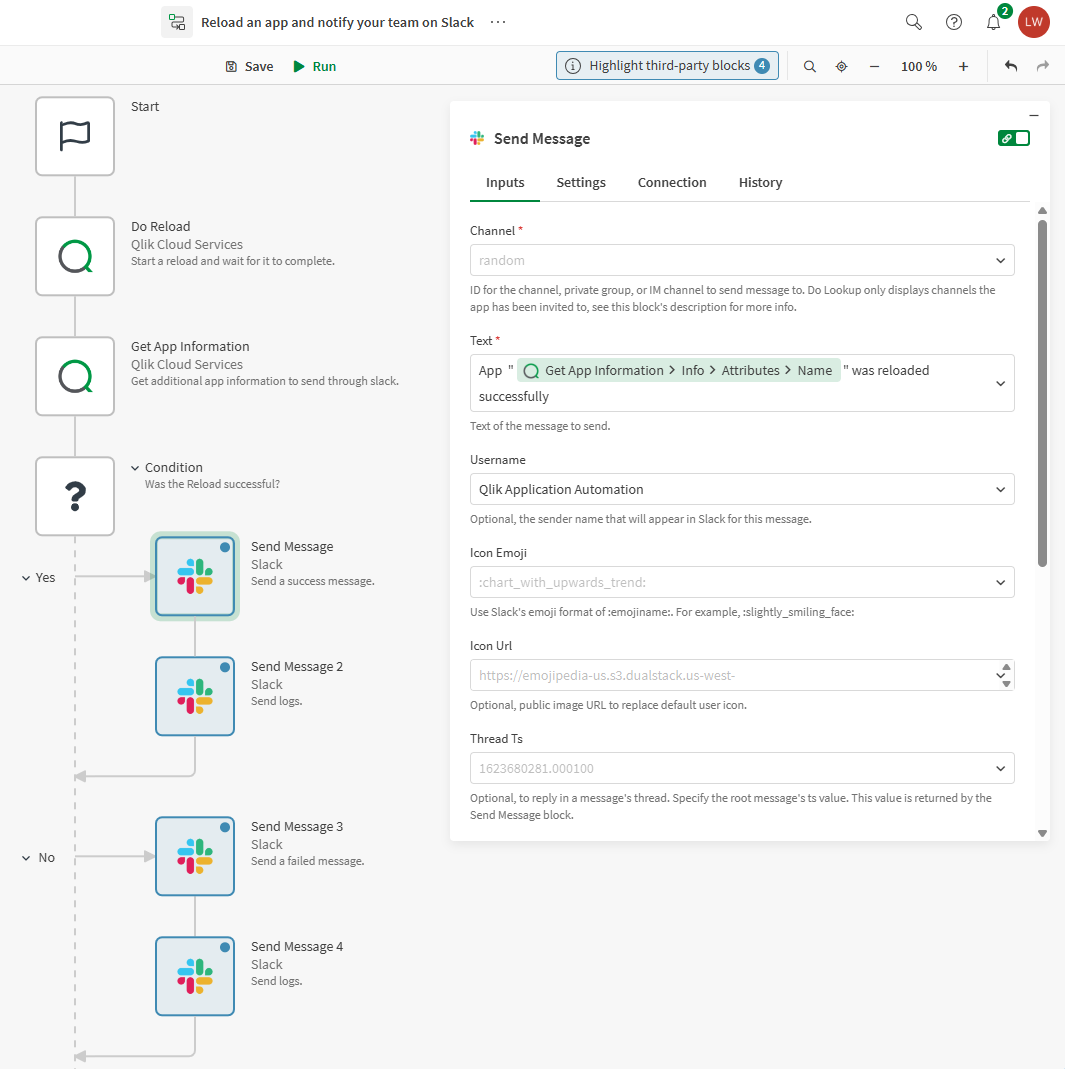
On the top bar, you will see a button labeled Highlight 3rd-party blocks. This is to inform you that the automation you are editing contains third-party blocks and how many are included. Click on this button to highlight third-party blocks in the automation. If the button is not present, it means the automation you are editing does not contain third-party blocks. Automation runs where third-party blocks are executed may incur additional costs.
In the example below, the automation contains third-party blocks, but their use is triggered by a condition. This means that only some runs of this automation would incur additional costs.
To search within an automation, click on the Search button ![]() or use Ctrl + F (Cmd + F in macOS). The search will return results for blocks, connectors and comments that are part of the currently open automation.
or use Ctrl + F (Cmd + F in macOS). The search will return results for blocks, connectors and comments that are part of the currently open automation.
Blocks with connection settings
When a block is selected on the automation canvas, the block configuration options are shown on the Block configuration pane. In the Connection tab you can select which connection you want to use for that service. In the Select Space drop-down list you can select the Space that has the connection you want to use. You also have the option to create a new connection or delete an existing one.
Once you select a connection, you can choose to also apply that connection to all blocks of that service in the automation. Your selected connection will be active until you change it to another one. Connections marked with a red exclamation mark are disconnected and need to be reconnected before they can be selected in the automation.

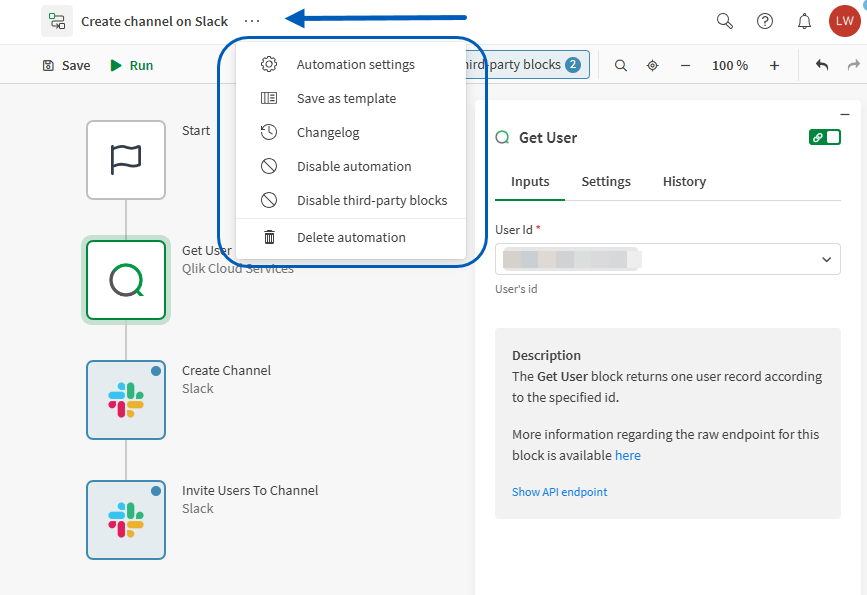
The More menu
The More menu of the automation canvas allows you edit your automation's details, save it as a template, view the changelog, enable or disable the automation, enable or disable third-party blocks, and delete the automation. To access the More menu, click on the more button ![]() located to the right of the automation name on the center of the navigation bar.
located to the right of the automation name on the center of the navigation bar.
The Automation settings option lets you change the name and description of your automation, move it to a different space, and enable or disable concurrent runs. With concurrent runs enabled, users can run the automation at the same time. This feature may be limited by the license or tenant settings. For more information, see Settings.
In Automation settings, you can also configure maximum execution time for your automation. The available values depend on the automation run mode in the Start block and, for triggered automations, the Run asynchronously setting. See Qlik Automate limitations for default values and supported ranges.
For information about AI-generated automation descriptions, see AI-generated automation descriptions.
Automation edit menu
The automation edit menu is available when you right-click the automation canvas.
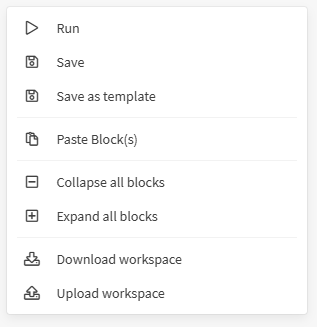
From the edit menu, you can manually run, save, and save the automation as a template. You can collapse or expand all blocks and you can also download or upload an automation. An automation is represented as a JSON file. This is helpful if you want to open an automation someone else created, or if you want to send your automation to someone else to use as a template or example.
To learn about how the Qlik Community is using automation templates, see Qlik Automate.
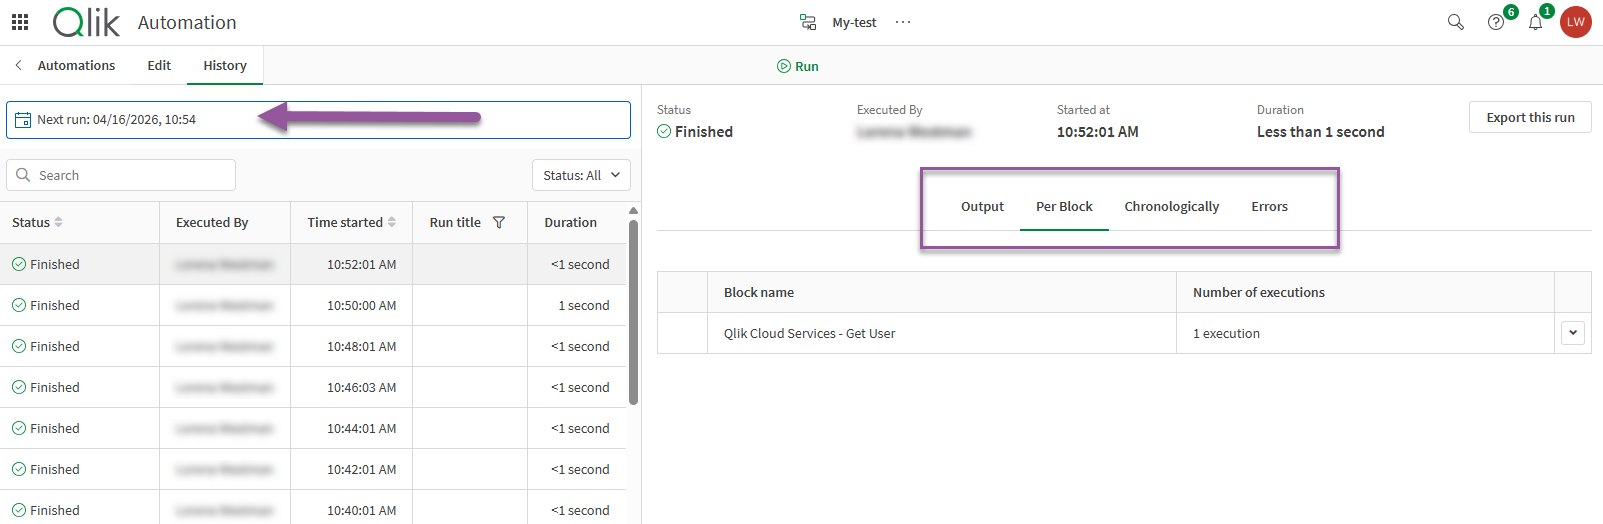
History
Above the automation canvas, you can switch to the History view, which shows the output details for the most recent automation executions and allows you to provide input values for automations that contain an input block. You can sort the Status and Time started columns in ascending or descending order. Use the filter icon on the Run title column to filter based on the name of the run. If your automation has an output block, the output from that block is shown on the Output tab. For details on how to provide inputs, see Working with inputs.
If your automation has a run scheduled, you will see the date and time of the next planned execution above the list of previously executed runs.
To see the input and output for each block, select the Per block or Chronologically tabs. Chronologically shows the order in which blocks were executed.
If any of the blocks throws an error, check the Error tab for details.
From the tool bar, you can start a new run by clicking on the Run button ![]() . From the toolbar you can see if the automation contains third-party blocks.
. From the toolbar you can see if the automation contains third-party blocks.
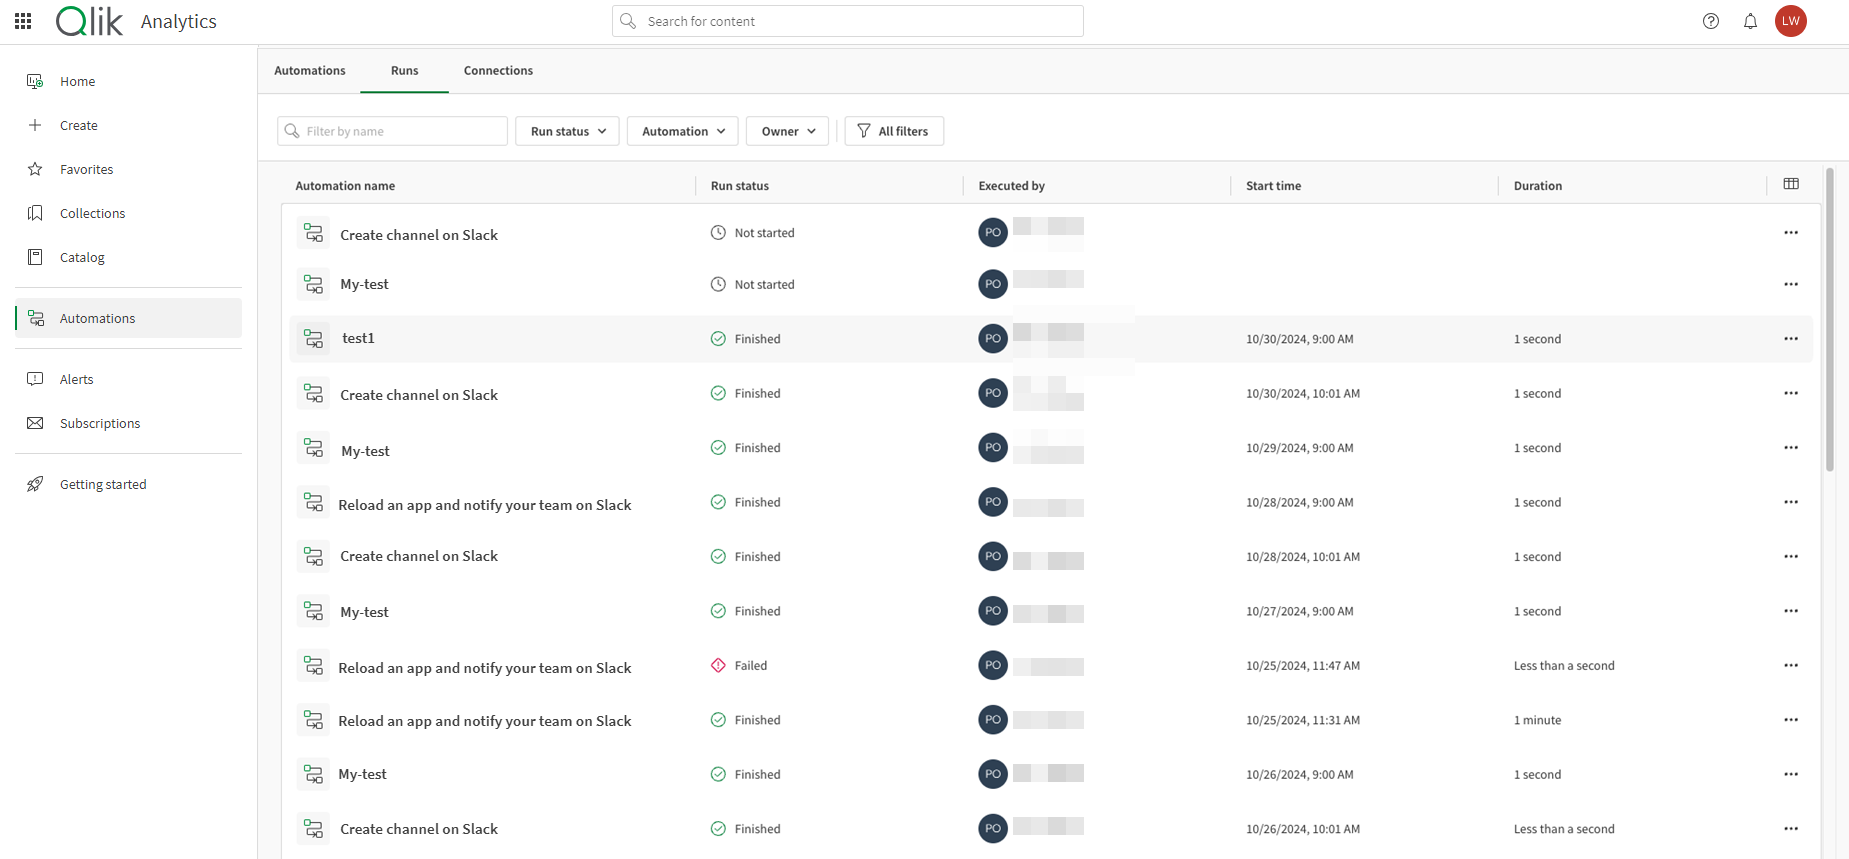
Runs
The Runs view provides you with a list of runs within the last 30 days. Use the search bar to find an automation by name or run title.
You can filter by:
-
Run status: Select between finished, failed, stopped, not started, running, finished with warnings, and limit exceeded.
-
Context: Filter by how the run was started, including automation, manual, scheduled, test run, triggered, webhook, QS button.
-
Automation: Filter by the automation name.
-
Start time: Narrow down the runs by selecting a time period for when the run started.
-
Space at runtime: Filter by which Space contained the automation when it ran.
-
Owner: Filter by the automation owner. You can type a name in the search box or select Anyone, You, or Others.
-
Executed by: Filter by the user who executed the run. You can type a name in the search box or select Anyone, You, or Others.
-
Third-party blocks: This filter allows you to list which runs used third-party blocks, which are considered billable.
You can limit your selection by choosing one of the following Runs status from the drop-down menu:
-
Finished: The run completed successfully.
-
Failed: There was an error that prevented the run from completing.
-
Stopped: This run was manually stopped.
-
Not started: This run has not yet started.
-
Queued: This run has been placed in the queue and will run when system resources are available.
-
Running: This run is currently operating.
-
Finished with warnings: This run is complete, but with warnings.
-
Limit exceeded: This run exceeded the limits placed by your license or subscription model. Contact your tenant admin for more information.
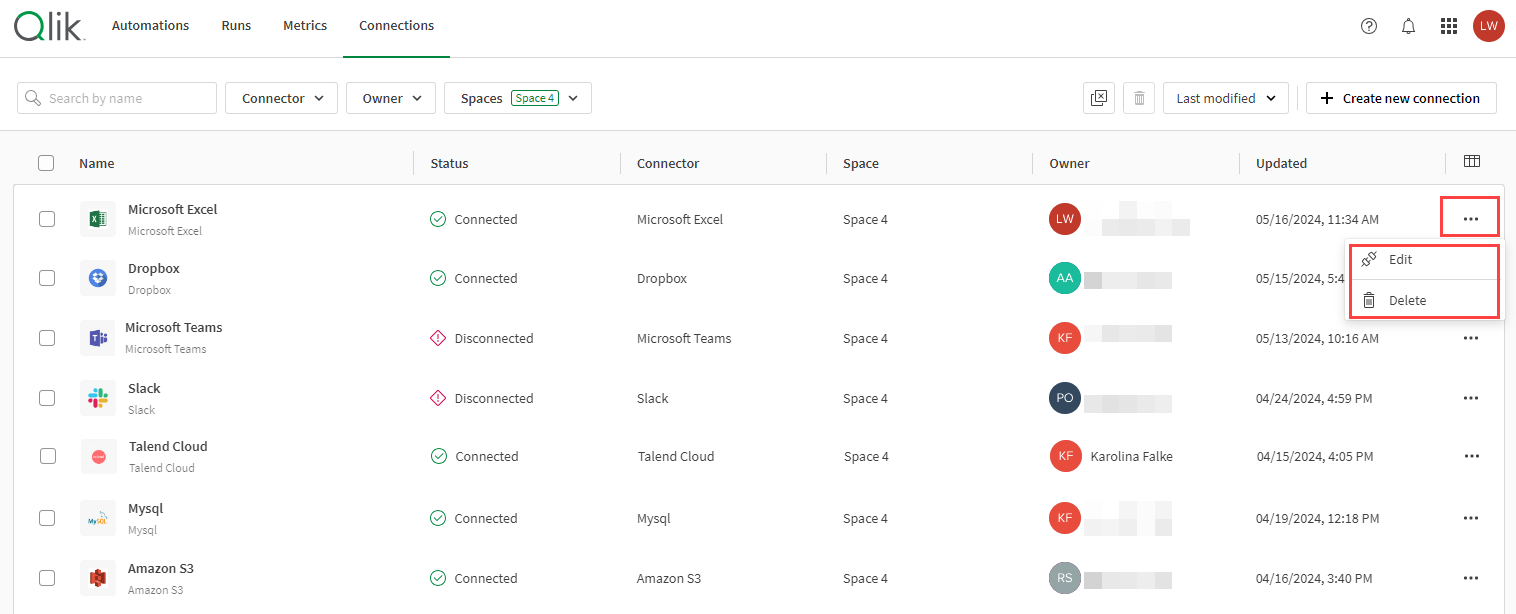
Connections
The Connections section is where data connections are listed. In this section you can:
-
Browse available connectors and set up a new connection by clicking on Create new connection.
-
Search by connection name and narrow down the results by filtering on Connector, Owner, or Space.
The More menu ![]() allows you to:
allows you to:
-
Modify the connections you created by clicking on Edit.
-
Reestablish the connection you created by clicking on Reconnect
-
Remove the connection by clicking on Delete
Deleting connections
To delete connections, you need to be the creator of the connection, or have role that gives you sufficient permissions to do so.
For more information about user roles, see Roles and permissions for users and administrators.
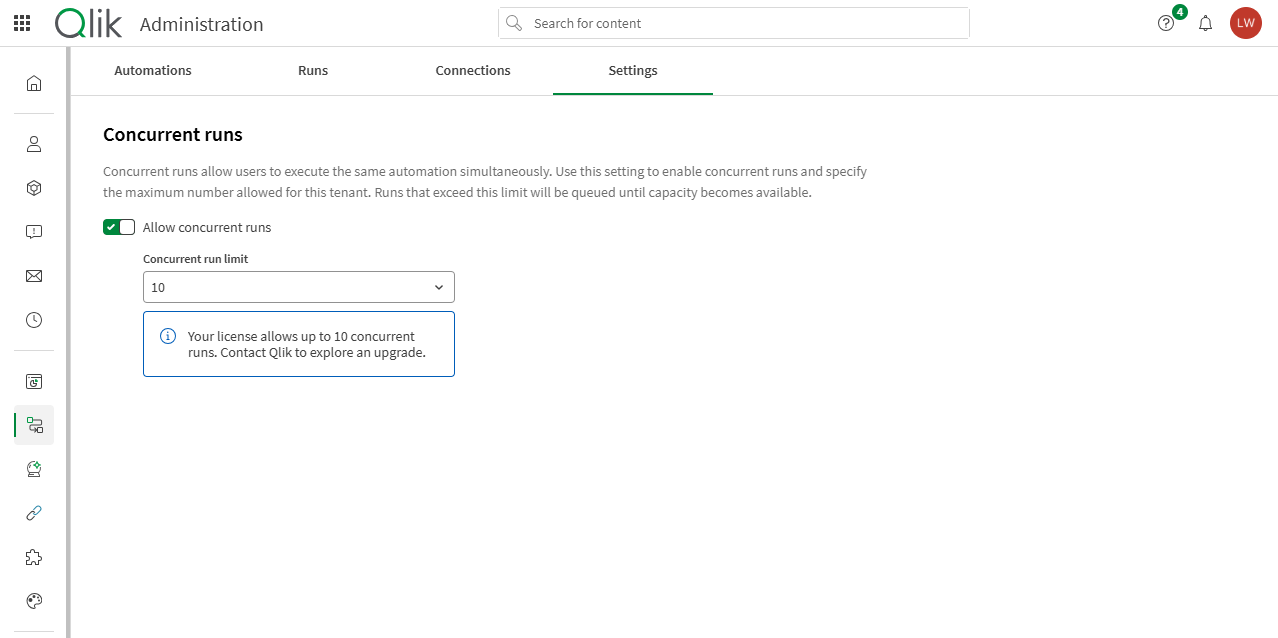
Settings
Tenant admins, analytics admins and users with Tenant Admin Automations permissions have access to the Settings section. In this section, you can:
-
Toggle concurrent runs on or off for your tenant.
-
Set the limit for the number of concurrent runs per automation. The default is 10.
The maximum number of concurrent runs allowed is determined by your license. Runs that exceed this limit will be queued until capacity becomes available.