Skip to main content Skip to complementary content

Setting up a test case

After creating a test case, you need to complete a few settings for your test case to work. These settings include adding test instances, if required, and specifying the input and reference files.

Before you begin

Before you can run the test case or its instances, you need to specify the input and reference files in the Context view and/or define embedded data sets in the Test Cases view.

Adding test instances

About this task

Upon creation, a test case has one test instance named Default. You can add as many instances as you need to run the same test case with different sets of data files. From the Test Cases view, you run an instance individually or run all the instances of the test case at the same time. To add a test instance, do the following:

Procedure

  1. From the Repository tree view, select the test case or the Job for which you created the test case and go to the Test Cases view.
    Information noteNote: If you have created more than one test cases for a Job, when you select the Job from the Repository tree view, all its test cases are displayed in the Test Cases view.
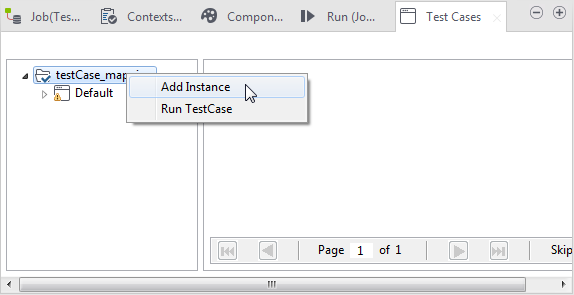
  2. On the left panel of the Test Cases, right-click the test case you want to set up, and select Add Instance from the contextual menu.
    Add Instance option in the contextual menu.
  3. Type in a name for the instance or accept the proposed name.
    The newly created test instance appears under the test case name node.
    The test instance under the test case name node.
    You can remove the instance, add test data to all existing instances, or run the instance by right-clicking on the instance and select the relevant item of the contextual menu. You can also remove a test data item by right-clicking it and select Remove TestData from the context menu.
    Information noteNote:

    Note that if you remove a test data item from an instance, this item is also removed from all the other instances.

  4. Specify a new context for the newly created test instance. For more information, see the procedure below.

Defining context variables for the test data

Procedure

  1. Go to the Context view of the test case.
    By default, the required variables have been created under the context named Default. You can define as many contexts as you need to perform your tests for different environments or using different text instances. For more information on how to define contexts and variables, see Using contexts and variables.
  2. Click in the Value field of the variable for the file you want to specify, click the Open button, browse to your file in the Open dialog box, and double-click it to specify the file path for the variable.
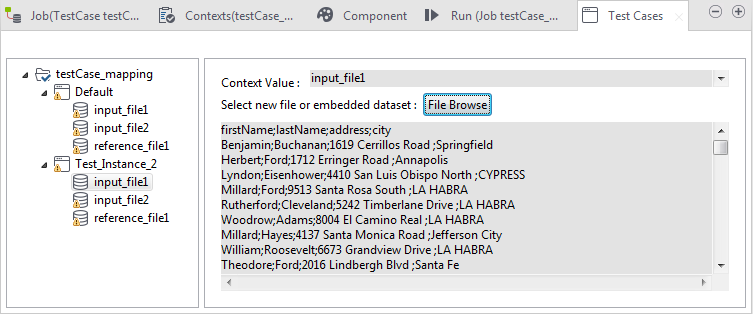
  3. In the Test Cases view, click each test instances on the left panel and select the related context from the context list box on the right panel.
    Test Cases view.
  4. Expand each test instance to show the test data, click each test data item on the left panel and check the context variable mapped to the data set. If needed, select the desired variable from the Context Value list box on the right panel.
    Test Cases view.

Defining embedded data sets

About this task

Information noteNote:

Embedded data sets defined in the Test Cases view are used only for test case execution from Test Cases view and override the files specified in the Context view.

Procedure

  1. Go to the Test Cases view of the test case.
  2. Select the data file to be defined from the left panel, click the File Browse button from the right panel, browse to your file in the Open dialog box, and double-click it to load the file to the repository.
    Once a data file is loaded, the warning sign on the data set icon disappears, the text field at the lower part of the right panel displays the content of the loaded file, and the test case will use the data from the repository rather than from the local file system.
    Test Cases view.

Did this page help you?

If you find any issues with this page or its content – a typo, a missing step, or a technical error – please let us know!